In this master class we will show you how to make a spider from beads with your own hands. This stylish beaded spider makes a beautiful pendant, keychain or phone charm.
Tools and materials Time: 2 hours Difficulty: 4/10
- 1 faceted silver bead 12 mm for the body;
- 1 faceted black bead 10 mm for the head;
- 1 hairpin 5 cm;
- 4 faceted black beads;
- 68 black beads, size 11;
- 24 golden-colored bugles, size 1;
- 60 cm of black wire 20 gauge;
- round nose pliers;
- pliers;
- wire cutters
Beaded spider as a pendant – original and fashion decoration, if you like this style! This spider can also be used in themed compositions or used as decoration for Halloween!

Materials:

Step-by-step master class
So let's get started making this stylish beaded spider.
Step 1: Prepare the Base for the Body
Since our beaded spider consists of two main parts, you will first need to prepare the wire legs and body for the body.
Cut 4 pieces of wire 12.5 cm long.
Wrap the center portion of each piece of wire around a length of approximately 7-8 cm of hairpin, tightly. In this step you will need to make loops in the center of each piece of wire so that they can be threaded onto the spider's body.

Step 2: Assemble the Body Base
Assemble a structure of beads and wire according to the following scheme: one faceted silver bead 12 mm, four wires for the legs, one faceted black bead for the head.

Step 3: Make a Loop
Using pliers, make a simple loop over the 10mm bead. If this technology is new to you, watch the corresponding video on YouTube.
Tip: If you are using wire that might fray when pliers are used, use a permanent marker on the finish to hide any imperfections.

Clarification: the spider's front and back legs should be slightly shorter than the four middle legs (to match natural proportions).
Step 4: Add Beads to the Front Foot
Add beads to the front wire according to the following pattern: 2 black beads, 1 golden bugle, 2 beads, 1 bugle, 2 beads, 1 bugle, 2 beads.

Step 5: Make a Loop
From the last bead, cut off the protruding end of the wire, leaving a piece of approximately 6-7 mm. Using pliers, wrap this piece into a loop and secure all the beads in place. Insert the end of the loop into the last bead.

Step 6: Repeat steps
Add beads and form loops on all four front and back legs.

Step 7: Add Beads to the Middle Foot
Add beads to one of the middle legs according to the following pattern: 2 beads, 1 bugle bead, 1 bead, 1 faceted bead 3 mm, 1 bead, 1 bugle bead, 2 black beads, 1 bugle bead, 2 beads.
In the same way as in step 5, cut off the protruding end of the wire from the last bead, leaving a piece of approximately 6-7 mm. Next, wrap the wire into a loop using pliers and secure all the beads in place. Insert the end of the loop into the last bead.
Step 8: Add Beads to All Middle Paws
Repeat step 7 for all four middle legs.

Greetings, dear needlewomen! Welcome to my beading master class. Continuing the theme of superheroes, I suggest you weave a beaded Spiderman! This amazing and sweet baby will be the center of attention wherever he is seen! Children and adults will be delighted to see such a wonderful superhero keychain, and if it serves as a souvenir, there will be no end to the admiration! Believe me! So let's quickly start making it.
To make the presented keychain we will need following materials and tools:
- Czech or Japanese beads of five colors - red, blue, black, gray and white;
- bead needle;
- monofilament or thin fishing line;
- accessories for a keychain;
- scissors;
- lighter.
Before we start the product, a little about the scheme. The circuit itself is very primitive, that’s what’s so cute about it. Weaving begins from the row marked with an arrow. First, we will weave the shoulders and head up from this row, and then we will turn the product over and continue to weave the lower part of the man. I almost forgot - we will weave bricks using the technique. A very simple and well-known bead weaving technique. Next, I will show in detail how to weave with bricks.
First stage. A set of beads and the first row.
To weave the whole man, one meter of fishing line will be enough for us.
Having threaded the first bead onto the fishing line, hold the bead on the fishing line at a distance of about five to seven centimeters from the free end. Pass the needle through the bead in the same direction two more times. This way we will fasten the first bead with ease and without unnecessary problems Let's continue casting and weaving the row.
Next, string the remaining eleven beads in accordance with the colors of the row indicated in the diagram.
Now we form the first row. To do this, insert the needle into the second red bead, skipping the first bead. The needle should be inserted from the side from the largest number of beads to the first.
After tightening the line, insert the needle into the third bead of the row in the same direction as the second.
Continue inserting the needle into each subsequent bead until the end of the row.
This is what the first row looks like. If suddenly the beads do not lie quite evenly, then they can be corrected in the finished row. Or when weaving the next rows they will more or less align. But you should still try to weave evenly.
Second stage. Second row and brick weaving.
In the second row we are going to narrow the fabric, so we weave in one bead in the following way: string one red bead and insert a needle under the fishing line connecting the first two beads of the first row, then tighten the fishing line and insert the needle into the just sewn bead from the bottom up.
Repeat in the same way to sew one bead at a time in the second row.
In the middle of the second row, weave one gray bead. By following the diagram, you will easily cope with the sequence of bead colors.
The second row is ready.
Next, weave the third and fourth rows in the same way according to the pattern.
When we reached the beginning of the fifth row, we should transfer the fishing line to the second bead of the fourth row. We will simply insert the needle into the first bead of the third row and remove the needle from the second bead of the third and fourth rows at the same time.
We braid the fifth row, like the previous rows.
Third stage. We weave the head and learn to expand the fabric.
In order to expand the row, at the beginning of the row we string two beads of the same color as indicated in the diagram onto a needle. We insert a needle under the fishing line connecting the first beads of the bottom row, and bring the needle out from the bottom up from the second bead of our two strung beads.
Thus, as you can see, we get a row in which the beginning of the row is wider than the previous row. Continue stringing and sewing the beads of the row according to the pattern. In this row we only have red beads.
At the end of this row you need to sew a bead, just like at the beginning of the row, extending beyond the previous row. To do this, we string a bead onto a needle and insert the needle into the last bead of the previous row, grabbing the fishing line between the beads of the fourth and fifth row, make a turn with the fishing line and tie two knots.
Then we boldly bring the needle up from the first beads of the fifth and sixth rows at the same time.
Our next row is expanding again. Here we also braid two beads at the beginning of the row.
At the end of the row, also insert the needle into the last bead of the bottom row and the next row, picking up the fishing line between the beads and tying knots, bring the needle up again.
The next row also expands.
But we will narrow the ninth row. So here we string one bead at the beginning of the row and hook the needle onto the fishing line connecting the bottom row.
In order to weave the last row of three beads, you should bring the line into the second bead of the top row.
Fourth stage. We form a loop.
While we are at the top of the product, let's make a loop for the fittings ring. String four red beads and insert them into the third bead of the last row from the opposite edge from the outgoing line.
Having hooked the fishing line to the lower beads, bring the needle up to the beginning of the loop and again go through the four beads of the loop with the needle.
Secure the loop by going around the circle several times. The top is ready.
Fifth stage. We weave the lower part of the man.
Pass the line from the top of the product to the bottom along the beads of the rows to continue weaving. Turning the product over, weave it row by row according to the pattern. Everything is simple here, just carefully and imperceptibly move the needle from one separate part to another.
The legs can be woven separately, that is, first one, then the other, or both can be woven at once, transferring the line from one to the other.
I wove the first two rows of legs at the same time, moving the needle from one end to the other, and then I wove the legs with only red beads separately.
My baby already makes me happy. Secure the ends of the lines by passing them between the beads of several rows and tying knots as you go. Trim the edge of the fishing line at a distance of about five millimeters and carefully burn it with a lighter. When the molten ball settles between the beads, it will be completely invisible.
Sixth stage. We attach the fittings.
Using pliers, I attached the keychain ring to the man's loop.
The three-centimeter superhero is ready! HOORAY! Will now be a hero on a backpack or keys.
Thank you for your attention and I hope that my master class was useful and understandable. Like and comment on my master classes. Happy crafting and happy holidays!
I love handicrafts that do not require huge financial investments, but the result is gorgeous things. Handicrafts should not be too expensive, and I have already written about this more than once. I want to show you another confirmation of my subjective opinion.
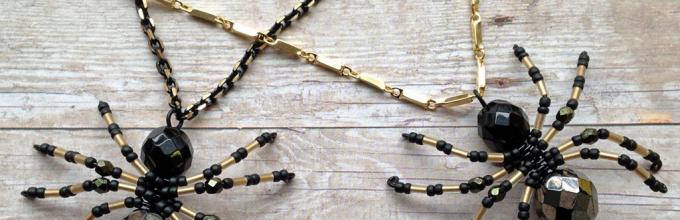
How do you like this spider made of beads and beads? Well, you must agree that this handicraft looks very chic. Another advantage of this product is the interchangeability of all components, except for the wire, of course, and since you already know, you can easily replace all the components.
It’s also important that you don’t need to weave such a spider, you don’t need to have a pattern or master different types of weaving, you just need to twist the wire correctly and string the beads.
So, enough reasoning, let's get down to business.
We will need:
1. We connect two large beads onto metal fittings, which can be purchased at any specialized store.
One end of the metal “stick” has a miniature “cap”; the other remains open. We twist the open edge several times to make a double ring. In front of the hat we put on several beads, then two large beads. 
2. Spiders have eight legs, so we cut four pieces of wire of the same size. We mark the center of the wires with a slight bend - this will be attached to the main part of the needlework.  3. Take all four wires and apply them to the place between the two large beads and twist everything together around the “iron trunk”, once. Then we level the legs of our needlework.
4. From the place where the legs are attached to the body, we collect 4-6 beads, until the legs become clearly visible from the outside. Then we begin to string the remaining beads. In order for it to turn out beautifully, all needlework must be symmetrical and the beads must alternate with each other, in the same amount.
 5. We finish the edges of all the wires like the edge of the main part - with a ring.
  6. If, due to bends, the wire turns out to be longer, then remove the excess.
  7. Align and move the paws.
  8. And here is the finished result of the needlework. Now all that remains is to figure out how to use it, but how to attach it - there will be no questions, because you can attach it to the rings at each end of the wire with whatever and however you like.
  9. Spider's abdomen.
  I hope you like this idea and the result will please you for a long time. Happy crafting.
Try weaving a snail from beads.
Details in
To work, we will need a wire 2 meters long, beads of three colors (a very good combination for a spider is dark red, blue (black), gold). It’s clear that you shouldn’t make a pink spider. Although...
T. Dergunova
Eight legs, eight eyes - I’m looking at you from the corner.
For those buzzing on the fly, we create a reliable network.
The web is lighter than fluff, but strong - there is no salvation.
If you catch a mosquito or a fly, you'll end up for lunch.
Spider. Weaving mustache.


SCHEME 1 We put 1 bead in the middle of the wire, put the ends of the wire together and put 2 beads on both ends. (remember that this is how we started weaving).
SCHEME 2 We put 4 beads (1-4) on either end and return through the third and second. Gently pull the end so that the antennae are pulled towards each other. Because The wire is long, we do everything very carefully so that there are no creases.
SCHEME 3 Let's thread both ends of bead No. 1 towards each other. Carefully pull the wire.

Those. We put the entire row on one end (the next row is 3 beads), and thread the other end towards each other.
Do not forget to throw the ends of the wire away from you after completing the row. Because We are weaving a voluminous figure, which means we are doing the belly and back alternately.
The next row is with eyes. We throw the wire over again and weave a row of 4 beads. This is the bottom row.
Bead spider. Weaving paws.

After this row we make the paws.
The diagram shows the legs on one side. But, of course, we weave them from both sides.
Let us remember that each paw is woven at its own end of the wire.
We put 10 beads on either end according to the pattern, and thread the same end in the opposite direction through the entire foot. Don't forget to leave a knot bead at the end.
Gently pull the end so that the paw moves closer to the body. To do this, pull the end exactly along the wire and to the place where you need to pull the foot. Then we weave the second leg at the other end, and make the next row of 5 beads.
Make sure that this row falls into place. This is the top row.
Beaded spider. Weaving of the body.

Here is a complete diagram of the spider.
Let us recall the notation of the diagram. Horizontal black stripes in rows. The row located between the stripes at the top is the rows of the back and top of the head. The bottom rows are the tummy.
IN previous section we made the first legs (the second side with the legs is also not shown) and the top row of 5 beads after the foot.
After the second leg we weave 2 more rows and a third leg.
After the third leg of the spider, the back begins. And the first row in the diagram yellow. On my figurine these are gold beads.
When weaving the body, so that it is rounded, use a pencil. Inserting the tip of a pencil inside the figure, crimp the rows of the back along the pencil. Then your spider will not be “crushed by a roller” - that’s what I always tell kids when their figures are too flat.
Having weaved the last row of 3 beads (this is the bottom row), we fasten the wires along the broaches.
Our beaded animal spider - done.

Here is another photo of the toy to understand its size. It is approximately 3.5 by 3.5 cm.
Don't forget to shape the spider by bending the legs as in the photo.
If you want to keep abreast of all the news on the site, subscribe to updates.
A wide variety of different bugs and spiders made of beads and beads. Almost all of them are woven using a parallel weaving technique on wire.

There are both simple and complex types of products. Try to weave according to the pattern and you will succeed.


Spiders made of beads and bugles
Will be required:large round bead with a diameter of 10 mm, a small bead with a diameter of 5 mm, 16 tubes of bugles 15 mm long, 17 red beads, 2 blue beads, 75 cm of wire.

String the red bead onto the wire and fold the wire so that one end is 5 cm longer than the other. String a large bead onto both ends of the wire (Fig. 1, a). On one end, string a tube of bugles, a red bead, a tube of bugles, a red bead. Thread the wire in the opposite direction through the glass bead, bead, glass bead. Push everything towards a large bead and pull the wire - you get a leg (Fig. 1, b). At the same end of the wire, make 3 more legs, placing them next to each other (Fig. 1, c). At the second end of the wire, make the same 4 legs.

Place the end of the wire under the base of the leg, the first at this end (Fig. 1, d). Stretch the wire, gathering all 4 legs into a bun. Gather your legs into a bun at the other end (Fig. 1, e). String a small bead on both ends. Then string a blue bead onto each end of the wire. Pass the short end of the wire through the bead on the long end (toward it) and through both beads (Fig. 1, e). Pull the wire.
Take the spider by the head and the rear end, twist it 5-7 times, holding both ends of the wire. Cut off the end at the back. Straighten the spider's legs and hang it by the remaining end of the wire, which looks like a cobweb (Fig. 1, g).
Marina Lyaukina


