Surely, every novice knitter, sooner or later, has to deal with the concept of shortened rows using knitting needles. But not everyone knows how to perform them correctly, and what they are actually needed for.
Partial knitting of rows (a synonym for the concept we are interested in) makes it possible to perform a smooth descent, as well as give the correct shape to the product. The undoubted advantage is that you can knit in this way in any part of the product, both on the front and back sides, and sometimes on both sides at once.
The essence of this knitting method is to under-knit a certain number of loops in the front row, after which the product is turned over to the wrong side and knitted to the end of the row. The next front row is knitted completely, leaving no unknitted loops. In this case, one side of the canvas comes out longer than the other.
We knit short rows with knitting needles with descriptions and diagrams
Short rows are used:
- when knitting darts and folds;
- to create a sprout when knitting raglan on top;
- to create a sprout when knitting pants or tights;
- when knitting coquettes;
- for knitting heels on toes;
- to achieve the most even bevels in the shoulders;
- when knitting the neck;
- to create an even semicircle for skirts.
Of course, at first glance, this knitting method may seem extremely complicated and impracticable, but our detailed master class will very soon help you master all the possible techniques of this knitting technique and will certainly convince you otherwise.
Basic methods of knitting short rows.Method No. 1. Short rows with double crochet.
We knit the fabric from the front side to the place where it is necessary to turn the work to the other side. Turning the fabric over to the wrong side, yarn over and continue knitting to the end of the row with purl stitches.
In the next front row we knit this yarn over and the loop that follows it together.

To perform the same action, but from the wrong side, it is necessary, having reached the desired place and turning the work over to the front side, also yarn over and knit the row to the end with facial loops. After this, having reached the yarn over, you need to remove it onto the right knitting needle, and carefully turn the purl loop that follows it to the other side and leave it on the left knitting needle. Next, you need to return the yarn over to the left needle, and bring the right one from behind and below through the inverted loop and yarn over, hooking the working thread, and purl it.

Method No. 2. Short rows with a twisted loop.
We knit the fabric from the front side to the point of turning, after which we remove the next front loop on the right knitting needle. In this case, you need to throw the working thread behind this loop to the front, return it to the left knitting needle and turn the knitting over. The loop turns out to be entwined. After this, we again transfer the working thread to ourselves and finish the row. Next, having knitted the next row, from the front side of the fabric you need to pick up the formed yarn over and the front loop with the right knitting needle from the front and bottom, and knit them with the front one.
From the wrong side, at the place of the turn, we remove the next loop onto the right knitting needle, and we wind the working thread away from ourselves and return the loop to its place. Turn the fabric over and knit further. Having reached the wrapped stitch, we turn it over, having first removed the yarn over the right knitting needle. We return the yarn over, and, bringing the right knitting needle from below behind the back walls, we knit a purl loop.
Method number 3. Short rows with a tight loop
We knit the fabric with facial loops until the turning point. Turning the knitting over, remove the last loop as a purl, and bring the working thread back from you and pull it so that two half-loops are formed, and continue knitting. Having reached the stretched sang, it will look like this:

Each of these methods will help you correctly knit partial rows without holes, which will make the product not only unique, but also ideal in appearance.
Current video on the topic of the article
And at the end of our master class, we invite you to watch several videos on a topic of interest that will help you learn the material in the shortest possible time.
|
This technique is used to discreetly knit additional rows into a knitted fabric, which allows for soft curves or darts. Shortened rows are rows that are knitted only partially before turning the work. Before turning, the penultimate loop must be wrapped with thread so that holes do not form at the turns. In the next row, the wrapped loop must be knitted together with the thread wrapping it. 1. To wrap a knit stitch, slip the next stitch onto the right needle as if purling. Bring the yarn forward between the needles. 2. Return the stitch to the left needle. Turn the work, bring the yarn forward or back (depending on whether you are knitting or purling) to complete the loop wrap. Knit the row to the end. |

Here's what I used from Vogue Knitting on the subject of short rows:
Front side
1.Working thread for knitting. Transfer the loop from the left needle to the right without knitting as a purl.
2. Move the working thread forward between the knitting needles.
3. Transfer the unknitted loop from the right knitting needle back to the left. Turn the work and move the working thread to the wrong side between the knitting needles.
One loop is "wrapped". When all the shortened rows are completed in the knit row, knit to the “wrapped” loop. Insert the right needle under the “wrap” and into the wrapped stitch at the same time and knit them together.
Wrong side
1.Working thread before knitting. Transfer the loop from the left needle to the right without knitting, like a purl stitch.
2. Move the working thread back between the knitting needles.
3. Transfer the unknitted loop from the right knitting needle back to the left. Turn the work and move the working thread to the wrong side between the knitting needles. One loop is "wrapped". When all the shortened rows are made on the purl row, knit to the “wrapped” loop. Insert the right knitting needle from behind under the “wrap” and lift it onto the left knitting needle. Knit the “wrapper” together with the purl loop.
Partial knitting method or shortened rows
When it is necessary for one side of a knitted product to be longer than the other, they usually resort to knitting shortened rows. Shortened rows are rows that are not knitted to the end, that is, in order for the row to be shortened, the work is turned before the end of the row, and after turning, the same loops are knitted again that were just knitted. As a result, there are many more rows on one side of the canvas than on the other. This technique is also called partial or rotary knitting.
Figure 1 shows a pattern for knitting a dart, when shortened rows are knitted on one side; such rows are made for darts on women's blouses, on the back of children's trousers, when knitting berets and flared skirts. Figure 2 shows a pattern of shortened rows on both sides of knitting. Such rows are knitted to obtain convex parts of the product, for example, to give a characteristic shape to the heels on the toes. Here, in each shortened row, one less loop is knitted and then, in order to “turn the heel,” one more loop is knitted in each row until the original net loops are cast on.


When, when turning the work, all the loops are knitted on top of each other, holes are formed between the loops. They can be left as part of the pattern if the pattern is openwork, or hidden by using the knitting method described below with entwined loops.
Let's take a closer look at how to make short rows in the front row and hide the holes:
1 Knit facial threads to the turning point. Without knitting, slip the next stitch onto the right needle, as in knitting, and bring the thread forward to the right side of the work between the knitting needles (Fig. 3).
2 Move the removed loop back to the left knitting needle, and move the thread back and keep it at work, as in knitting. Turn the work as if you had knitted to the end of the row. The removed loop will be entwined and there will be a long constriction around it (Fig. 4). Then knit with purl stitches.


When you knit the knit stitches above the turn and the constriction stitch on the next row, you must knit the knit stitch together with the constriction stitch. This will be done in more detail as follows: knit the fabric up to the entwined loop, then pass the right knitting needle under the constriction along with the loop (Fig. 5) and knit them together.

Now let's look at how to make short rows in the purl row and hide the holes:
1 Knit purl stitches to the point of turning without knitting, then slip the next stitch onto the right needle, as in purl knitting, and move the thread forward to the front side of the work between the knitting needles (Fig. 6).


2 Transfer the removed loop back to the left knitting needle, and move the thread back and hold it behind the work, as in knitting, then turn the work, as if you were knitting to the end of the row. The removed loop will be entwined and there will be a long constriction around it (Fig. 7). Next knit with purl stitches.
When you purl the stitches over the turn and overstitch on the next row, you insert the right needle behind the back wall of the loop formed by the yarn and move it onto the left needle. Next we purl the loop together with the constriction.

Such shortened rows can also be used for “horizontal arrows” (Fig. 9), shoulder or other bevels (Fig. 10) and when connecting parts of different densities (Fig. 11).


"Horizontal Arrows"(Fig. 9) is a convenient opportunity to use the ability to knit short rows to give the details of clothing a more tight-fitting or simply original shape. To do this, you need to knit from the edge of the fabric, i.e. from the side seam to the tip of the “arrow”. Then turn and knit to the third or fourth loop (depending on the angle) from the edge of the fabric. Knit in this way and in each front row, each time knitting 3-4 loops further from the side seam, until you get an “arrow” of the required depth. Next, knit along all the loops.
Shoulder bevels (Fig. 10) are also formed using shortened rows. If you close all the loops several times, without knitting to one of the edges, the edge of the fabric on the shoulder cut will turn out to be stepped. To prevent this from happening, you can turn the work in front of the loops that need to be closed for the shoulder bevel, and repeat this procedure in each row in which the loops are closed. As a result, all the loops will form a bevel and end up on the knitting needle; now they can be closed in one step.
Connect parts(Fig. 11), connected by patterns with rows of different densities will help to shorten the rows. For example. you can easily connect a garter stitch sown with the front of a cardigan knitted in stockinette stitch. You will need to knit six rows of garter stitch for every four rows of stockinette stitch. Having completed the row at the end of the garter stitch, you need to turn and knit with garter stitch, then turn again and knit the garter stitches with knit stitches, turn again and knit them in the reverse row as well. After this, continue knitting on all the loops from a distance.
 Pay attention to how the second row is knitted after the “wrapping”
Http://www.doggy-luxury.ru/forum/19-168-1
Short rows, or also called partial knitting, are used when inside a knitted part it is necessary to obtain rows of different lengths to give the fabric a certain shape. Thanks to the technique of knitting in short rows, it becomes possible to form a round neckline, eliminating the need to secure loops and cast on new ones along the edge.
Used to make bevels, necklines, and horizontal darts. You can also make bulges, for example, when knitting the bottoms of sweaters.
The essence of shortened rows is that the row is not knitted to the end and the knitting is turned around and knitted in the opposite direction. At the same time, in order to get a smooth transition and the absence of a hole at the turning point, you must follow the turning rule and clearly monitor which knit or purl loops you see on your knitting needles at the turning point.
This is a method of knitting short rows with a “wrap”.
Stocking knitting.
With this knitting, one side of the knit is knitted with knit stitches and the other side is knitted with purl stitches.
If, when knitting a product, it becomes necessary to knit shortened rows with the knitting turned both on the front side and on the wrong side, then you must strictly follow the rule of turning on the face or on the wrong side.
We determine the place of the turn according to the knitting pattern and, having knitted to this place, depending on how the knitting lies in front of us, makes a turn for this side.
Front side
1. Working thread behind knitting. Transfer the loop from the left needle to the right without knitting it as a knit stitch.
2. Move the working thread forward between the knitting needles.
One loop will be "wrapped".
4. We knit the reverse purl row to the cone.
5. Knit the front row to the “wrapped” loop. Insert the right knitting needle under the “wrap” and into the wrapped loop at the same time and knit them together using the bottom segment.
Wrong side
1. Working thread before knitting. Transfer the loop from the left needle to the right without knitting, like a purl stitch.
2. Move the working thread back between the knitting needles.
3. Transfer the unknitted loop from the right needle back to the left. Turn the work and move the working thread to the wrong side between the knitting needles.
One loop will be "wrapped".
4. Knit the reverse front row to the end.
5. We knit a purl row to the “wrapped” loop. Insert the right knitting needle from behind under the “wrap” and lift it onto the left knitting needle. Knit a “wrap” together with a purl stitch.
This is how ONE shortened row is knitted.
When knitting a dart, you need to perform several turns at once in one row, starting from the extreme end, for example, every 3-4 loops. That is, you need to repeat steps 1-3 several times in one row. We tie the row to the end. And when knitting the reverse row, we apply the rule according to point 5 at the place of each turn.
I further call knitting in the opposite direction according to point 5 “closing turns.”
Here is a VERY WELL description of knitting short rows using this method with pictures:
http://www.kroshe.ru/view_sposob.php?id=13
If your pattern at the turning point is made with garter knitting (back and forth knitting with knit stitches), then at the turning point you should apply the rule of turning the FRONT side.
There are other ways to knit short rows.
Hello.
Today we are knitting short rows with knitting needles.
A few words about what they are needed for.
Sometimes in a knitted fabric it is necessary to knit rows of different lengths. For example, to make darts:
or a sprout when knitting raglan (this is how I finished the top part):
With the help of shortened rows you can beautifully and neatly design:
- sloping shoulder line
- bulges (when knitting heels)
- wedges in berets
- an even semicircle at the skirt
- semicircular neckline, etc.
Usually in these cases I, like many others, simply close off several loops in each next row. And the edge turns out to be stepped and very uneven. Short rows allow you to do the work more accurately, without holes.
Below we will look at 3 ways to perform shortened rows.
How to knit short rows with knitting needles
The essence of these rows is that each row is not knitted to the end, the work turns around and continues in the opposite direction. This type of knitting is also called rotary or partial.
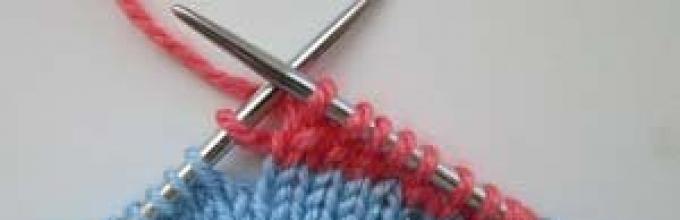
For clarity, I use yarn of different colors. Each of the following examples shows how to knit short rows, first on the front side and then on the wrong side.
Method 1 - Short rows with double crochets
We knit a row until the place where we need to turn the knitting.

We turn the work to the wrong side and make a yarn over. We knit the row as usual until the turning point.

In the next row, on the front side, yarn over and knit the next loop.

As you can see, there is no hole here.

Now let's see how to knit a short row with a double crochet on the other (wrong) side. After purl. row, turn the knitting and yarn over, knit a row.

Then, having knitted the purl row back, we reach the yarn over, slip it onto the right needle and turn over the next purl loop.

Then we throw this loop and yarn over onto the left knitting needle and knit a purl loop, bringing the right knitting needle from behind and below, grab the working thread and pull it through 2 loops.

It turns out that the yarn over (pink loop) is at the back. And everything looks very neat.

And if we had not turned the purl loop over, but knitted it with a crochet the way it lay,

it would have turned out like this (the drawing on the front side is broken):

Method 2 - Short rows with a twisted loop
At the point of turning on the right side, slip the next knit stitch onto the right needle,

we pull the working thread forward behind it and put the removed loop on the left knitting needle again.

We turn the knitting, again throw the working thread towards us and knit the reverse row as usual.

On the front side (after knitting the next row) the turning point looks like this:

Using the right knitting needle, pick up the yarn over and knit stitch from the front from below

and knit both knit stitches.

On the wrong side, we knit a shortened row with an entwined loop like this: we slip off the next loop, we start the working thread from ourselves,

turn the knitting, pull the thread through the work.


We do not knit it right away, but first turn it over on the knitting needle (before that we remove the pink loop).

We knit both loops, bringing the knitting needle from below to the back walls.
The pink loop remains on the wrong side of the knitting.

And from the front side the knitting looks like this:

Method 3 - Short rows with a tight loop
Another way to knit short rows without holes. Try it, maybe you will like it more than others.
We tie the front row to the turning point.

Turn the knitting and remove the knitted loop, purl-wise.

Then we bring the thread up and away from us and pull it so that we see 2 half-loops (blue).

Then, when you knit the purl. and persons rows and you get to this stretched loop in the front row, it will look like this:

Knit it knit by inserting a knitting needle, as shown in the photo,

and stretch the working thread.

From the wrong side we proceed in the same way: we tie it to the turning point,

remove the loop like a purl

and move the working thread over the knitting needle away from you.

We stretch the working thread,

and then, in the next purl row we knit it purlwise


And from the front it looks like this:

Now you know at least 3 ways: how to knit short rows with knitting needles. All of them are on this sample. But there are no holes)))
And, if the entire fabric is knitted with yarn of the same color, then the transitions will not be noticeable at all.
I hope you find the information above useful. Personally, I will now knit the neckline without closing the loops in every 2nd row, but using shortened rows.
Have fun knitting!
Knitting in shortened and extended rows is necessary in many cases when knitting: when knitting darts, a semicircular neckline, a shoulder bevel line, knitting items made from the neckline (with raglan sleeves and one-piece sleeves), etc.
When knitting in shortened rows, the number of knitted loops in knit and purl rows, or only in knit or purl rows, decreases, and when knitting in extended rows, it increases.
In order to master the techniques of under-tying ( knitting in short rows), cast on 30 stitches on the knitting needles and knit several rows in stockinette stitch (stocking stitch). Starting from the front side, knit 25 loops for the first time, leaving 5 loops on the left knitting needle (not knitted enough). Then the 5th loop, counting from left to right, is removed onto the right knitting needle, leaving the working thread in front of this loop, passing the working thread between the ends of the right and left knitting needles from front to back and returning the 5th loop to the left knitting needle, wrapping it around it. Turn the knitting over to the wrong side and knit the row to the end.

Wrapping a knit stitch when knitting in short and long rows
In subsequent rows along the front side, the 10th, 15th, 20th and 25th loops are wrapped in the same way with the working thread, counting from left to right. When all the loops located on the left knitting needle are unknitted, you need to knit a common front row. When knitting loops that have been entwined, the end of the right knitting needle is directed from the bottom up under the entwining thread and into the loop, grab the working thread and knit the main loop together with the entwining thread with a knit stitch. After knitting the common front row, the wrapping threads remain on the wrong side and are invisible from the front side.

Knitting the main loop together with the wrapping thread in the front loop
When knitting short rows on the wrong side, the purl loops are wrapped around the working thread in the same way. as well as facial ones. When knitting a common purl row, the thread that wraps around the loops is grabbed with the end of the right knitting needle from the front side, put on the left knitting needle and knitted together with the main purl loop.

Knitting the main loop together with the wrapping thread with a purl loop
Knitting in extended rows is explained in the following example. For the sample, cast on 25 stitches on knitting needles and knit several rows in stockinette stitch. Starting from the front side, the first time a smaller number of loops are knitted, for example 4 loops, and the 5th is wrapped in the same way as was described in the case of knitting in short rows. Turn the knitting to the wrong side and knit the loops purlwise (there will be 4 loops). Then 9 loops are knitted along the front side and wrapped around the 10th, while the 5th loop, which was twisted with the working thread in the previous row, is knitted together with the wrapping thread. After wrapping the 10th loop, turn the knitting to the wrong side and knit the row to the end. All subsequent front rows are knitted in the same way, increasing each by 5 loops. Knitting in extended rows on the wrong side is done in the same way as on the front side, lifting the wrapping thread in the same way as when knitting in short rows.
The method of knitting short rows is “Wrap and Turn”.Every craftswoman, at least once, is faced with the need to use the technique of knitting in short rows. This technique gives us knitters a lot of advantages and opportunities. Using knitting in this way, you can get a variety of geometric shapes, from the simplest (triangles, squares, circles) to intricate and complex ones. Short rows help to knit the heel at the toe, the sprout at the jacket; obtain curved shapes of the product in accordance with the pattern.
The list of possible uses of this technique could go on for a long time.
Today I'm sharing my favorite way to knit short rows - "Wrap and Turn". 

Knit with knit stitches from the beginning of the row to the turning point.
Without knitting, slip the next stitch onto the right needle, as in knitting. Bring the thread forward to the right side of the work between the knitting needles.
Move the removed loop back to the left needle. Wrap the thread around the loop and move it (the thread) back to the work, as in knitting. 
Turn the work to the wrong side, as if knitted to the end of the row. The removed loop will be entwined and there will be a long constriction around it. Then knit with purl stitches.
Knit a row with purl stitches until the turning point. Slip the next stitch onto the right needle, as in purl knitting.
Bring the thread forward to the right side of the work between the knitting needles.
Transfer the removed loop back to the left needle. 
The thread wrapped around the loop.
Turn the work as if knitted to the end of the row. Knit front row.
The facial loops above the turning point (loops with constrictions) are knitted as follows:
knit the fabric until the entwined loop, then pass the right knitting needle under the constriction along with the loop and knit them together.
The purl wrapped loop above the turning point is knitted like this:
insert the right knitting needle behind the back wall of the waistband and move it in front of the purl loop. We knit them together.