We continue the series of master classes on weaving from rubber bands. Today's lesson is about how to weave rubber band bracelet French braid on a slingshot. Unfortunately, not all sets come with a device such as a slingshot, but some do. You can also purchase it separately. Having a slingshot at your disposal, you can weave many types of bracelets, replacing the machine with it. It is possible that for many this method will seem even more convenient than weaving on a machine.
What is needed to weave a bracelet from rubber bands French braid on a slingshot:

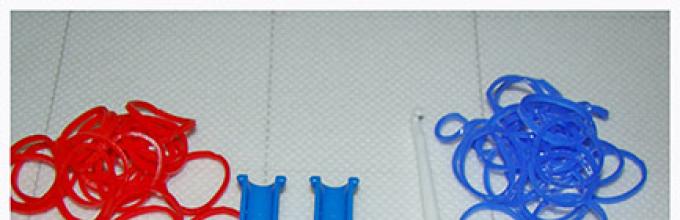
- 25 rubber bands each different colors(red and blue were taken in the master class);
- 1 transparent clip for connecting the bracelet;
- slingshot;
- hook.
How to weave a bracelet from elastic bands French braid on a slingshot?
Take the slingshot in your left hand (if you are right-handed, or if you are left-handed, then take the slingshot in your right hand, and it will be more convenient for you to weave a bracelet with your left hand). At the top there should be two columns with the side facing you where there are recesses in the columns.
With your right hand, put rubber bands on the columns. Place the first red elastic band on the posts in a figure eight pattern, as shown in the figure.

Then, put on the elastic bands without twisting them and alternating colors. That is, the next one will be a blue rubber band, and after that a red one.

Take in right hand hook, hook the lower left elastic band and remove it from the left column, and then release it between the columns.

Remove the rubber band from the right column in the same way.

Now put the next blue rubber band on the columns. Using a hook, remove the middle red elastic band from the left column.

And from the right one, remove the bottom rubber band blue. This is how it should work:

Please note that when weaving according to the French braid pattern, it is necessary to remove the middle elastic band from one column (the one that is different in color from the two outer ones), and from the other column, always remove the bottom elastic band.

Weave until you get a bracelet of the required length.
When the last two elastic bands on each column remain on the slingshot, remove the lower elastic bands one by one with a hook.

Now transfer the last elastic band from the left column to the right one (or vice versa, from right to left, whichever is more convenient for you). Hook both elastic bands on the post with one of the hooks on the clip and remove the bracelet from the slingshot.

Using the second hook of the clip, hook the initial figure eight elastic band to connect the bracelet into a ring.
Wear your French braid bracelet with pleasure!
If suddenly the photo master class was not very clear, we suggest looking at weaving in more detail in the video lesson.
In today's master class we will look at how to weave a French braid bracelet from rubber bands. This weaving technique is extremely similar to the most popular ““: the differences in the technique are minor, but the result is different. It is most convenient to make this bracelet two-color. Firstly, this will prevent you from getting confused while weaving, and secondly, a two-color bracelet is much more impressive.
To weave a French braid bracelet, you will need:
elastic bands for weaving in two colors;
one figure-of-eight clasp.

How to weave a French braid bracelet: master class
The most convenient way to weave this bracelet is on a slingshot. However, in the absence of one, you can use your own fingers, two pencils or an ordinary table fork.
Because I have two colors, blue and yellow, for convenience I will call the elastic bands by color. So, we put a blue elastic band on the fork in a figure eight.


We throw both parts of the lower elastic band towards the center.

Because Last we put on a blue elastic band, now we put on a yellow one - also without a cross. All subsequent elastic bands are put on in the same way.

On the left we hook the bottom yellow elastic band and throw it towards the center.


On the right, we hook the blue elastic band and also throw it towards the center.


This was the initial stage, and now the main weaving begins, which will continue without changes until you weave the desired length of the French braid bracelet.
Throw on another blue elastic band.

We look at which column there are two rubber bands of the same color. In our case, there were 2 rubber bands on the right one yellow. We hook the bottom yellow elastic band and throw it towards the center.


From the left column we also remove the yellow elastic band towards the center - it is located between the blue elastic bands.


We throw on another yellow one - and we see that there are 2 blue rubber bands on the left column.

We pick up the bottom blue elastic band and throw it towards the center.


We do the same with the blue elastic band on the right column.


We continue by analogy: because We have a yellow elastic band at the top, we throw on a blue one and throw it to the center, first the lower yellow one on the right column, then the central yellow one on the left.

We weave until the desired length of the bracelet is reached. At the end, we secure the weaving with a figure-eight clasp, and with the second end of the figure-eight we pick up the initial blue ring on the free tail of the bracelet.

Here is the answer to the question of how to weave a French braid bracelet from elastic bands on a slingshot. If you have questions, we will be happy to answer them in the comments.


Eva Casio specially for the site Handicraft Master Classes
Weaving a bracelet "French braid" from Rainbow elastic bands Loom. ? Below watch the “French braid made from elastic bands” video clip.
Video “Bracelet made from rubber bands “Braid”
Bracelet from elastic bands "French braid" is one of the most popular bracelets due to the ease of manufacture and interesting design. Two colors are used in the weaving process. Choose elastic bands of matching colors and let's get to work.

12. We continue our master class on how to weave a French braid from elastic bands. Then weave, repeating the sequence of actions. To avoid confusion, remember that we put one elastic band on the posts, alternating colors. If the middle and bottom elastic bands on the post are the same color, you need to remove the bottom one. If the color of the middle elastic band on the column is different, remove the middle one from this column. The color of the removed rubber bands is always the same. Continue weaving until you get the desired length of the bracelet.

13. You need to complete weaving the bracelet at the stage when two elastic bands are put on the posts. Remove the bottom elastic bands from the right and left columns, dropping them to the middle.

14. Remove the elastic band from the left column and transfer it to the right column.

15. Take the fastener and fasten both elastic bands of the post to it. To make this easier, the elastic bands need to be tightened.

16. Remove the elastic bands from the post.

17. Our master class on how to weave a French braid from elastic bands is coming to an end. At the opposite end of the bracelet, find double elastic band, with which we started weaving. Secure it with the clasp as well.


Now you know how to weave a bracelet from French braid elastic bands on a machine!
Classmates
Hi all! In this tutorial, I'll show you how to make a French braid bracelet using elastic bands. I don’t know why it’s called that, but it doesn’t matter, because the bracelet will turn out to be original and will look great. You can weave it on a loom or use a simple slingshot. I recommend that you make a bracelet from rubber bands of two colors, then it will turn out the most beautiful. Well, let's get started.
What you will need:
- Rainbow loom machine (or slingshot)
- Hook for weaving elastic bands.
- Rubber bands in two different colors.
- Clasp (C or S-shaped clip).
French braiding
First, prepare your Rainbow loom machine. Remove the left row of posts so that it does not interfere with you, since you only need two posts to make a French braid.
For example, we will weave a bracelet from elastic bands of two colors (in my opinion, the most beautiful version of the bracelet) - orange and green.


Throw the first elastic band (orange) over the first two columns, twisting it in a figure eight. Then pull an elastic band of a different color (in my case green) onto the same posts in the usual way, without any eights (in the future, we will throw all the elastic bands in the usual way onto the same columns). Again take an elastic band of the same color as the first one (orange) and throw it over the posts.


Now on the left column, hook the first elastic band (stretched in a figure eight) and throw it off the outside of the column to the middle. Then remove this elastic band from the right column in the same way. In the end it should look like this:

Throw a green elastic band over the posts.


To weave it into a bracelet, remove the center elastic from the right post, and then the first (lowest) elastic from the left post.
French Braid Pattern

Next is the orange elastic band - pull it over the posts. Now on the right column there are two elastic bands of the same color (green) at the bottom, this means that we need to remove the bottom elastic band from the right column.

On the left column, the colors of the elastic bands alternate, so we will remove the central elastic band from it (it is the same color as the one removed from the right column, that is, green).

Last time we added orange elastic, so add green elastic over the posts. Now on the left column there are two elastic bands of the same color, which means, following the instructions from the previous paragraph, we need to remove the bottom elastic band from it.

In turn, on the right column the colors of the rubber bands alternate, so we remove the central one from it.
Alternating colors, add elastic bands to the posts. Weave them together following the pattern described above. Let's fix it:
- two elastic bands of the same color on a post - remove the bottom elastic band from it;
- The colors of the elastic bands on the column alternate - remove the central elastic band from it.
Continue French braiding in this way until the bracelet is the length you need. It will look like this:

Finishing the bracelet weaving

It's time to remove the rubber bands from the machine. There are two rubber bands left on each of the posts. First, remove the bottom elastic from both posts.


Then remove the last elastic from one post and place it on the other. Place a clip on the resulting loops.
Out of 10 based on 17 ratings
Weaving bracelets from multi-colored rubber bands (Rainbow loom) is a new fashionable activity for girls. All you need is a special slingshot or machine, a hook, a lot of bright, colored rubber bands and imagination.
Types of weaving rubber band bracelets
No matter how fun and funny the activity may seem, the end result can always surprise you if you approach the hobby with soul and diligence. Even from “frivolous” material you can create a fashionable and eye-catching decoration.
Where to start weaving bracelets?
The first step in mastering a hobby is to acquire necessary tools: hook, machine, fasteners and elastic bands of different colors. The main item on the list is rubber bands. You can do without anything else. This type of work will be economical, but not very convenient.

Take a look at this amazing example of the power of human thought! The following photos show the process of creating a bracelet" fish tail"Surely the master will create a beautiful blue product.

Beginners should not purchase a large weaving machine. An experienced and passionate craftsman will need such a tool. The machine is necessary for the manufacture of complex bracelets, large or non-standard works. For example, to create a cheerful palm tree.

It is also worth stocking up on creativity and patience. Working on bracelets can lead even to a dead end experienced craftswomen. The main thing when making jewelry is to understand the principle of weaving, and not to learn the pattern by heart. Then combining any colors in your work will become a simple and easy task.
Which weave should a beginner choose?
The simplest type of weaving bracelets is a bracelet made from French braid elastic bands. For convenience, you need to purchase a small machine or slingshot.
Why is it called a braid bracelet? Because it looks like a well-known hairstyle. It should be noted that fishtail braiding is a type of French braiding.

Many people like the French braid bracelet made of elastic bands. The product looks most impressive in a two-color design. Fishtail bracelets are best made in one color.
Diagram of a bracelet made of elastic bands "French braid"
Beginners should pay attention to the simplest bracelets. It’s easier to understand how to weave bracelets from French braid elastic bands than to study complex circuits bracelet "Kaleidoscope". The procedure will be discussed using the example of weaving a bracelet from French braid elastic bands on a slingshot.
Step 1. Lay out everything you need for work on your desktop. Namely:
- rings of two colors;
- padlock;
- hook;
- slingshot
In the example, the most contrasting colors were selected: orange and black. In fact, you should take the time to choose harmoniously matching colors of the product.

Step 2. Put the first rubber band in the shape of a figure eight on the slingshot. In the future, it will become a “loop” for attaching the fastener.

Step 3. The following rings are put on the slingshot without twisting. During work, all elastic bands should be attached in the order of alternating colors.

Step 4. You need to make a “loop” for the fastener. To do this, use a hook to throw the “figure eight” onto the next two elastic bands from the first and second posts of the slingshot.

Step 6. You need to put on another elastic band. You need to hook and throw the middle elastic band on the left over the top elastic band. Agree, these are completely simple actions.

Then the bottom right elastic band should be hooked and thrown over the top elastic band again. Of course, this is painstaking work, but in the end you will get an unusual decoration.

Put on a new black rubber band. In the finished work, half of the bracelet will be orange and half will be black. However, the product will harmonize with clothes of any color.

Step 7: Follow Step 6 from right to left. Weaving is repeated until the bracelet reaches the required length.
It is much easier to figure out a French braid than to remember the weaving pattern. Following the pattern, you can always get distracted and get confused in the order of changing the colors of the rubber bands and the direction of weaving.
There are always three rubber bands on the slingshot. You need to start from the side where the colors of the rubber bands alternate. If at the beginning of step 6 the sequence orange - black - orange was the same for both sides of the slingshot, then at the end of the step the sequence on the left will be: orange - orange - black, and on the right: black - orange - black. Therefore, step 7 should start on the right side of the slingshot with the central orange elastic band and end with the lower orange one on the left.
The final step. The weaving of the bracelet is completed with a second “loop” for attaching the clasp. To do this, the extreme elastic band must be thrown over one side of the slingshot.

The lock is inserted into both “loops” and completes the bracelet. As accessories you can use not only plastic hooks, but also those made of metal alloys.

The inexplicable popularity of rubber bands
It is worth noting that the hobby we are considering has spread throughout the world with unprecedented speed. The age of people who are interested in Raindow loom ranges from 6 to 99 years.

Boys and girls of all ages are crazy about making bracelets. As it turns out, their parents enjoy this activity no less. What crazy things do adults create from rubber bands! For example, rubber orchids in a pot.

Some create slippers, a watch belt, and even a dream catcher from colored rings. People with creative thinking They produce entire paintings that fit perfectly into the interior of any home.

But Jimmy Kimmel rightfully deserved the championship in the competition for the originality of using rubber bands! Who is this man? Why did fans of this unusual hobby pay attention to him?

Famous host of a comedy show. He appeared on television wearing a suit from Rainbow Loom, which aroused increased interest from the audience. The "Suit of the Loom" outfit was made by children from different countries peace.


