DIY boxes
What is the packaging without the box? Of course, a gift can be packed in a bag or bag embroidered with rhinestones and beads, but making a box is easier (especially if you are just starting to master the skill of an applied decorator) and faster (this is important in a situation when you suddenly received a call and were told that you, it turns out, waiting at a party where everyone has already gathered, and decency simply oblige to present something small and nice to a half-familiar mistress of the house). You can buy a box in a store, but it's expensive - sometimes more than the gift itself is worth. You can use a box from under something - for example, a small one from under a charger for a mobile phone or a large one from under sandals. But it is only our parents who tend to keep all the boxes in the pantry, and young people do not have such a habit. So it does not hurt to learn how to make boxes with your own hands. By the way, it makes sense to put them on for the future - at the same time you will practice.
simple box
Having learned how to make the simplest base box, you can make more complex options without much difficulty.

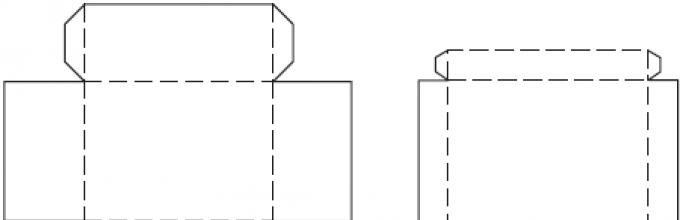
We take a sheet of cardboard of the right size and draw a rectangle or square on it (depending on the volume and shape of the gift itself). We mark and draw length lines from each side of the drawing to the center of the box - this is the depth. On one side of each "sidewall" we draw protrusions of 2 cm, cut them off near the bottom of the box at an angle of 45 degrees, cut out the entire workpiece completely, bend along each line and glue it to the adjacent "sidewall".
The lid should be 2-3 mm larger than the box itself. To keep the lid, you also need to make ledges. Before gluing the cover, fasten it with paper clips and check if it fits.
"Grandma's Chest"
The manufacture of this package begins with the same blank as for a simple box, with "sides" and protrusions for fastening. The starting material is the thickest cardboard you can find in an office supply store.

To determine the size of the pattern, place your gift in the center of the sheet (glued, if the gift is large, from two halves) and step back from each edge by about 8 cm - then you can definitely be sure that the gift will fit.
From one of the large sides we draw a rectangle equal in size to the bottom of the box - also with protrusions for fastening, and so that the sides of the lid go inside the “chest”.
We draw on the "sides" of the box (located across the width) a semicircle, the length of which should be equal to the width of the lid. We make the second semicircle along the length of the lid. We glue the workpiece.
The final step is coloring. You can, for example, glue a pre-painted "barn lock".
Again we draw a square with "sides", that is, the walls of the "house".

At the same time, we draw a “roof” - triangles (preferably with protrusions for fastening).
In the "sides" we mark the door and windows, cut them out, select rectangles of cellophane or polyethylene that are symmetrical to the openings. A window frame is cut out from a separate sheet of cardboard - we will fasten it, like “glass”, on the back of the sheet.
The door can be drawn either so that it opens and closes, cut through from three sides.
We color the "house" at our discretion. We fix the "chimney". It remains to glue the "house", put a gift into it and fasten the fragments of the roof together.
At the final stage, you can make small holes for a bow or ribbon.
We draw a square. We retreat from its sides and draw five more equal squares.

We add them around the perimeter of the base, attaching the last one to one of the previous ones.
Do not forget to make allowances for gluing fragments.
Having cut out the blank, paint it or paste over it with bright paper.
We glue the fragments, put the gift in the box and fasten the top.

triangular box
We draw a pattern - a triangle twice as large as the box we need. We divide all sides in half and draw straight lines along their middles - these are the fold lines of the box.

We put the gift in the center of the inner triangle and glue the box. To do without allowances for fastening, you can pierce small holes around the edges for decorative tape.


Box-"handbag"
From plain or colored cardboard, you can cut out and glue a handbag as shown in the figure.

cone-shaped box
The packaging box can also be cone-shaped. The starting material is cardboard or thick paper. It is not necessary to go to the stationery store for cardboard, especially if there is not much time before the party. Juice packaging, a kefir tetrapack will be used, in extreme cases - a cover from an old wall calendar.

envelope
Such an envelope can be made for both a flat gift and a postcard.

box-case
Such an “intimate” tiny case also implies a very “thin” gift, intended exclusively for a loved one. From two contrasting sheets of cardboard, you can glue a sliding box-case in two parts.

Box with a clasp
Such a box is good for a mother, girlfriend or daughter, as it looks at home and emphasizes the closeness in a relationship.

Source materials - thick beautiful paper or colored scraps of whatman paper.

It is clear that only a small box will look cute and hold firmly. Consequently, the gift is also meant to be “chamber” - either tiny, but valuable, or completely playful, like candy with a note.
Box-"asterisk"
Option one
Such packaging is suitable for a children's gift, for example, for small things like elastic bands and hairpins.


Option two
In such a package, it is good to present a modest "household" gift.

Boxes for watches and money
Pretty "substrates" for watches or chains can be made very simply. And the money invested in a man-made envelope will not seem like such a “mundane” gift.


We put the pattern on cardboard or velvet paper. We cut it out, fold the box and decorate with various applications.

Cup box
A cardboard cup with a delicate flower at the top is suitable for any gift.

1. We make a pattern according to the scheme and fold the workpiece.
2. Carefully lay the allowances.
3. We fix the folds at the bottom with adhesive tape.

chest
According to the manufacturing technique, such a chest is not much different from a simple box. At the top, it can be decorated with any “lock”, depending on the purpose of the gift and the occasion.


"Locomotive" from chests
To build such a package, at first glance, is difficult. However, in fact, it consists of the number of simple cardboard chests you need.

Box-"leaves"
This box is equipped with a double-sided latch.

Box-"T-shirt"
Such packaging is suitable for a flat object, such as a book or a disk.

Box-"machine"
And in this box a toy car will look great. Or... diamond earrings.


Box-"giraffe", "elephant", "tortoise"
Children's gift boxes can be made in the shape of a variety of animals.

Box with application
An ordinary flat box can turn into a funny animal - just stick an application on top and bottom of it. If you make a bottom pattern in the form of a “sun” with a “fringe” for attaching the case, the box will turn out to be round.

We start making packaging with a paper tube. Glue the cone. Having cut out two small ovals with ears, we glue them together. We put a blank-head on the cone-body, stick a bow on the neck, draw a tail and paws.

When the gift is packed into the box, seal it from the bottom with a thick cardboard circle.

"Frog"
A small paper cone will serve as the frog's head. We glue the eyes to the workpiece, draw the mouth, and then glue the body from the cylinder with the bottom closed. It remains to glue the head and paws to it and color the “frog”.


"Muzzle"
Making a funny face with multi-colored pigtails is very simple. Source materials - several fragments of multi-colored paper, preferably one that does not tear (for example, cigarette paper).
We wrap the gift box in paper, fastening the seams - then they will be hidden under the pigtails. We weave a long pigtail out of paper of different colors - such that it is enough to wrap the box around the perimeter. We tie lush bows to its ends. You can tie the pigtails with a thread, and fluff the tails. It is more interesting if the ponytails with bows fall on the corners of the box. We draw the face itself with felt-tip pens.

"Candies"
Such "sweets" are ideal for "distributing elephants" at school or kindergarten at the birthday of your beloved child. They can also be used in the process of a wedding celebration: guests presenting gifts will be pleased to receive a return gift, albeit the most modest one.
"Candy" universal
The starting material is a rectangular sheet of drawing paper, rolled into a tube and fastened with a stapler or tape. The rectangle is selected taking into account the dimensions of the gift.

Glue small rectangles of thin wrapping paper around the perimeter of the tube at both ends and assemble them into a “quill” using decorative tape. Before gluing the blanks, we decorate them with shells, dry flowers, stickers, appliqués, etc.
"Candies" for fruits
You can pack everything - not necessarily a valuable gift for a special occasion. A handful of cherries or a few apricots brought to the hospital by an ill colleague will make a completely different impression if you work a little on their design.

1. We fold a “boat” out of thin, preferably bright tissue paper.
2. We place the fruit in its “nose” so that the paper fits it like a scarf.
3. We twist the ends of the paper left free. We connect the ends.

For fruits or, for example, for a larger bunch of grapes, an oblong sheet of paper is suitable.
1 Lay the offering in the middle of the sheet so that there are free ends.
2 We collect them in brushes and bandage them.

"Sweetie"
Such packaging is suitable, for example, for jewelry, a small toy, a tie, etc. It is better to get rid of the factory packaging and turn the gift into a “candy”.

Our task is to bend the paper so that the resulting envelope resembles a candy wrapper.
1. We twist a tie (or any other soft gift) with a tube - this way it will be easier to pack it.
2. We put it in the center of gift paper.
3. We bend the ends so that we get triangles, like a candy wrapper.
4. We bend and bring the ends of the package together, fixing them with adhesive tape.
5. We bind the junction of the edges of the package with a decorative tape or cord.
A paper box is a very valuable item because it can be used as a place to put a gift. And to give a person a gift not openly, but in a gift box, that is, in a box. It’s even more interesting, since any secret intrigues and arouses interest. Or you can store some of your things in it, for example, shoes. Almost everyone can create a paper box. There is nothing complicated in its creation.
How to make a paper box (1 way)
You will need: paper, jewelry, scissors.
1. First we make a lid from the box. To do this, we take paper measuring 21.5 cm by 21.5 cm and draw it diagonally. Lines connect opposite corners.

2. We bend one of the corners so that it looks to the center (to the place where our diagonal lines intersect). After that, we bend it again so that the edge of this fold is flush with the strip drawn in the center. Then we dissolve the figure and see that folds have formed, which we will need later.


3. The same thing that we did in paragraph two, we do with all other corners.

4. We make cuts on both sides as shown in the picture.

5. And we proceed to fold our craft in stages.


6. After creating the lid from the box, we proceed to create a bottom for it. To do this, we take a piece of paper with dimensions slightly less than 21.2 cm by 21.2 cm. The bottom is made in a similar way as the lid. When creating it, one-color paper is taken, unlike the cover, when it is best to use something colorful, containing several colors, perhaps even some kind of picture.


So you made a paper box using our simple instructions. You can take other sizes for the box, but do not forget to make the bottom of the box 3 mm smaller than its lid.

How to make a paper box (2 way)
It will take a little patience and time, as well as thick paper of any color (can be used with patterns, or plain).
1. Since we make the box in a square shape, then the sheet of paper, before starting to create crafts, also needs to be shaped like a square.
2. It is necessary to bend the paper square in half across and carefully smooth the fold line so that it is clearly visible. Expand the square and repeat the same, this time bending the sheet vertically. Unfold the workpiece. You should have a square with two intersecting lines.

3. Bend the square diagonally in half. Then straighten it and repeat the same for the other diagonal.

4. Bend each of the 4 corners of the square towards its center to form a diamond.

5. Bend back the two opposite corners of the rhombus so that the figure looks like something like a “candy”.

6. We bend vertically the side parts of the "candy" (that is, those that do not have sharp peaks) to form a right angle. We bend vertically in the same way as its sharp edges.

7. We bend both tops of the “candy” inside the box (first one, and then the second).

8. So you made a box. True, without a lid. The lid will also have to be done in the same way, but to create it, you need to take a square of paper a couple of millimeters larger so that it can close the box. To decorate the box in the future, you can use paints, ribbons, pieces of fabric or sparkles. Here you can show your imagination to the fullest.

How to make a paper box (3 way)
Such a box looks quite stylish and can become a real decoration for your room. To create it, it is preferable to use either colored or textured paper.
1. Fold a square sheet of paper in half.

2. Fold the resulting triangle in half again.

3. Expand the edge as shown in the figure below.


4. We do the same on the other side. The result is a double square.

5. We bend the corners in the same way as it is done in the figure below. We do the same on the reverse side.

6. At this stage, you should have such a figure (see picture).

7. Unbend the bent corner along the marked lines.

In this master class, we will consider several ways how to make handmade paper box The first method is a little more difficult, and the second is very easy.
The first way is an origami paper box.
To make such a box, we need scissors and two pieces of paper. The first size is 21.5x21.5 centimeters, this will be the lid of the box. The second sheet is 21.2x21.2 centimeters in size, respectively, this will be the lower part. As you noticed, the sizes of the sheets do not differ much, and if you don’t have a ruler on hand, I advise you to pick up sheets so that one of them is a little smaller. The folding method of the top and bottom is the same. That is why we will consider making only one part of origami with our own hands. To make the box stronger, we advise you to take thicker paper, for example, cardboard. Let's get to our instructions.
1 . We outline 2 diagonal lines. The easiest way to do this is with a ruler and a pencil.
2 . We bend one corner to the center of the square, as shown in the photo.

3 . Then fold the same side in half. The edge should lie exactly along the diagonal line.

4 . After we ironed the fold lines, we unfold everything back.

5 . Exactly the same procedure described in paragraphs 2-4 is done with the rest of the corners.

6 . We cut 2 corners with scissors, as shown in the figure.

7 . Bend the side corners to the center. So that they converge at the central point of the square.

8 . Raise the side walls of the box. Since we have made all the necessary folds, this item will not cause you any difficulties.

9 . Next, we begin to form the walls. To do this, we bend the edges to each other as in the diagram.

10 . Now the edges that we cut are put inside the box with our own hands.

11 . Now the lid for the gift box is ready. It remains only to make the bottom.

12 . The bottom is made in exactly the same way. We advise you to carefully approach the choice of paper. Basically, paper of a single color is selected for the lower part. And for the top paper with different patterns.

13 . Additionally, you can give solemnity to the gift box with your own hands, decorating it with a beautiful ribbon.

The second scheme of the paper box.
This box is much easier to make than the previous origami. You don't need scissors or a ruler to make it. All you need is to pick up a sheet of paper of standard size A4, A3, A2, depending on what kind of box you want to get as a result. For example, from an A4 sheet, a box measuring 10x10.5 centimeters is obtained. We will also consider only the manufacture of one box module with our own hands. Since both parts are assembled according to the same principle. Do not forget the bottom of the box should be a little smaller.
1 . Place the paper in front of you, long side facing you.

2 . Make 2 fold lines, you should get 3 equal shapes.

3 . Fold the right rectangle in half as shown in the photo.

4 . Do the same with the left rectangle.

5 . We bend the corners on both sides from the top and bottom, as shown in the pictures


6 . Turn the sheet over and do the same. On the one hand, you should get single-layer corners, on the other, from two layers of paper.


7 . Having bent all 8 corners, we unfold the workpiece, with the corners inward.

8 . Let's proceed to the most important stage, we need to evenly open the box.

9 . We form the ribs. This can be done by hand. Make sure the sides are about the same size.

10 . In such a simple and quick way, we made one part of an origami box.

11 . In the same way we collect the second part of the box. Do not forget that one of the origami parts should be a little smaller.

Now you have met origami and know how to make a paper box with your own hands. These two ways of origami are the most popular and simple. Do not forget to leave feedback and impressions of the master class.
Instructions for making original boxes contain templates and diagrams that make it easy to make crafts using improvised materials. Based on your own imagination, you can supplement the models with a variety of decorative elements, independently create or improve the proposed drawing of future packaging. Designed options for men, women, children, suitable for any type of celebration: birthday and marriage, New Year, Valentine's Day and so on. Decorative boxes are also used to store items and trinkets, harmoniously fit into the interior of the room.
Pull-out box
The option is simple in execution and relevant for gifts for any occasion. For the manufacture of crafts, packaging, colored paper, scrapbooking or cardboard is suitable. The latter is used to enhance the strength of the box.
The parameters of paper for the manufacture of packaging with a removable lid depend on the size of the gift, the average is 215 * 215 millimeters. The sheet should be square, the work is done without cuts, the parts are glued together with an adhesive stick or PVA glue.

According to this scheme, a package with an original lid is created in a few minutes. In the manufacture of the latter, the parameters of the box are taken into account, which are advisable to measure with a ruler and add 4-5 millimeters.
The cover is made of the same paper or matching color. Decorate the package with beads, using special glue, ribbons, lace, and so on.
With non-removable cover

To make a box, a template is printed out, the product is cut out, folded along the marked lines and glued. If you need to change the packaging parameters or shape (to give it a rectangular look), you can make a drawing yourself. To obtain a durable box, the product is made of cardboard.

Having made several cube boxes of the same size, you can put together an original puzzle package of 4 or more gifts.

Cake
A composite box of individual elements in the form of a festive dessert is mainly used when holding a celebration in a large company. In this case, the packages can be personalized or presented with a cake with predictions placed in each cell.

For manufacturing, you should print a template or draw your own according to the proposed layout. Bend the paper along the dotted lines, glue. The cake usually consists of 10-15 pieces, but their number can vary depending on the number of guests.

Pyramid
The box is designed for packing small gifts: candies, toys, jewelry, hairpins, cufflinks, lipstick, nail polish and so on.

To make crafts, you should use the template and photos of the master class. In the cut out layout, the elements highlighted in color are carefully folded. The pyramid is assembled without the use of glue, connecting the parts with decorative threads. To make holes, it is convenient to use a hole punch or scissors for manicure.


square box
Universal packaging with a removable lid is designed for gifts for any occasion. It is preferable to make it from cardboard; use Moment glue to glue the parts.

The template consists of 2 parts - a lid and a box. The product is cut out, the elements are bent and glued together. Decorate the packaging with braid, stickers, ribbons, rhinestones and so on.


Quick option
The box is made from a square sheet of paper. The method is simple to perform.


According to the instructions, the paper is folded several times, cuts are made in the indicated areas. The box is folded and fastened with glue and double-sided tape. The lid is assembled according to the same scheme from a sheet larger than the original one by 5 millimeters. Decorate the product with rhinestones, ribbons, buttons, beads and other elements.
Strawberry
A bonbonniere in the shape of a ripe berry is ideal for packing sweets.

To make the product, a template is cut out, consisting of 2 parts: berries and leaves. Paper is used color, for scrapbooking or cardboard.

The strawberry box is folded along the dotted lines; a needle and thread are used to fasten the elements. The leaves of the berry are sewn or glued as desired.

Lock
The open box is made in the form of a padlock. The product is made of cardboard or paper.

For manufacturing, a template is cut out, bent along dotted lines, and the contacting elements are glued together. Decorate the box with rhinestones, beads, ribbons. If desired, you can make a key out of cardboard, scrapbooking paper or wrapping paper and hang it on a thread, string or rope to the lock.

small house
An elegant bonbonniere is made of thick paper or cardboard. For gluing elements, it is preferable to use PVA glue or Moment.

The template is cut out, bent along the dotted lines, the parts in contact are glued together. For the manufacture of the roof, rectangular sheets are used, which are attached to the upper folds. Paper settings depend on the size of the house.

If desired, you can decorate the box with a ribbon tied in a bow on the roof. In this case, it is glued to the side walls and threaded into a pre-made slot. Decorate the house with stickers, flowers, bird figurines and other elements.

flower bud
The gift box is made of packaging, colored paper, for scrapbooking, cardboard. The work is done without the use of glue.

The template is cut out, bent along the dotted lines. A gift is placed inside the box, a bud is formed, connecting the “petals” together.


Spiral box
The packaging is made of thick paper in different colors.

For manufacturing, use the proposed template or create your own. The layout is printed in the amount of 10 pieces of different colors, cut out.
The elements cling to each other with their upper parts and slightly turn to the right. As a result, a kind of snowflake is formed. Then the product is turned over and the parts are assembled on the other side in the same way.

Carrot
The case in the form of a vegetable is made of colored paper or cardboard. Packed in a box of sweets, nuts, berries, seeds and so on.


The template is cut out, bent along the dotted lines. An incision is made in the marked areas. The box is assembled, fastened with glue and incised parts. Decorate carrots with green leaves made of paper or fabric, ribbons, lace.


Origami
The box is made of paper or cardboard, the method is fast. When working, no glue is required.


The template is cut out and the parts are bent along the dotted lines. Before assembling the box, it is recommended to walk with a ruler along the contours of the product. The package is assembled by fixing the “petals” together.

Origami with clasp
The box is made of paper or cardboard. The flower at the top of the lid forms a lock.

For the manufacture of packaging, the template is cut out, cuts are made in the indicated places using nail scissors or a clerical knife. The box is assembled by laying holes on top of each other, flowers are threaded through them, fixing the product.

chest
The closed box is made of cardboard or thick paper.


For the manufacture of packaging, a template is cut out, the “wings” are bent and glued together. In the indicated place, a slot is made into which a notch is inserted, forming a lock.

Apple
Sweets, nuts, berries are packed in a fruit-shaped box. An original surprise will be bright marmalade worms.


For the manufacture of packaging, the template is printed on a color printer. The product is cut out and folded in the shape of an apple according to the scheme given in the instructions.
Decorate the fruit with a curly cut, a leaf put on a toothpick.

flat box
It is easy and quick to make flat packaging in which you can present gift certificates, tickets to the theater, cinema, and more.

For manufacturing, cut out 4 identical circles and bend them in half. Then the parts are glued to each other, as shown in the figure. The box is folded and fixed with tape.
Baby
Animals
An unusual animal figurine box will help to please and surprise the child. The craft is easy to perform and can be done by children on their own to decorate a gift for friends and relatives. Decor elements and fantasy will turn the packaging into any representative of the animal world.


For the manufacture of the box, a standard template for such cases is used. It is cut out, the edges with notches are bent and inserted into pre-made slots. Next, the box is turned into an animal: ears, eyes, nose, paws, tail, etc. are glued on.

Basket
The original packaging is ideal for young fashionistas. You can put a lot of miniature things into it: sewing supplies, decor elements (beads, beads, pebbles, rhinestones), hairpins, rubber bands, stickers. To enhance the strength of the basket, it is recommended to make it from cardboard.

They make a box from a layout, which includes 5 squares of the same size arranged in the form of a cross. The parameters of the figures are arbitrary and depend on the purpose of the packaging. Places for holes are pre-marked with a pencil and pierced with a hole punch at the same distance.

The sides of the box are neatly fastened, passing ropes, threads, ribbons, braid, and so on through the holes. The best option is a cross stitch.

The handle for the basket is made of any material that can hold its shape: thick paper, cardboard. It is sewn to the box or glued, you can use a riveting or a pushpin, bending the sharp tip from the inside.

Geometric figures
Miniature boxes in the form of three-dimensional pentagons, rhombuses, triangles are suitable for packing sweets, small toys, notes, and more.

Boxes are made according to patterns corresponding to the figures:
- figure 1 - pentagon;
- figure 2 - triangle;
- figure 3 - rhombus.
Crafts are made from colored or wrapping paper. The template is cut out, folded along the dotted lines, and fastened with a glue stick.


Candies
Sweets, nuts, miniature toys, confetti and more are packed in bright boxes. The product is made of colored paper.

The template is cut out, the squares along its edges are removed, bent along the dotted lines, glued.

You can draw the layout yourself, increase the number of candy sides, change the package size, add new elements. Decorate products with stickers, bows, ribbons and so on.

lego
In packages in the form of a LEGO constructor, you can put parts from it, toys, figurines, sweets and other miniature items.

For manufacturing, a template is cut out, consisting of 2 parts: a box and a round element to create convex parts. The product is folded along dotted lines.

The boxes are neatly folded and glued. Convex parts are obtained using a template by cutting out on it and sticking several circles on top of each other.


Men's
Classic variant
Packages for the stronger sex are presented mainly in a simple style with a minimum number of decorative elements. Optionally, you can paste images on a male theme: cars, liquor, watches, cigars, tools, and more.


The product is made according to the proposed scheme, the parameters of the box depend on the size of the gift. The layout is cut out and folded along the dotted lines, the work is done without the use of glue. In order for the rounded edges to bend beautifully, it is recommended that you first draw along the contour with a knitting needle or nail scissors, leaving a slight furrow. It is important not to damage the paper sheet.
On the top of the box, small cuts are made, indicated on the diagram in the form of the letter "G". The recesses are connected, forming a kind of castle.
Shirt with tie
Spectacular closed packaging is presented in the form of a paper case with decorative elements: a tie or bow tie.

Make a box of durable paper or cardboard. To do this, print a ready-made template or draw your own layout according to the specified scheme. The folds are indicated by a dotted line. The box is assembled, the contacting elements are carefully glued together, it is better to use PVA glue or Moment. A fold-over collar keeps the case closed. It can be glued to a shirt if desired.

A tie or bow tie is made independently or using a template. They are made of colored, packaging and any other paper, cardboard or fabric. Then the decor elements are glued to the box.

Case
The closed box is made in a classic style. It is made from thick paper or cardboard.

The template is cut out, bent along the dotted lines, glued. In order for the rounded edges to bend beautifully and correctly, they are first drawn along the contour with a knitting needle or nail scissors, leaving a light furrow. It is important not to damage the paper sheet. The notch is inserted into a pre-made incision - a kind of lock is obtained.

Women's
Corset
In the package in the form of a piquant item of women's wardrobe, you can present underwear, perfume, sweets, a bottle of wine, champagne and other exquisite gifts.

The process of making a box is quite laborious, the size, decor elements are chosen at your discretion. The work is done on thick paper using templates. Such layouts are easy to draw on your own, adding new elements as desired.
Initially, the front and back of the corset are cut out, the layout is folded inward along the dotted lines, and the side parts are glued together.


Next, templates are used to make cups for the corset and the bottom of the package. 2 small parts make 1 cup. To do this, they are cut out, an element with 2 dotted lines is bent along them in opposite directions. Another small template with 1 dotted line is glued to the inner fold of the part, which remains on the edge when the parts are joined. As a result, a convex detail is obtained - a cup with side recesses, with the help of which it is glued to the corset. Then the second cup is also made and attached.
The large round template is the bottom of the package, which is glued to the lower inner folds of the corset.
Next, the item of women's wardrobe is decorated. To do this, with the help of manicure scissors, holes are made through which ribbons, ropes, ribbons are passed, flowers, beads and other elements are glued. Optionally, you can make and glue straps, decorating them with lace.
Diamond
It is advisable to pack jewelry in a box in the form of a precious stone: a brooch, a ring, a pendant, a chain, and so on.


For the manufacture of the product, a template is cut out, double-sided colored paper or cardboard is used. It is recommended to use black, blue, blue, gold, silver and other catchy shades. The craft is assembled and glued, according to the master class.

slipper
In a shoe-shaped box, you can present sweets, gift certificates, tickets to the theater, cinema or to a ball.

Make packaging from thick paper or cardboard. To do this, cut out the template, bend along the dotted lines. The part between the heel and the boat is removed. The elements of the product are carefully glued together. The shoe is optionally decorated with paper flowers, rhinestones, beads and so on.

Dress
An open box is made of colored paper or cardboard. It packs cosmetics, sweets, jewelry and other small items.

For manufacturing, a template is cut out, bent, shaping the dress, and glued together. If desired, the layout can be changed by experimenting with the style of clothing. Decorate the product with rhinestones, beads, ribbons, lace.

New Year's
Christmas trees
In boxes in the form of a symbol of the New Year, sweets, Christmas toys, figurines and more are packed. They can be done in several easy ways.
Option 1


Templates are cut out, and an additional side layout can be used if desired. It is printed on another, preferably bright colors, paper in the amount of 6 pieces and pasted on the Christmas tree.


Crafts are neatly folded along the dotted lines. The ribbed side protrusions are carefully glued together, for this you can use Moment glue. The bottom is fixed with recesses that are inserted into the slots.


Additionally, the Christmas tree is decorated with beads, rhinestones. You can cut out a star and secure it to the top with a colored toothpick.
Option 2
The instructions for making the box are as simple as possible and suitable for working with young children.

Print the template or create a similar one yourself, adding new elements. The layout is cut out, folded along the dotted lines, the side protrusions are carefully glued together.
The craft is decorated with beads, rhinestones, imitating Christmas decorations. To hang the box on the Christmas tree, ribbons, ribbons, ropes are attached to the top.

Snowflake
The figured box is made on plain white paper or cardboard. The rays of the snowflake make the packaging closed, forming a kind of castle.

The template consists of 2 parts: the box and its bottom. The layouts are cut out, folded along the colored lines, the side parts are glued together.

The upper elements of the box are alternately connected, fixing the rays of the snowflake between them. The bottom is glued to the folds.


With Santa Claus
The box is made of thick paper or cardboard. The packaging is suitable for sweets, small gifts and surprises.

The finished template is printed on a color printer and cut out. You can stick it on cardboard if you need a strong package. The product is bent and fastened elements, forming a box.
With a snowman
Packaging is carried out on white paper or cardboard. The product does not require additional decoration.

For manufacturing, a template is cut out, the elements are bent and fastened together, forming a box.
Valentine's Day
Valentine boxes are perfect for surprises for your loved ones. There are several ways to create a heart-shaped package, all of them are easy to perform and take a minimum of time.
Valentine 1
Make a box of thick paper or cardboard. The use of glue in the work is not required, the heart in the upper part of the product forms a lock.

The template is printed on a color printer and cut out. If desired, you can create your own layout according to the proposed scheme. The product is bent along dotted lines, cuts are made along solid straight lines. The halves of the hearts are connected by inserting one into the other.

Valentine 2
The heart-shaped packaging consists of a box and a removable lid. Made from paper or cardboard.

The template includes 4 parts: the sides of the box and lid and the bottom for them. The elements are cut out, bent along the dotted lines in the shape of a heart. The bottom of the box and the top of the lid are glued to the corresponding folds.


Valentine 3
For the manufacture of packaging, double-sided colored paper or cardboard is used.

The template is cut out, bent along the dotted lines. The result is a square box, the halves of the heart are connected to each other, forming a lock.

In the style of "Love is ..."
The design of the original packaging is based on the famous chewing gum “Love is…”. The box is ideal for gifts to loved ones.

Packaging is made of cardboard or thick paper. To do this, print and cut out a template consisting of 2 parts: a box and a removable lid. The product is bent along the lines and glued. The packaging can be decorated with ribbon.


Birthday
Birthday gifts can be packed into any boxes, decorating them with thematic images: balloons, cake, age, candles, crackers, confetti and so on.
Cake 1
The product is a sealed package with a removable lid.

For manufacturing, a template is cut out, consisting of 2 parts: a box and a lid. Layout elements are bent along dotted lines, the parts in contact are glued together. Decorate the package with a burning candle made of paper rolled into a tube or a cut off part of a cocktail stick, and an artificial flame.

Cake 2
The box is made mainly of colored paper. It is convenient to use a glue gun to glue the elements.

2 strips are cut out of a sheet of paper, one of which is 2 millimeters longer than the other. At a distance of 5 millimeters from the edge, a vertical line is drawn on both parts. 
Strips are bent along it and a fringe is cut into narrow segments. Then 2 cylinders are formed from the parts by gluing the edges.

A larger cylinder is circled, a circle is cut out, glued to the bottom - this part is the lid of the box. The second circle is drawn with a diameter 4 millimeters longer than the previous one. The circle is attached to a smaller cylinder, getting a box.

The package is closed with a lid and decorated with lace, fringe, braid, ribbons. Candles are made from cocktail tubes cut into pieces. The flame is made from pieces of yellow paper. Candles are glued to the lid of the box.

Removable lid box
The packaging is a retractable origami box and a removable lid with an open top. The product is made of thick paper or cardboard.

An origami box is assembled from a square sheet according to the proposed scheme. Product dimensions are arbitrary.

In the manufacture of the lid, a strip of paper is cut out, marking on it the parameters of the box - the bottom and side parts. According to the photo of the master class, a cut is made in the middle of the layout in the form of a square. The lid is assembled and glued. If desired, it is made closed by attaching a square cut from the file to the back of the slot. Decorate the packaging at will with ribbons, postcards, lace, stickers and other elements.

Wedding
Gifts for newlyweds, invitations and surprises for guests are packed into boxes.
Tuxedo and wedding dress

A tuxedo box is made using a template that is transferred to cardboard or printed on paper. The layout is cut out, folded along the dotted lines, glued. An incision is made in the area marked with an arrow, the elements are folded outward, forming a tuxedo collar. The parts in contact are glued together, the notches are inserted into the pre-made slots. Decorate the box with a fragment of a shirt with a butterfly, a handkerchief in your pocket.

To make a wedding dress, a template is printed on white paper and cut out, folded along the dotted lines, and glued together. Decorate the packaging with ribbons, lace, rhinestones and other attributes.

Handbag
The box is made in gentle colors, decorated with a bow.

The template is cut out, the elements are bent. Incisions are made in the marked areas, the area under the handles is removed. Assemble the box in the form of a handbag, connecting the parts with slots and glue, attach a bow.

Bonbonniere 1
A package of sweets is presented to guests as a sign of respect and gratitude.

The template is cut out, bent along the dotted lines, forming a pyramid, the side ribbed parts are glued together. In the areas marked with a “plus”, punctures are made using nail scissors, a clerical knife, a hole punch, and so on. Ribbons and ropes are inserted into the hole and tied. Decorate the package with inscriptions of the names of the newlyweds and the date of marriage.
Bonbonniere 2
The box for sweets is presented in the original rounded bottom shape.

For the manufacture of the product, a template is printed and cut out, carefully folded along the dotted lines. In order for the rounded edges to bend beautifully, it is recommended that you first draw along the contour with a knitting needle or nail scissors, leaving a slight furrow. It is important not to damage the paper sheet. Adjoining elements are glued together. In the areas marked with a “plus”, holes are made into which ribbons, ropes, ribbons, etc. are inserted. On the box, the names of the newlyweds and the date of marriage are marked.
Probably, many will agree that not only children, but also adults love to receive gifts, and if it is hidden in the original box, it will leave an unforgettable impression of the surprise. And we are sure that the time spent creating it will pass quickly and unnoticed, because the result will definitely please you. Here you can find the most original and interesting ideas on how to make a do-it-yourself paper box with a lid. Step-by-step painted instructions will help you arrange it without much difficulty in a matter of minutes.
Important! Before you start creating a gift box, we advise you to practice on simpler paper, because then you will be able to take into account all the errors and inaccuracies that may arise.
Choosing a material
So, how to make a beautiful DIY gift box? For this you need the following materials:
- Corrugated cardboard;
- Laces, ribbons, ribbons;
- Buttons, beads;
- Ready labels;
- Scissors, clerical knife;
- Double-sided tape, glue stick;
- Super glue or glue "Moment" universal (transparent gel) for fixing beads and other things;
- Pencil, ruler;
- Hole puncher;
- Compass.
Now there are many ideas for creating original gift boxes, for you we have selected the most interesting and affordable options.
Box with round base:
- You need to cut out 4 circles: using a compass, we draw circles (you choose the diameter yourself) from thick packaging cardboard, you can also use porous cardboard. Two large mugs and two small ones.
- From tinted cardboard or any other that you have, we cut out two strips so that they match the size of the circles, with a margin for overlap, one of them is wide, the second is narrow.
- Glue two large circles together with Moment glue or double-sided tape. After - separately glue the remaining two circles.
- We need small circles for the base of the box. We apply transparent glue “Moment” on the sides of the mug, gluing a strip of cardboard, for reliability, you can also stick another strip on top of this one.
- We do the same with the lid for the box: we glue a narrow cardboard strip along the edges of the large circle.
Important! To make your box look more festive, you can create a beautiful bow from a colored or printed ribbon. To do this, cut the ribbon in half, glue its ends to the inside of the lid, and tie the remaining long ends into a bow on top.
Classic gift box
And for lovers of the classics, there is such an option: a small box for a small gift. We will need the following materials:
- Ruler;
- Scissors;
- Thick colored paper or cardboard (soft).
Step by step we will consider the whole process of how to make such a box of paper with your own hands. For blanks you need two squares - large and small. The difference in size is 1 cm, for example 15:15 and 14:14. Let's arrange them:
- We select the lines of squares diagonally, after that we bend the corners to the center.
- Further, the corners bent towards the center must be bent to the opposite fold line, and then to the nearest fold line. A square should form in the center, which will later become our future bottom.
- After that, on both sides of the formed diagonals, we cut along the first deflections to the designated square in the center.
- The edges that we cut are folded along the bends, so we get the walls of the box.
- We bend the sharp tips of the walls inward, to the center of the square.
- With the remaining not bent tongues of paper, we grab the bent ends, thereby wrapping them inward.
We have a lid box. 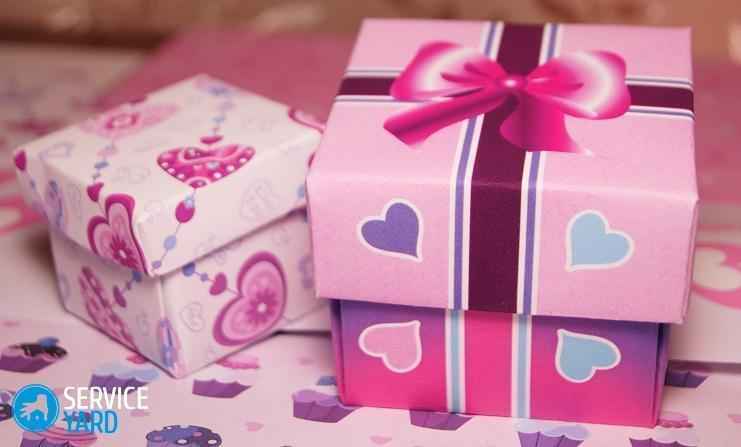
We perform the same manipulations with the second square, and due to the fact that this square differed in size by one centimeter, the box comes out smaller and fits freely under the previously made cover.
In order to fix the gift inside, put a napkin or light paper in a crumpled form on the bottom. As you may have noticed, making a gift box with your own hands is quite simple. To give originality and an interesting accent, a colored braid will help, with which we will tie our box.
Box with a secret
And now we offer to your attention to make small gift boxes with a surprise. The so-called snag box: when the lid is removed, it swings open at the same time. How to make a cover - you can look at the second option described above.
So, let's start making a gift box with a secret.
Work materials
For her we need:
- Scissors, glue, thick paper;
- Old postcards, beads, ribbon;
- Jewelry, decorative ribbons.
Important! If you decide to make the bottom 18x18 cm, then for the lid you need 1 cm more, that is, 19x19 cm.
Step by step master class:
- The box itself is made in this way: we divide the sheet into nine equal squares, we do not need the corner ones, they need to be cut out. We bend the remaining squares inward, forming a box.
- We decorate the inside as your imagination desires (with pleasant wishes or poems), glue beads, rhinestones, buttons, drawings from postcards, a small bouquet.
Important! Do not overdo it with decor so that the gift still remains the main focus of your surprise.
- Now you can put the gift in the middle, gather the walls of the box together and cover it with a lid, you can also tie it with a ribbon.
Felt box
Felt is a wonderful material from which you can create not only handbags, jewelry, toys, but also beautiful gift wrapping.
materials
To create it, we need:
- Colored felt - its density can be different, depending on the thickness of the sheet, choose the most convenient and flexible, so that it is convenient to sew;
- Threads with a needle;
- Ruler;
- Glue (super glue or hot glue)
- Scissors;
Master class in stages:
- Draw the canvas with a pencil to leave less marks and not stain the fabric, into 9 squares. You can also rectangles, cut out the corners.
- On the outside, decorate with colored appliqués, if desired - you can embroider unpretentious patterns, decorate with beads or beads.
- Gently bend the walls and sew them together. Seams with contrasting threads will give a more interesting and unusual look. In general, there are no restrictions, so you can freely experiment.
Important! Felt boxes can later also serve as a box for various little things or jewelry. It is also possible to use them during competitions for children and various holidays.
Beautiful flower box
If you need a minimum of costs and time spent, then for you there is an option for a simple box without glue:
- We print or you can redraw the template on colored paper.
- We cut the workpiece, create folds along the lines, while using a ruler.
- If your paper is white, then turn the workpiece over with the front side, while tinting it over the entire surface or only the edges with a sponge and a stamping pad (you can also use pastels or watercolors).
- We hide our present in the middle, and we can collect the “petals” from above.
Box with a heart
For solemn events, we can make such a delicate and romantic paper box with our own hands.
materials
For her you need to take:

We make a box of paper - a master class in stages:
- Print and cut out the template, follow the indicated lines with a dull knife or scissors to make neat grooves in the right places.
- Transfer the heart template to the lid part and cut it out with a clerical knife.
- We make folds along the lines and fold the box, after that we fix it with glue.
- From the wrong side, carefully close the window with a film.
- We decorate the lid with flowers made of paper or fabric, stripes with beads.
- Do the same for the bottom.
- The composition at the end of the work is supplemented with a ribbon.
Cardboard gift packaging
For the manufacture of packaging for a gift from cardboard, we need:
- Cardboard sheet;
- Scissors or compasses;
- Scheme;
- Double sided tape or glue.
Let's get to work:
- Cut out a rectangular box template from a single sheet, as shown in the diagram.
- We draw along the fold lines with scissors or the tip of a compass to evenly fold the sides of the box.
- After - glue the pieces of double-sided tape as shown in the picture.
- We decorate with colored pictures or inscriptions - it depends on the event for which you are preparing.
Cardboard carrot
It sounds intriguing - it will be a wonderful and unexpected surprise where you can hide a small gift, for example, jewelry, sweets, small toys.
Important! If you are thinking about what to put in such a package, here are a few ideas:
- A friend or sister can pack nail polish, lipstick in this way.
- For a spouse or girlfriend, you can put a bracelet, earrings or a chain in the “carrot”.
- For a father or brother, gifts such as cufflinks, tie clips or money clips are suitable.
Materials for work:
- Orange thick paper;
- Green dense threads;
- Scissors;
- transparent moment;
- Green fabric (felt will do);
- box template;
- Hole puncher.
Progress
So, the steps for creating a carrot box:
- We print the template on orange thick paper.
- We cut out the workpiece. We fold our product along the dotted lines.
- We collect and glue the workpiece. We create a hole in the upper parts of the workpiece with a hole punch.
- We cut out leaves from green fabric, tying green ropes to them. Pieces of five such leaves will be enough.
- We tie the leaves to the holes that we previously cut with a hole punch.
Important! On green paper or a ready-made cardboard tag, you can create an additional sheet on which you can leave a congratulatory inscription.