how to tie warm, but thin and dense gloves.
For knitting, select thin wool yarn and a hook No. 2.5.
Cast on a chain of chain stitches equal to the circumference of your wrist + 1 cm to freely put on the glove. Connect the chain into a ring with a connecting stitch and to start knitting the first row, make 3 air stitches. lifting loops. Knit the first row st. s/n and finish the row of connections. loop into the last loop of the lift. Next, to knit the second row, make 2 air. lifting loops and knit an elastic pattern, alternating convex and concave relief columns. Finish the row with the same connection. loop. Knit the next rows of elastic in the same way as the second. The glove cuff knitted with an elastic pattern can be of any width from 4 to 6 cm at your discretion.
Then proceed to knitting the main part of the glove. Knit the glove in half columns in circular rows in a spiral, i.e. do not make lifting loops, then the seam of the initial loops of the row will not be visible. For yourself, mark the sides of the glove where the thumb will be located and where the little finger will be located. Having knitted 2-3 circular rows with half-columns along the side near the side of the thumb, begin to make additions to expand the wedge of the thumb. To do this, in the next 5-7 rows, add one half-column at a time, knitting two from one loop.

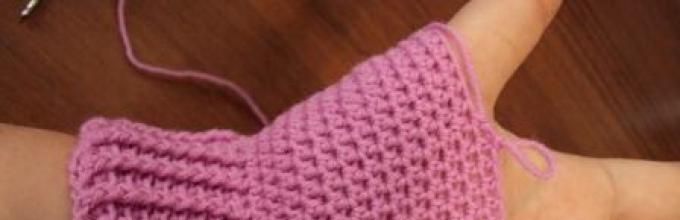
When you knit in height to the base of the thumb in the last row, without knitting 6-7 loops to the edge, cast on a chain of 8-9 air loops and fasten it into the arch through 12-14 loops of the previous row. This creates a hole for the thumb, which is knitted last.


Before you start knitting the fingers of the glove, calculate the loops for each finger. You can identify them by trying on the glove and noticing the loops on the inside and outside. To knit the little finger, attach the thread from the side of the palm, make 3-4 air. loops and attach the arch to the back of the glove. Next, knit half columns in a circle to the height of your little finger.

Closer to the tip, make decreases on both sides of the finger to narrow it. When you have knitted your finger to its full height, close the loops by knitting single crochets in a circle - one of the two loops. When the hole narrows, cut the thread and secure it by pulling the tip through the loop. Insert a needle into the remaining tip of the thread and mend the remaining hole, thread the thread on the wrong side.
If you look at your hand, you will see that the fingers are located at different heights - the first little finger, the index finger a little higher, and the middle and ring fingers at the same level. Therefore, after knitting the little finger, return to knitting the main part of the glove. Taking the remaining thread to work, knit one circular row with half-columns along the inside, the arch at the base of the little finger and the outside of the glove. Now you can knit the ring finger. Attach a new thread to the inside, tie a chain of 4 chains. loops and secure the arch on the outside.

Knit half stitches to the height of your finger, narrow it at the top, making decreases along the sides. Finish the knitting in the same way as on the little finger - make decreases by knitting two single crochets together until the hole narrows to a small hole.
Take back the remaining main thread and knit one round row through the arch of the ring finger. Next, attach the thread for knitting the middle finger. If you get a large hole for your finger at the base, then make decreases in the corners, knitting two half-stitches together.

Knit the index finger with the thread left from the main part of the glove.

Attach the thumb yarn and knit in the round in half stitches, decreasing at the corners first, knitting two half stitches together until the hole is equal to the diameter of the finger. Next, knit it to height and narrow it with single crochets.

The glove for the other hand is knitted in the same way, but in a mirror image.
The back part can be decorated with a knitted flower or embroidery.

The gloves are very comfortable to wear. In this master class we will crochet gloves. They are not as difficult to knit as it might seem at first glance. To knit gloves, you need to choose thin yarn with added wool so that your hands are warm in them. The color of the gloves can also be matched to the outerwear; we chose red.
To knit gloves we will need:
- Yarn (red and white);
- Hook.
We start knitting gloves from the fingers. We cast on two loops. And then in the second we will perform six sc.
Next you need to make increases in all the loops. Now we need to decide on the finger size. We measure the diameter of the index finger. And then we measure the knitting diameter. If there is less knitting, then you need to make three or four more increases in different places in the new row.
After we have knitted the finger increases, we begin to knit in the round.
We knit several rows until the finger is just right. To do this, you need to try it on your hand.

That is, we do not make the increments as usual in a circle, but we make them so much that the finger is the right size.
When all the fingers are connected, we begin to connect them into a glove.
And we will start doing this with the little finger. Let's attach the ring finger to it with one sc. And knit exactly half the loops of the ring finger.

Let's also attach the middle finger. Then the index finger. We don’t touch the big one yet, but knit it in the round, decreasing at the places where the fingers are attached in three rows.

We attach the thumb in the same way as all the others.

And now we will knit one row in which we will make one decrease above each finger. We make decreases on both sides of the glove.
So we will narrow the knitting a little.
After this we knit several rows until we come to the wrist.
Here it is necessary to narrow the glove again. And so we will knit decreases through four stitches. That is, in every fifth loop of the row. And let's do one more row without decreasing.

Let's start knitting the cuff. We make four loops and knit one DC here.
Then in the third loop of the row we knit one dc, one ch and again one dc. So along the entire row.

We got checkmarks. And we will knit the entire second row in their middle where we have one VP.
In each tick we knit a new tick, which consists of two Dcs, one VP and two more Dcs.

And we knit another row exactly the same as the previous one.
You can crochet gloves yourself using diagrams and descriptions. This item will be a wonderful addition to any look, adding sophistication and femininity to it. Beginners in this business should watch several master classes in advance and choose the most optimal product option for themselves.
Nuances of work
Before you start creating the gloves themselves, it is worth considering several nuances of the work. First you need to decide on the model of the future product. Then choose the appropriate yarn. Wool threads are suitable for warm mittens, because they retain heat well and prevent your hands from freezing. For light openwork gloves, it is better to use acrylic threads. The crochet hook is selected according to the thickness of the yarn.
Advice! Typically, manufacturers themselves indicate the recommended hook size on the yarn labels.
Knitting patterns
The description of each crocheted product is usually accompanied by its diagram. It is important to be able to read it correctly and without errors. To do this, you should get acquainted with the basic rules:
- Knitting according to patterns should start from the bottom up if there are straight and reverse rows. And from the center to the edges, if in a circle.
- All odd rows are front rows and are read from right to left, even rows are purl rows and are read from left to right, respectively.
- Circular rows are read from right to left, that is, counterclockwise. On diagrams, very often the rows are numbered or differ in color.
- In knitting there is such a thing as rapport. Rapport is a repeating part of a pattern. Rapport can be repeated both in the diagram and in the description; it is enclosed between two asterisks (*…*). Knitting begins with loops to rapport, then repeat is knitted as many times as needed.
Model without fingers
A comfortable glove model for comfortable use of gadgets or when driving a car. The process of creating such gloves is much simpler than the classic model. They will need:
- wool yarn;
- appropriate size hook.
Now you can start knitting.
- To begin with, a chain of air loops is knitted, which is closed into a ring using a connecting post. Four fingers should fit freely into this ring. Then we knit two chain stitches and three rows of single crochets.

Advice! For greater comfort, gloves should start knitting from the fingers to the wrist.
- Next will be knitting in lush columns. A lush stitch is three “under-knitted” double crochets, knitted in one loop at the end. To obtain a fluffy stitch, yarn over, insert the hook into the loop of the previous row and pull out the thread. The thread is knitted into the resulting loop and yarn over.
- We repeat the process again so that there are four loops on the hook, and then we knit them at the same time. The lush column is ready.

- We knit three rows of puffy stitches, then three rows of single crochets, then two more rows of puffy stitches.
- At the base of the thumb, a chain of fifteen chain stitches is knitted and attached using a connecting post to the main knitting four loops from the beginning of the chain.

Advice! At this stage, it is better to try the glove on your hand. The thumb should fit freely into the resulting hole.
- Next, knitting continues in the circle with single crochets.
- After two knitted rows, you should start decreasing. It is best to do them this way: evenly decrease four loops in a row - knit the next row without decreasing - decrease four loops again - knit the row again without decreasing. There should be four rows of decreases in total.

- Then we knit another four to five rows without decreasing the stitches. We finish the work with a fastening row, carefully tighten the last loop and cut the thread.

The second glove is knitted using the same principle.
Openwork gloves
This model will suit almost any outfit, adding femininity and romance to its owner. Its creation will not take much time and effort. For openwork gloves you will need acrylic yarn and a hook of a suitable size. Now you can get to work. 

- Knitting begins from the upper part of the right hand. A chain of 25 chain stitches and an additional three to move to the next row are made. We knit two rows with double crochets in each loop.

- In the third row we knit six double crochets, and then we start knitting the pattern: we skip one loop, in the next we knit a “fan” of six double crochets, we skip one, two double crochets. We repeat the pattern element according to the same principle two more times and end the row with double crochets.

- We knit another eight rows with the pattern. In the next row above the outer “fans” we knit only three double crochets through one loop.
- We knit another row with a pattern element in the middle. Then two rows with single crochets. At this stage, the length of the part should be equal to the distance from the base of the palm to the base of the little finger.
- Now you need to distribute the number of loops on each finger. This is done according to the following principle: 25 / 4 = 6 and one loop left. This makes six loops for the index finger, seven for the middle finger, six for the ring finger, and six for the little finger.
- We begin to knit 19 double crochets for the little finger.
- Then we knit 10 rows of 6 double crochets for the ring finger. The piece is completed with a “fan” of six double crochets in a loop in the middle of the row. Afterwards the thread is secured and cut. At this stage, it is important to attach the workpiece to your hand in order to accurately determine the length of your fingers.
- The middle and index fingers are knitted in a similar manner. But since these fingers are long, we knit 12 rows of 7 double crochets.

- The back of the glove is knitted by casting on 25 warp stitches and 3 chain stitches to move to the next row. The number of rows should be equal to the distance from the base of the palm to the bend of the thumb. In the next row you need to leave room for your thumb. To do this, we knit 2 double crochets, skip 8 loops and above them we knit a chain, also of 8 chain loops, and continue to knit with double crochets.
- Now, in the prepared place you need to tie your thumb. To do this, we fasten the thread to the post adjacent to the place for the thumb and knit three air loops. Then eight double crochets in each stitch and another double crochet for the adjacent stitch.

- We finish with a “fan” of six double crochets in a loop in the middle of the row. We fasten the thread and cut it.

- When both parts are ready, they should be connected with a hook or stitched with a thread and a needle.

- Then you should knit the cuff for the glove according to the following principle: two double crochets, skip one loop, in the next we knit a “fan” of six double crochets, skip one loop.

The left glove is knitted symmetrically to the right.
Men's
Hand-knitted gloves can be a wonderful gift for a man. They can have different colors. But the best option would be products in gray, black, green or blue colors. To create men's gloves you will need wool or wool blend yarn and a hook of a suitable size. When all materials and tools are prepared, you can begin to work.
- First, a pattern is made for future gloves. Either the man’s palm or his old glove is outlined on a sheet of white paper.
- The initial chain of chain stitches is made from the beginning of the cuff to the tip of the little finger following the pattern. Next, rows are knitted in single crochet stitches the width of the little finger. Start each new row of columns with one lifting air loop.

- Single crochet is knitted to the base of the ring finger. Afterwards, a chain of air loops is drawn up to the tip of the ring finger.
- Next, rows are knitted with a single crochet the width of the ring finger. The middle and index fingers are also knitted. The back of the glove ends after the index finger is knitted.
I will share the local secret of handicrafts from our rural capital, Uryupinsk. Down gloves made from goat down, how to knit them?
For a pair of gloves you will need about 40-50 grams of fine white goat down yarn. Spinning is performed on cotton thread size No. 40-50, and hook No. 1.5-2
We knit an elastic cast-on edge made from double crochets.

We calculate its length using the edge loops. There should be 54 of them. Carefully connect the edge into a ring. And from 54 loops we form 27 cells.

Then we perform fillet knitting in a circle. You need to knit 3 or 4 rows. Depending on the size of the palm. The smaller it is, the fewer rows you need to make.

We knit a glove on the left hand.
Then we knit 2 squares from the junction (this is our 5th row). And immediately we make a dilution for the thumb.

We knit this and the next row to the end according to the pattern. Then in the next row we also knit 2 squares and make another dilution.

We knit according to the pattern until the next dilution and make the second one.

We knit this row and the next one to the end. That is, after each row we repeat 2 dilutions. It turns out like a “wedge”.

We finish making it when there are 9 cells between dilutions. Then in the next row, having reached the dilution, we simply knit 10 air loops.

They will be the basis for the continuation of the glove.


Don't forget about the central design on the back of the glove. They begin to knit it on the 9th row of cells. This is done as follows. In order for the pattern to be exactly in the center, after the second dilution it is necessary to knit another 7 cells, and the eighth to knit with a column inside. The result is not an empty cell, but a filled cell. Using these cells and air loops we will knit a pattern.
In the next rows of cells in a checkerboard pattern we knit the filled ones, which are connected to each other with air loops (VP).

VPs are connected only in the center:
First with one loop, in the next row with three, and in the third with five loops. Then the drawing begins to narrow. Then in the next row the VP must be connected with three loops, and then with one.


We knit the fabric of the glove according to the pattern until the bases of the fingers are hidden. We break the thread.
Now we knit the fingers. Let's start with the index finger. From the junction of the rows - the seam (it is located in the palm of your hand), retreat 2 cells to the left and attach the thread.

We knit 4 VPs, count 10 squares to the left from the junction of the thread and connect them to the back of the glove FIGURE 17. We knit 3 VPs for lifting and knit the index finger in a circle. You need to knit until the top of the finger is hidden. Then we lower and close the loops.


Then, on the back of the glove, from the base of the index finger, we step back 4 squares to the left and tie a thread. Then we proceed as in the previous version and knit the middle finger. Only on the palm side, 3 cells recede from the index finger.
Do you want crochet gloves? Then our master class will help you learn the technique of knitting gloves and you will understand how to tie warm, but thin and dense gloves.
For knitting, select thin wool yarn and a hook No. 2.5.
Cast on a chain of chain stitches equal to the circumference of your wrist + 1 cm to freely put on the glove. Connect the chain into a ring with a connecting stitch and to start knitting the first row, make 3 air stitches. lifting loops. Knit the first row st. s/n and finish the row of connections. loop into the last loop of the lift. Next, to knit the second row, make 2 air. lifting loops and knit an elastic pattern, alternating convex and concave relief columns. Finish the row with the same connection. loop. Knit the next rows of elastic in the same way as the second. The glove cuff knitted with an elastic pattern can be of any width from 4 to 6 cm at your discretion.
Then proceed to knitting the main part of the glove. Knit the glove in half columns in circular rows in a spiral, i.e. do not make lifting loops, then the seam of the initial loops of the row will not be visible. For yourself, mark the sides of the glove where the thumb will be located and where the little finger will be located. Having knitted 2-3 circular rows with half-columns along the side near the side of the thumb, begin to make additions to expand the wedge of the thumb. To do this, in the next 5-7 rows, add one half-column at a time, knitting two from one loop.
When you knit in height to the base of the thumb in the last row, without knitting 6-7 loops to the edge, cast on a chain of 8-9 air loops and fasten it into the arch through 12-14 loops of the previous row. This creates a hole for the thumb, which is knitted last.

Before you start knitting the fingers of the glove, calculate the loops for each finger. You can identify them by trying on the glove and noticing the loops on the inside and outside. To knit the little finger, attach the thread from the side of the palm, make 3-4 air. loops and attach the arch to the back of the glove. Next, knit half columns in a circle to the height of your little finger.

Closer to the tip, make decreases on both sides of the finger to narrow it. When you have knitted your finger to its full height, close the loops by knitting single crochets in a circle - one of the two loops. When the hole narrows, cut the thread and secure it by pulling the tip through the loop. Insert a needle into the remaining tip of the thread and mend the remaining hole, thread the thread on the wrong side.
If you look at your hand, you will see that the fingers are located at different heights - the first little finger, the index finger a little higher, and the middle and ring fingers at the same level. Therefore, after knitting the little finger, return to knitting the main part of the glove. Taking the remaining thread to work, knit one circular row with half-columns along the inside, the arch at the base of the little finger and the outside of the glove. Now you can knit the ring finger. Attach a new thread to the inside, tie a chain of 4 chains. loops and secure the arch on the outside.

Knit half stitches to the height of your finger, narrow it at the top, making decreases along the sides. Finish the knitting in the same way as on the little finger - make decreases by knitting two single crochets together until the hole narrows to a small hole.
Take back the remaining main thread and knit one round row through the arch of the ring finger. Next, attach the thread for knitting the middle finger. If you get a large hole for your finger at the base, then make decreases in the corners, knitting two half-stitches together.


