A well-designed and neatly knitted collar plays a big role in the design of the product, as well as in creating your appearance. Collars can make your neck appear “shorter” or “longer”. When choosing a collar for a knitted product, you should take into account the texture of the knit, pattern and ornament. Collars can be knitted separately, or they can be entirely knitted.
Stand collar
A stand-up collar can fit tightly around the neck or be looser. Having made all the parts of the product, we assemble the loops for the stand-up collar. We start casting on from the middle of the back and knit in garter stitch to the desired height. After this we make a fold line. The fold line can be decorated with teeth. We knit the second half of the stand with knitting needles of a smaller diameter, repeating the rows in the reverse order and increasing the knitting by one row. We close the outer loops of the collar with a “pigtail”. We sew the edge of the second half of the collar along the front side of the work.

Roll collar
It is convenient to cover the neckline of the half-cord with stocking tape. After the half-over is already sewn and the neck loops are closed, we cast on an even number of loops from the wrong side, along the edge of the neck, pulling them out of the fabric. We knit the binding using stocking stitch, 4-6 cm wide. The last 2-3 rows are used with paper thread. Without closing the loops, remove the knitting from the knitting needle and iron. Fold the binding in half and baste it to the front side. We unravel the rows knitted with paper thread, and sew the opened loops to the neck of the half-cord at equal intervals. In this case, the edge will be smooth. It can be decorated with cloves.

Ruffle collar
This collar can be knitted in 2 ways.

1st method
For the sample, cast on 30 loops and knit:
- 1st row - knit 1, purl 1, etc. to the end of the row;
- 2nd row - 1 chain stitch, 1 knit stitch, 1 chain stitch, 1 purl stitch, etc. to the end of the row (an air loop is made by knitting a loop between the loops or a yarn over (in the wrong row we cross the yarn over);
- 3rd row - chain 1, knit 1, chain 1, purl 3, etc. to the end of the row;
- 4th row - chain 1, knit 3, chain 1, purl 3, etc. to the end of the row;
- 5th row - chain 1, knit 3, chain 1, purl 5, etc. to the end of the row;
- 6th row - chain 1, knit 5, chain 1, purl 5, etc. to the end of the row;
- 7th row - chain 1, knit 5, chain 1, purl 7, etc. to the end of the row;
- 8th row - chain 1, knit 7, chain 1, purl 7, etc. to the end of the row;
- 9th row - chain 1, knit 7, chain 1, purl 9, etc. to the end of the row;
- 10th row - knit 9, purl 9, etc. to the end of the row.
Using the knitted pattern, we determine the required number of loops for the ruffle in the neckline. Then we knit the collar using circular knitting needles (or on 4 knitting needles).
2nd method
We cast on an amount equal to twice the number of loops along the neckline (when casting on the edge, we pull out the loop between the loops), and knit 1.5-2 cm of 1×1 elastic.
- 1st and 3rd rows - 1 purl, 1 knit, etc. to the end of the row;
- 2nd row - purl 1, knit 2 together, 1 yarn over, etc. to the end of the row;
- 4th row - purl 1, yarn over 1, knit 2 together, etc. to the end of the row.
Next, take knitting needles 0.5 mm larger and knit the pattern again from the 1st to 4th rows. Having knitted the required height, we close the loops on the front side with purl loops. Iron the finished ruffle and carefully sew it along the neckline or fastener.
Sports turtleneck
On the pattern of the front and back of the sweater, draw a line parallel to it 1.5-2 cm below the neck line. If the sweater is raglan cut, do not forget to mark the same line on the sleeve pattern. When knitting the details of the sweater, close the loops tightly along the new line. Sew the sweater, measure the neck line and calculate how many loops you need for the collar. Using a 1×1 elastic band, knit a collar 12-16 cm high on round knitting needles (cast on an even number of stitches) or on regular knitting needles (odd number of stitches). After this, take knitting needles one full size larger and knit the knit stitches of the elastic with knit stitches, and string the purl stitches onto an additional knitting needle. From this moment on, the collar seems to fall apart, a stand is formed, each part of which is knitted separately. In this case, the purl loops of the back part of the stand are also knitted in knit stitch, but 2 more loops are added on both sides of the row. The height of the stand should be no more than one and a half centimeters, the front part is 1-2 rows longer than the back. Knit the last 2 rows of both parts of the stand with paper thread (these rows are temporary, then they unravel).

The collar should be round. Therefore, if it is not knitted on round needles, stitch it and sew both parts of the stand separately (except for the rows knitted with paper thread). Iron the post without touching the elastic. Insert the neck of the sweater between the 2 parts of the stand; apply the back of the stand to the wrong side of the sweater. Undo the loops connected with paper thread, sew the opened loops with a “back needle” seam (Figure 461).

Then baste the front part of the collar stand to the right side of the sweater. Having unraveled the rows connected with paper thread, sew the opened loops with the same seam. This way, the neck of the sweater will be hidden in the collar stand.
Collar with decorative corners
Such a collar and cuffs will decorate a dress and blouse of the simplest style, the simplest knit. They are knitted very tightly in a garter pattern (all rows with knit stitches).

First of all, measure the length of the neckline, add 2-3 cm for the fit and 9 cm on both sides, this will be the width of the collar. Let's say the neck length is 36 cm, which means the collar width is 36 cm + 3 cm = 39 cm. The collar height is 9 cm. This means you need to cast on 39 + 9 + 9 = 57 cm. Knit a sample and determine the knitting density. We remind you how this is done: if there are 30 loops in the sample, and its width is 11 cm, then the knitting density is 30: 11 = 2.7 loops in 1 cm. Knowing the knitting density, it is easy to calculate the number of loops for the first row: 57 x 2.7 = 153.9 loops, or 154 loops. Cast on the loops of the initial row with a thick thread, knit the next row with a regular thread. On both sides of the row, nine centimeters from the edge, mark with a colored thread along the loop, near which you will need to lower the loops to get right angles (Figure 463).

You need to decrease in every second row, knitting two loops together in front and after the marked loop (it is knitted with a knit stitch on the front side of the work, and on the wrong side of the knitting, the thread is removed without knitting before the removed loop). You need to decrease until the loops on the side of the collar run out. Then, in short rows, without tying 3-4 loops on both sides, knit 2-2.5 cm, after which close the loops tightly. Iron the collar and sew it on. You can knit the cuffs in a similar way.
V-neck
We begin knitting the cape-shaped neckline at the same height as the armhole. We divide the front of the half-vera into 2 parts and knit each separately. In each row, from the neckline side, we make decreases to the shoulder line. Sew the shoulder sections. Cast on stitches around the neckline using 3 needles, starting from the seam on the left shoulder. Mark the loop in the middle of the cutout. Knitting in a circle (about 3 cm), decrease (make one from 3 loops) along the 1st loop to the left and right of the central cutout. Having knitted the bar to the desired height, we close the loops with a “braid”.


Bob neckline
We cast on the loops of the back, front and 2 sleeves on 4 knitting needles and knit with a 1×1 elastic band, decreasing the 1st loop in each row (you can do it in every 2nd row). Having knitted the cutout of the required height, we close the loops with a “rope”.

Opash collar
Having tied the shelf to the neck, remove the strap loops with a pin and finish the shelf according to the pattern. The neckline is made with partial knitting. When the shelves are ready, we sew them together. We remove the loops of the strap (on the right shelf) from the pin onto the knitting needle, then knit them. Using the same knitting needle, along the neckline and sprout, we cast on the loops for the collar. Having knitted to the left shelf, we transfer the loops of the bar to the knitting needle and knit the row to the end. Next, we finish the collar with the main pattern, keeping the placket pattern along the edges. You can knit the entire collar with a stripe pattern.

Shawl collar
The shawl collar is knitted simultaneously with the front in the vertical direction or by picking up loops from the edge row of the front in the horizontal direction.
The finished collar is sewn to the product.

Size 44
Knitting machine of any type, class 5
You will need: yarn in bobbins (50% wool, 50% acrylic) - 700 g. 4 shades of blue, thickness 31x2 in 4 folds.
Design: fitted silhouette.
Density on the carriage - 4, Pg on the sample - 3.5 p. = 1 cm, Pv on the sample - 4.5 rows = 1 cm.
Back
Start knitting on 148 loops. Knit 1.5 cm in double stitch, or 3 cm in knit stitch. satin stitch and make a hem. After the shift Smooth transfer stitches to base stitch. needle bed, continue knitting faces. cooler stitch, adding 1 stitch every 47 rows 4 times + 2 rows (= 190 rows). Decrease 1 stitch every 6 rows 11 times. Knit, adding 1 stitch every 8 rows 11 times + 2 rows (= 90 rows).
Armhole: close off 4 stitches at once, decrease 1 stitch every 2 rows 10 times (= 20 rows). Knit straight 16 cm = 72 rows. Using the partial knitting method, knit the neckline simultaneously with the shoulder bevel.
Neck mode: from the “O” needle in both directions, close 18 stitches at once, then decrease 1 stitch each row 6 times.
Shoulder mode: decrease 4 loops every 2 rows until the end of knitting the part. Knit the second shoulder in the same way. Before: knit similarly to the back, but from the beginning of knitting the straight section of the armhole, knit the neckline.
Mode: decrease 1 p. every 3 rows 24 times. Total number of closed loops for the neck (from “0” needle) = 24.
Sleeves:
Start knitting on 84 loops. Knit in double stitch 1.5 cm, transfer stitches to the main needle bed, knit. stitch stitch, adding 1 stitch every 11 rows 17 times + 7 rows (= 194 rows).
Roll: cast off 4 stitches at once, then 1 stitch every 2 rows 30 times (=60 rows) and 3 stitches every 2 rows 6 times. Cast off the remaining stitches immediately.
Collar:
On 200 needles, start knitting, knitting faces. satin stitch 23 cm = 104 rows. Knit with waste thread (BN) 6 rows. Remove the part from the machine.
Assembly:
Sweep and steam the parts. Sew the main seams On the front, according to your figure, baste 3 pintucks on each side and stitch them. You can sew 2 waist darts on the back. Steam the collar, stitch both sides, unravel the BN and pin along the open loops to the base. It is better to make the seam of the collar in the back center.
clamp
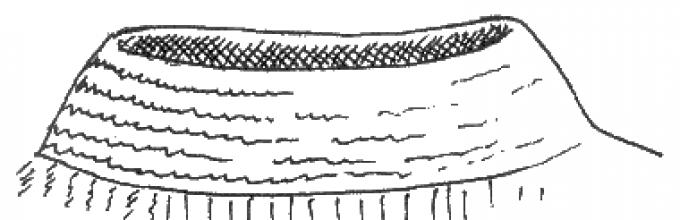
The shapes of the collar collar are extremely diverse: there is a large collar lying in soft folds (Fig. 1), a small one adjacent to the neck (Fig. 2), and a “collar” in the form of a hood (Fig. 3). The ways of doing it are also varied. Here are some of them.
Rice. 1 – 3 “Yoke” lagging behind the neck; fitted cowl collar; "collar"-hood
A “collar” that lags behind the neck (see Fig. 1) Knit it from the bottom edge of the collar in the form of a rectangular fabric (Fig. 4). It should be soft, so you need to knit with thick knitting needles and preferably with garter stitch - the errors of loose knitting are less visible on it.
Rice. 4 Pattern of a “collar” lagging behind the neck
After knitting the collar, finish it with several rows of auxiliary thread and iron the edge along the sewing line. Sew the fabric, fold along the seam and mark the opposite fold. After this, weave the auxiliary thread and baste the collar to the wrong side of the product (neck loops should be closed). Next, weave 1 row of woolen threads from the collar and attach it to the inside of the neck.
“Yoke” adjacent to the neck (see Fig. 2)
Apply a new neck line to the base pattern of the back and front; for an adjacent collar, it is enough to place it below the main one by 1.5 cm (Fig. 5).
Rice. 5 Pattern of an adjacent collar “collar”
Start, work - the lower edge of the collar. The knitting direction is shared. Having knitted several rows of garter stitch (edge), go to the main pattern, in this example finely stitched, and knit, making decreases (see signs - in Fig. 5). When the height of the collar becomes 10-14 cm, change the pattern to 1X1 elastic (the number of loops is the same, and the number of knitting needles is one less) and, knitting 3-4 cm, finish the work with several rows of auxiliary thread.
Remove the knitting from the knitting needle, iron along the sewing line and sew the side edges of the collar. Then fold along the seam and mark the opposite fold with colored thread. Next, weave the auxiliary thread and pin the collar to the model so that the seam coincides with the middle of the back, and the color mark coincides with the middle of the front. The neck loops must be open. Now weave 1 row of woolen threads from the collar and connect it to the neckline with a loop-to-loop stitch.
“Clamp” in the form of a hood (see Fig. 3)
On the base pattern of the back and front, draw a new neck line (Fig. 6). When knitting the product, leave the neck loops open. Make the collar in the transverse direction in the form of a straight fabric, starting and ending with an auxiliary thread. You should knit loosely, preferably with an elastic band, such as an English one. Having finished the work, iron the edges with the auxiliary thread, weave it and connect the open loops of the collar with a loop-to-loop stitch (for elastic bands). When seating, sew the collar to the neckline.
Rice. 6 Pattern of the “collar”-hood
Hood-collar (Fig. 7)
Often in sewing, the shape of the hood is modeled directly on the head, placing the fabric in intricate folds. There are also traditional forms of hood: classic, anorak, bonnet, hood-collar.
Rice. 7 Hood-collar
In knitting, along with the classic hood, which resembles the heel of a sock in shape, the hood-collar is especially common. There are several ways to do this. Here is the simplest of them.
The neckline on the base pattern for the back and front remains unchanged; only the dimensions of the fastener bar and hood are outlined (Fig. 8a). Knit the back and front pieces, leaving the neck loops open. Sew the product, put the neck loops on one knitting needle and, starting from point A, knit 1 row with knit stitches along the front side of the work. Slip the loops up to point A onto the right needle without knitting. Next, make the hood with a placket pattern, such as garter stitch, adding loops in the middle of the hood at the back (see + signs in Fig. 8a) or along the edge of the hood (Fig. 8b). When the height of the fabric reaches 35-38 cm, finish the work with an auxiliary thread, after ironing, unbraid it and sew the open loops with a loop-to-loop stitch.
Rice. 8 Knitting the hood: a - adding loops along the midline of the back of the head; b - adding loops along the outer edge of the hood
Practical advice
The “collar” adjacent to the neck can be made not only in the lobar, but also in the transverse direction; the loops of the pattern in this case lie on the collar “sideways” (Fig. 9).
Rice. 9 Cross-knit cowl collar
The fit to the neck is achieved by partial knitting: on the side of the sewing line, every 2 cm, either 1/4 or 1/3 of the collar loops should be left unknitted (Fig. 10).
Rice. 10 Using partial knitting when making a collar
The “collar” of stocking stitch (Fig. 11) is made using partial knitting.
Rice. 11 Cowl collar in hosiery knitting
On knitting needles No. 2 or 2.5, pick up loops of double collar height (36-38 cm) and every 2 cm on both sides of the fabric do not finish 6 times with 4-5 loops, which results in small darts with a depth of 12 rows each (Fig. 12 ).
Rice. 12 Neck shape and hosiery collar pattern
When the side edges of the fabric become equal to the circumference of the neck (47-48 cm), the work is finished with an auxiliary thread (you also need to start with an auxiliary thread), removed from the knitting needle, ironed, the auxiliary threads are woven and joined with a loop-to-loop seam. The edge of the neck is tucked between the collar fabric, basted, and then the collar is sewn with a hidden seam, first to the wrong side of the model, and then to the front.
This topic, in my opinion, is very relevant and in demand. To begin with, I want to duplicate here the description of knitting an English collar for a jacket and coat. Actually, of course, it is suitable not only for them, but it just so happened that the girls were interested in these particular models.
“Now about the collars, or more precisely, about the English collar, because this is what is on both models of interest.
to photo hosting →
Just a trapezoid will not help here; there are a few more tricks. The English collar refers to open collars, i.e. The shelf with it, as a rule, is not fastened all the way. In this case, the middle of the collar is made 1.5 cm wider than the edges (red line 1-7-2 in the drawing). In closed collars (for example, shirt collars), on the contrary, the middle of the collar is narrower (blue line 1-4-2). To calculate the CV along the neck line, divide the segment (1-2) into 3 approximately equal parts and make a tie in the middle of the collar (for an open collar) or in the corners (for a closed collar). You can knit the collar separately, or you can tie it to the neckline - there are different options here. Again, on a single-layer machine it can be made either double - with a collar (thinner than the top) or single-layer, but with a border so that the edges do not curl. Edging can be done by machine or by hand - it depends on the model and yarn. On a double-face machine, the collar can be immediately made single-layer so that it does not curl, using, for example, rep (double-face knitting). The ends of the collar can be made in the form of right angles (including points 5 and 6), they can be extended with sharp angles, or they can be made obtuse. As a rule, these little things are very clearly observed in men's fashion - in jackets and shirts, pay attention to it if you want, ignore it if you want, this is a personal matter - you knit for yourself.
In addition to the shape of the collar, its fit will be greatly influenced by the density of knitting. In order for it to lie neatly, you need to knit looser along the flight line than at the neck line, at least 2 units, otherwise the edges of the collar will be pulled together.
Thus, for a jacket, you need to cast on the required number of loops along the neckline (not reaching the edges of the lapels), knit an overlay in the middle of the collar (with this width it will be 1.5-2 cm, gradually increasing the number of overlay loops, then knit, switching twice density by a larger number after approximately the same number of rows. At the end of the loop, close loosely without tightening the edge; if necessary, crochet the collar around the perimeter to reduce the curling of the edge - this is provided that the collar is made on a single-loop machine of the 3rd. class or through a needle (otherwise it won’t work out of such shaggy yarn).
The collar on a cardigan should be done in the same way. "


