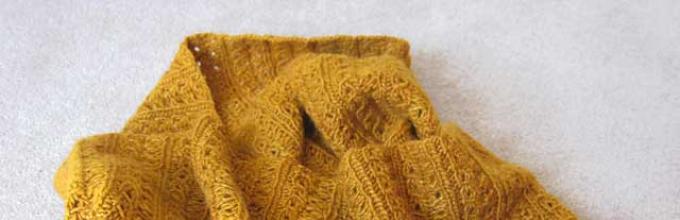
The most popular warm neck decoration in the last few years can be called the figure eight scarf. It is also called snood, scarf-collar. Indeed, it looks like a pipe or canvas combined into a ring. You can wear it in different ways: on the head as a hood, simply draped over the neck, with a brooch, in a figure eight fashion - wrapped twice around the neck.
The peculiarity of this scarf is its versatility and splendor. It suits a lady of any age. It has the ability to transform a woman’s appearance, making it modern and youthful.
All types of yarn are suitable for knitting this type of product; you can use any pattern and color you like. It can be plain yarn or mixed colors, melange, fancy, in general, it all depends on your preferences.
Depending on the purpose, this accessory can fit perfectly into an evening outfit, warm you up in cold weather, and transform your appearance on cool summer days.
Knitting methods:
- Knit a regular long scarf using a complex pattern or simple knitting, sew it into a ring;
- Knit a scarf on circular knitting needles;
- Knitting elements according to different patterns and then combining and weaving them together.
Let's look at examples of the possibilities of knitting a figure eight scarf.
Knitting a figure-eight scarf
How to knit a figure eightYou can knit a long rectangle and then stitch along the edges. The length and width of the rectangle will be different for each model, the size of the canvas depends on your size. You can start knitting a rectangle with a short or long side, use one pattern, or combine several pattern patterns. In our example, we start from the smaller side of the rectangle.
Yarn consumption will depend on the knitting density and the size of the product. This model will appeal to beginner needlewomen; the level of complexity is low. A simple scheme is used, no special skills are required.
Approximately you need 3-4 skeins of yarn 50 g/90 m, knitting needles 5 mm, hook.
Job description:
Cast on 48 stitches on the knitting needles and knit with an elastic band according to the 2x2 pattern, alternating knit and purl stitches. The wrong side is according to the drawing. Thus, we continue 10 rows, in the eleventh row a cross is made: we remove the first 12 loops onto an additional knitting needle, leave it before work, knit 12 loops with an elastic band, then 12 loops from an additional knitting needle with an elastic band according to the pattern, continue knitting according to the pattern. From 12 to 20 rows are performed with a 2x2 elastic band.
In the 21st row we again make a cross on the other side of the canvas. Having knitted the first 24 loops with a 2x2 elastic band, remove 12 loops onto an additional knitting needle before work, knit 12 loops according to the pattern, knit 12 loops from an additional knitting needle. So, we have connected a section with two intersections, the next intersections will be repeated in the same order.
After every 10 rows connected, a cross is made on one side or the other of the fabric, according to the drawing. The length of the product depends on your desire. The number of such crossings may vary, but there must be an even number of times. After completion, we close all the loops and connect both edges of the fabric, sewing them together with a knitted seam; first, one of the ends must be twisted.
Making a scarf using circular knitting needles according to the pattern

This model is very airy and pleasant to the touch, fits beautifully on the shoulders, gently envelops the neck, and creates an elegant look.
For a scarf up to 1 meter long and 35 cm wide you will need:
- circular knitting needles No. 6, the length of which is at least 60 cm;
- 3 skeins of yarn 200 m / 100 g;
- yarn needle.
Having cast 252 loops, knit the first row and close the loops in a circle. Then continue according to the following scheme:
1 row: Rapport: k1, purl 1, knit 3, purl 2 is repeated until the end of the row, in this and each subsequent row knit the last two loops knit 1, purl 1.
2nd row: 1 knit, 1 purl, 1 knit, yo, 1 knit, slip 1 loop without knitting, pull 2 purl loops purl through the slipped loop, repeat until the end of the row.
3rd row: 1 knit, 1 purl, 2 knit, 3 purl.
4 row: 1 knit, 1 purl, remove 1 loop without knitting, pull 2 knit stitches through the removed loop, 1 purl, yarn over, 1 purl.
We continue the subsequent knitting according to this pattern until the height of the product is 35 cm. Close all the loops and hide the threads.
Knitting a scarf woven into a braid

 Braided scarf
 Difficulty level: easy. An unusual scarf consists of three elements knitted with yarn of different colors; you can use plain yarn. You will need size 5 knitting needles, circular or regular. Using circular knitting needles, you can get smooth, plain knitted tubes without a seam. You can also use ordinary knitting needles, after finishing knitting the product, it will need to be sewn along the edges to get a pipe.
For each of the three elements, we cast on 22 loops and knit a pipe or fabric of the required length, on average up to 1.5 meters, in a circular stockinette stitch. You can experiment and knit these details with purl stitch rather than knit stitch. After this, you need to sew the ends of the 3 parts together, weave a braid, fasten and combine the ends of the scarf into a ring.
A woman will look beautiful in any of these hand-knitted scarves. These accessories will perfectly warm you up and make your look interesting and unusual. By experimenting with patterns, textures, size and volume, you will certainly achieve success with others.
Elongated stitches are knitted similarly to double crochet or single crochet stitches, but an air loop is knitted inside the stitch. The fabric knitted with such posts is tighter than knitted with ordinary posts.
Long single crochet
Initial chain of air loops: 2 lifting loops, the first stitch is knitted into the third air loop from the hook.
Insert the hook into the loop, grab the working thread and pull it through the loop. There should be 2 loops on the hook. Knit a chain stitch through the first loop on the hook.
Elongated single crochets, knitting an air loop
Again there should be 2 loops on the hook. Knit a stitch by pulling the working thread through the remaining 2 loops. Next, knit stitches into each stitch of the row.
Long double crochet
Initial chain of air loops: the first stitch is knitted into a quadruple air loop from the hook (3 lifting loops).
Yarn over, insert the hook into the loop, grab the working thread and pull it through the loop. There are 3 loops on the hook.

Extended double crochet: knitting an air loop
Then work a chain stitch through the first loop on the hook. Knit a loop and yarn over.

Extended double crochet: knit a loop and yarn over
Finish the stitch by knitting the remaining 2 loops on the hook.
Posted by admin Ninel
Today in two ways. Typically, such loops are used for finishing knitted items or for women's berets and children's hats, and so, let's get down to the technique, knitting long loops with two options and choosing your favorite.
Knitting long loops is not a quick task; later, in practice, you will understand why.
The point here is that each long loop must be pulled out, twisted around the thread and then knitted with a knit stitch. This is in the first version.
In the second version, the technique is slightly different; it requires skill in twisting the thread around your fingers. But such long loops are worth the hassle. Agree, long loops look interesting in products.
So, the first option.
Knitting long loops with knitting needles - option No. 1

Row 1: knit stitches
Row 2: purl stitches
The first ones for the row are knitted like stocking stitch, and then the fun begins. :))
Row 3: knit a knit stitch and do not drop it from the knitting needle, but use the fingers of your left hand to pull out a long new loop.

Knit facial loops with facial loops. And so knit along the entire row.

All even rows are purl stitches. All odd rows - knit as the 3rd row.

We knit long loops with knitting needles - option No. 2
You can also learn to knit long loops in another way. This knitting method is usually used for hats.
As usual, cast on stitches and from the beginning of knitting: knit three rows in garter stitch.

Insert the right knitting needle into the next knitting stitch and use its end to grab the long loops wound around your fingers. The next stitch is a knit stitch. Knit like this until the end of the row.
Row 5: knit stitches, including 3 stitches knitted like 1 stitch.

So, today you learned how to knit long loops with knitting needles, and also in two ways.
Quite an interesting knitting. You can use it as a finishing for a knitted product, you can knit a baby hat. But knitting long loops with knitting needles will require maximum patience, because the long loops themselves are not knitted very quickly.
A knitted cardigan is a universal wardrobe element that can be combined with trousers, skirts, and shorts. You can buy it in most stores, but it’s much nicer to have a unique item, and for this you have to knit it yourself.
Knitted cardigans for women models photo and description
Cardigan is a wardrobe element that consists of a back and two front parts. Worn like a jacket - on the shoulders.
A cardigan can be with or without fasteners, with buttons and even zippers, have a belt, a hood, and different types of pockets - patch, hidden, lowercase.
Nowadays they are considered very fashionable things over size– i.e. larger than it actually is. Therefore we consider long, large and loose cardigans. You'll have to knit a lot of fabric, but it's worth it! The main thing is to find a color that suits you. The good thing is that when you knit something yourself, you can choose any pattern, color and yarn. You can make a collar and sew pockets on the finished product. Stylish women's products and patterns with descriptions are waiting for you below! 

Knitted cardigans with knitting patterns for girls 2018
Let's start knitting stylish cardigan with knitting patterns
, which will be in fashion in 2018. Dimensions of the future product: chest circumference 112, length 82, sleeve length on the inside 24. We knitted 450 grams blue / blue colors, white shade – 200 g, 250 black And pink. Don't forget the main tool - knitting needles number 6 or 7, depending on the thickness of your yarn. Advice!!! It’s better to fold the thread in half. 
Popular articles:
Pattern used in the work: « Prostitute": L.P., I.P., the pattern in this pattern shifts by 1 P. in each R.
Job description: we start with backrests. We take two threads at once: white and blue / dark blue - 58 P. - tangle, but in the next P. - alternate colors: 4 cm G.C. (blue color) and B.C., 9 cm G.C. and R.Ts. , 8 cm – G.Ts., B.Ts., 8 cm – G.Ts. and Ch.C., 10 centimeters G.C. and R.Ts. Completely combine black and blue. At 3 cm - P.R. 1 P. on the sides. P.R. every 5 cm*14. At 77 centimeters, close to form shoulders in each 2 R. on the sides 6 P. * 6. All P. that remain are closed at once.
The left and right fronts are knitted similarly. Left: G. and B.Ts. – 58 P. – with a tangle, as in the description above. 3 cm to the right P.R. 1 P.P.R. every 5 cm. At 77 centimeters, in order to make a bevel, close on the right in each 2 R. 6 P. * 6. When there are 5 P. left, dial P. Knit according to pattern until you reach the middle of the neckline from the back.
For bevel:
after 4 cm P.R. 1 P. from each side. Repeat P.R. every 2 centimeters*7. When the canvas measures 24 cm, close all the loops.
To assemble the product beautifully and evenly, stretch it flat, moisten it with water, and wait for it to dry. Lay it out like on the pattern and sew all the details.
Knitted cardigan for women with description and diagram
The cold weather is coming, which means it's time to warm up. The next option is a knitted cardigan with blue patterns. It will turn out very soft and warm. The detailed master class below will tell you how to make such a fabric, what the pattern should be. So, we take about 500 grams of blue thread, regular and 6 mm circular knitting needles.
Patterns at work:

Work begins with knitting backrests: 66 P. – R. 1*1 3 cm. Next - I.G. 8 R. After – P.R. on both sides P., in each 10 R. 1 P. * 5, in each 8 R. 1 P. * 2, in each 6 R. 1 P. * 6, in each 4 R. 1 P. * 4, in each 2 R. 1*1 P., 2 P.*3, 3 P.*2, 4 P.*1, 5 P.*1, 6 P.*1, 7 P.*1. Count from the beginning of the elastic
66 centimeters on each side we close 3 P., in each 2 R. 3 P. * 19, 2 P. * 6. After 10 cm – central 10 P. – close. As usual, with this technique, the two sides are knitted separately. Here in every 2 R. we close 2 P. * 2. From the beginning of R. 1*1, count 86 cm - close the work.
The left and right fronts are knitted symmetrically, as in the option above. 34 P. – 3 cm with elastic band. Further I.G. 40 cm. W.B. on the left 1 P. * 9 in each 10 R. We knit in the height of the back, close. We collect as usual
, only for strip 197 P. on circular tool L.G. – 7 cm.
Cardigans for obese women knitted with patterns
Beautiful cardigan (female) knitted with a description and knitting pattern we are waiting for you in our next master class. It will require about a kilogram of yarn, our color is brown.
Patterns at work:

Knitting back:
91 P. = 4 R. with double elastic band, 12 R. - R. 1*1. Next is the main pattern, on the sides K.P., U.B in 1 R. 30 P., after 43 cm - close 2 P. on both sides. After 15 cm - close.
Right shelf
(left - similar): 59 P. - 4 R. with double elastic band, 12 R. - with 1*1 elastic band. (the first 3 P. – double P). Next, 3 P. with a double elastic band, 21 P. with a simple elastic band, following the pattern, 23 P. - the main pattern. At the same time, W.B. in 1 R. 12 P. In every 10 R. we will make 2 shortened R.: 1 R.: 23 P. - basic. pattern, turn the work over. 2 R.: 23 P. main. pattern, turn it over. 3 R.-10 R.: 47 P. according to the drawing. 11 R.: rapport with 1 R. After 36 cm in every 6 R., two UK.R.: 1 R.: 23 P. - main, turn over. 2 R.: 23 P. – main, turn over. 3 – 6 R.: 47 p. according to the drawing, 7 R.: rapport 1 R. After 43 cm - close 2 P. on the left, after 15 cm - all P.
Sleeve:
45 p. – 4 R. with double elastic band, 12 R. – R. 1*1. Next is the main pattern, U.B. in each 1 R. 6 P. Close the P. - after 48 cm.
We collect as in MK above!
For the collar, 3 P. with double elastic, 21 P. with regular elastic, 97 P. with the main pattern, 21 P. - R. 1*1, 3 P. - with milking elastic. In 6 R. - 2 UK.R. After 15 cm - double R. Close. 
Stylish knitted coats and cardigans with patterns
In 2018, beautiful knitted items will come into fashion.
It's easier to buy them. But tying it yourself is a pleasure. 


Knitted cardigan for girls with knitting needles with description
Beautiful and simple openwork cardigan – a new trend of the season for little fashionistas. Little girls look very beautiful in such a thing. Our video lesson on knitting such a product is for you:
Beautiful knitted cardigans
How to tie cardigan LaLo knitted for beginners – diagrams with a description of the work will teach you this simple but entertaining process! The pattern is knitted strictly according to agricultural standards. Both knitting needles and a crochet hook are suitable for this work. We dial an odd number of P. Repeat the actions in brackets.

DIY knitted cardigan
Beautiful knitted cardigan from the pattern " Honeycomb" 1 kg 250 g of beige melange yarn, circular knitting needles and buttons.
Patterns:

Product creation:
Back: 86 P. 13 cm elastic band. Then a honeycomb pattern with K.P. 21 times rapport, R. finish K.P. After 66 cm ort of the beginning of knitting, we close 4 P. * 1 on both sides, in each 2 R. U.B. 30 P.*1. So: after K.P. 2 P. together with a broach, at the end of R. in front of K.P. – 2 P. together. Close 26 P., which remained at a height of +27 cm.
The right and left fronts are knitted similarly. 46 P. with an elastic band 13 cm. After - honeycomb, P. distribute as follows: K.P., 9 P. rapport, 8 P. - R., K.P. After 39 centimeters from the beginning of the fabric, we set aside 6-30 P. The burlap pocket can be knitted separately, or here 25 P. 15 cm L.G. On the right is a bevel for raglan. Measure 70 cm from the beginning of the fabric - neckline. Left last P. honeycomb pattern with 1 P. planks - together. In every 2 R. do this 7 more times. For 8 P. strips – 10 cm R. 1*1.
Sleeves:
50P. – 8 cm with elastic band. Honeycomb pattern, where P.: K.P., 12 P. rapport, K.P. P.R. – in each 6 R. 1 P. * 10, in each 6 R. P. * 4, in each 4 R. = 1 P. * 8, 1 P. * 10, in each 2 R. P. * 4. These P. are a pattern of honeycombs. W.B. after 40 cm.
How to knit a long cardigan vest master class video


