For boys, the needles are a real pleasure for master. Especially if the boy is only two years old and the size of his clothes is quite small. Such products knit in one breath, it is impossible to get tired of them, and the result is visible in a few hours.
A few words about yarn
Selecting the material for knitting children's sweaters, should be understood how appointing these products. If they are needed at a time, for example, on some holiday or photo session, a acrylic or other artificial yarn is quite suitable.
It is much cheaper than wool, but does not have the characteristics that are necessary for winter warm things. At the same time, the sweater for the boy, the knitting knitting, designed for walking in the fresh air, should be definitely warm, "breathable", easy and, of course, beautiful.

Traditionally, children choose yarn from alpaca or merino wool. These materials are distinguished by high quality and considerable price. However, for the baby, quite some yarn (literally 300 grams) will be required.
You can also use sheep wool mixed with acrylic or cotton.
How to work with instructions?
Often, sources offering for the boy with knitting needles, specific data on the density of the canvas, as well as the number of loops and rows. This is relevant only for those masters who plan to use exactly the yarn that was applied by the author of the model.
In the case when the thickness, composition or twist is different, all parameters will be different.

Making sample
To understand how many loops are recruited at the beginning of work, you need to link a small fragment from the yarn, which was selected by the craftswoman, and using a specific pattern. Then the sample is erased, dried (so that it takes his real size) and measure. The data obtained will be used to calculate the product. For example, according to the sample, it came out that 10 cm of the web there are 22 loops (in width) and 18 rows (in height). It means that you need to dial 40x22 / 10 \u003d 88 loops to knit the details. This figure is only an example, because each craftswoman will have its own density indicator.
Knitting Details
Taking into account the resulting number, you need to dial the required number of loops on the knitting and check with five centimeters with rubber band. Here you can apply completely any pattern: 1x1, 2x2 or even a French gum.

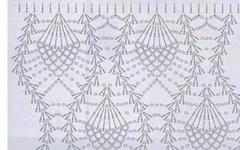
Here, an empty cell refers to a front loop, a square with a black point is an invalible. The icons illustrating the crossing give a visual concept of how many looping and in which direction should be moved.
If you take for the database used earlier, an example (88 PET), the sequence of knitting the first row after the gum will look like this:
1 14 facial, 58 in the pattern, 15 facial.
Instead of facial loops, you can apply almost any simple pattern. The main thing is not to peer and not get confused in drawings and schemes, otherwise the simple work will turn into infinite error correction.
Neck
Sweater for the boy with knitting knitting knit smoothly without additions and abbreviations. For the formation of the neck, they calculate how many loops should remain, add three or five to the formation of a round cutting and multiply this digit to two.
For example: 12 cm x 22/10 \u003d 26. This is the number of loops that will remain in the last row of each shoulder. They will add five more (they will be reduced in the first five rows after the closure of the neck loops and will make it possible to form a bevel ...
Total, the neck remains (88-31) x2 \u003d 26. Algorithm for the formation of a rollout:
- Peer 31 loop on the pattern.
- The next 26 loops are free to close or transfer to the auxiliary needle (or thick thread). When the details of the transfer and backs will be sewn, these loops will become the basis for the collar.
- Peer 31 loop on the pattern.
- Rotate work and perform 29 loops according to the ornament scheme.
- The last two loops to lie alone. In subsequent rows, so cut 4 loops, leaving 26.
- Knit the canvas to the desired height, then close all the loops (or move it on the auxiliary needle if the shoulders will shifted
- Similarly perform the second shoulder. Here cuts are made in the mirror reflection (at the beginning of the row). Sometimes the fastener is transferred to the shoulder, as in the photo at the beginning of the article. But, as a rule, it is inconvenient. It's easier to make ordinary sweaters.
Sweater boy (2 years old) with knitting needles can be associated with a simplified pattern, so you can not do the neck on the back of the back. After a rubber band, the web knit or the selected pattern and closes when it reaches the desired length.
Sleeve
Depending on the desire of the master, the details of the sleeves can be decorated with a pattern or be associated with a simple stroke.
It looks good and relatively simply running sleeves with one decorative element in the center, such as a large braid or weave braid. At the edges of the canvas, it is better to position the easiest pattern, because it will have to expand it.
Loop adding is evenly performed after the cuffs are finished. For example, the calculations showed that it is required to add 17 cm. This will be (17/2) x (22/10) \u003d 19 loops on each side. Since the height of the sleeve is also 19 cm, then through each centimeter the canvas should expand on two loops (at the beginning and at the end of the row).
Build product
When you are ready all the details, a sweater for a boy, knitted knitting, you can sew. First connect the details of the transfer and backs, then the sleeves are inserted, the loop is gaining a hinge (knitting it from 2 cm to 15 cm) and freely close all loops.
The described algorithm is perfectly suitable if you need to make a sweater for an adult man. In this case, the proportions and the size of the pattern will be different, but the sequence of work will remain the same.

The pattern can be located in the center of the details of the transfer, then along the edges there will be wide areas associated with a front stroke. Or a decorative ornament can be doubled.

It becomes small braids, which in the original version were framed for other elements.
How charming children in knitted blouses look. And so many different models of sweaters are for boys. Eyes run away from bright models and all sorts of schemes. Where to begin? About the most important details that should be provided for the Master when creating a sweater for a boy further.
 Any product requires patterns and schemes. These are the very first steps that Master must do. Next, based on the model, yarn is selected. After the needles and they should be in size (so the product will be densely and will last the initial shape for a long time).
Important!
In many master classes that are on the Internet usually specified and yarn and how much it is required for a certain size.
Close attention to the model itself and the pattern of the sweaters. If these are new-fashioned Arana, they will require additional needles (several). They will help not be knocked up and not to break the scheme special markers. On the intricacies of the choice of tools and yarn.
Choose good threads
Do not make a mistake in the choice of yarn will help knowledge. The first thing to pay attention is to make up. The knitter is worth knowing what each type of yarn is intended. Briefly about the most popular types and where it is better to apply:
 Woolen Yarn (Natural)- Perfectly suitable for creating scarves, hats, socks, sweaters. It includes such subspecies:
- angora;
- mohair;
- cashmere;
- smetland yarn;
- merino yarn;
- 100% wool;
- alpaca.
 Acrylic - It is already "artificial wool". Usually it is added to the wool yarn. To create warm things you need to choose the yarn with the composition of the acrylic of 10-20 percent;
 Cotton yarn - It is also a natural yarn and is more often used to perform summer things. But intended mainly for crochet;
 Linen yarn - View of natural yarn to create summer things, tougher yarn;
 Silk Yarn - It has a decent appearance, some overflows. In the heat, it retains the feeling of coolness. Suitable for creating not warm things;
 Viscose - Popular as "Artificial Silk". Applicable to create warm things, but it will be uncomfortable in heat;
 Bamboo - Excellent solutions for creating children's things. The yarn has antibacterial properties, very soft and hypoallergenic.
The second moment is worth considering is the thickness of the yarn, usually there is this information in master classes.
And the third is the threads themselves. They must be homogeneous, without breaks and various defects.
We select tools
 Experienced masters have already learned how to determine what the needles and for which thickness of the yarn fit. Beginners will help tips on packing with yarn. If there have been no such, you can ask the seller's advice. You can learn how to determine the desired size itself.
Important!
The basic rule: "The needker should be thicker than the thread by twice. To choose the size, you need to fold the sample in two threads and twist - it will be the thickness of one knitting needles.
Additional needles for making braids can also be different. There are very comfortable short with a fitted middle. Such in the work will not interfere and will not fly until the master performs the moster element.
 Markers exist different, but it is more convenient to buy bright and contrasting yarn options. They will help when counting the loops. For example, it is convenient for the same braids, there should always be equal to the number of loops and the marker helps in this.
Needle needles are not suitable for connecting knitted things.You will need thicker needles.
We need Merki
Knitted things, unlike others, do not require such scrupulousness in the meticulous dimension. You can use two ways to create a thing:
- measure as knitting, simply applying the product to your model;
- remove several measurements in advance and knit on them.
There is a table of typical sizes for boys.

Not always the child is growing through guests and therefore each indicator is better to merry.
How to shoot measurements for a sweater
For a sweater, you will need to remove only 6 measurements:
- What the length of the sleeve is needed - this is a measure from the point of the shoulder and to the wrist (be sure to hold the tape through the elbow).
- Neck girth - This indicator will help to associate the right size collar for a sweater. For measurement, the tape is applied and not tightened, it should freely make it easier around the neck.
- Length of the back. It should not always correspond to the length of the product, more often the sweater knit with a slight margin so that the back is always well covered. Plus additionally gum. The measurement itself comes from the bottom cervical vertebra to the waist line.
- Breast girth - at the chest level.
- Waist girth - if you need a strictly damned product.
- Cooking hips - important to create a gum so that the product does not pull and not too loose.
Now proceed to the consideration of popular knitting schemes.
Knit sweater for the boy with knitting needles: schemes with description
 Without a doubt, the most popular knitting schemes for a boy can be noted who loved everyone arana. No less popular models reglansMoreover, even simple pattern circuits can create a fashionable product. Add a thick, but soft thread to the usual sweating, and you can associate a creative model. Large volumetric buttons can serve as an excellent decoration element.
Children's sweater with a gate and a "braid" pattern
Sweater for a boy on height 110. The abundance of braids and a combination of a pearl pattern is very popular for the 2018 decisions for 2018.

Required:
- nako yarn Bambino 11.5 motels;
- spokes number 3.5 and 4.5;
- sewing needle.
Several schemes were used in the work.
Scheme number 1 is pigtails on the side of the direction and back, as well as the scheme of braids on the sleeves.

Scheme 2 is an ordinary pearl pattern, it dilutes the web of the sleeves and the side parts of the handle and the back.
Scheme 4 is a gum for cuffs.

Between the schemes contains an invalid surface.
First stage: Pad and back
On the knitting needles for this size you will need to dial 74 loops. Knit with rubber band 2 * 2. The height of the gum should be 5 cm. In the last row, it is necessary to evenly add a few hinges so that there are 82 loops on the spokes. Then we immediately go to the combination of schemes as in the photo. It is in the center - Scheme number 2. Bocames two schemes 1 and 3. The remaining side loops occupies a pearl pattern. Knit at the proposed schemes to a height of 37 cm. Next, in the next row, close for sleeves of 4 loops.
Important!
For children's products, a square prumtery is more often used.
The height of 43 cm begins the formation of the neck. No need to close the loops, you can simply transfer them to an extra needle. So then it will be easier to make a neat gate.
Separately, eliminate the right and left, observing the pattern of the canvas.
Similarly, to make a second item, it does not differ from the first.
Sew shoulder seams and with the help of circular spokes to eliminate the neck. It helps to avoid excess seam.
Second Stage: Sleeves
These sleeves will not have to sew. You just need to make a set along the edge of the ruble on the right and to the left of the canvas.
In the center of each sleeve three pigtails. For the left sleeves, three pigtails from the circuit number 3 and the number 1 scheme for the right. On the sides of the braids pearl pattern. Total for the sleeve you need to dial 62 loops. Refrigeration for the sleeve do according to the scheme: after 5 cm, it is reduced by one loop of each edge. After a length of 31 cm, go to the cuff. This is again a gum 2 * 2. So suck 5 cm and close the loops.
Third Stage: Assembly
Hide extra threads and just sew the sides of the sleeves and the transfer and backs. Ready sweater with original pigtails.
Pullover with buttons for a boy
A simple sweater of cauldron with a pattern of English elastic. Cuffs with rubber band 1 * 1, bottom and neck with rubber band 1 * 1. This is the same sweater. Which boy did not want to try on such a thing in the 2000s.

The sweater in which the main hero of the film "Brother" appeared on the screen. Sweater as Danil fit in simple schemes.

Simple cut and large thread.
Back and before connected without a prouch. Only a small neckline of the neck. For the transfer and back to apply the main pattern of the English gum. Cuffs and bottom products are 10 cm gum 1 * 1.
Collar - This is also a gum 1 * 1. On the edge of the collar make holes (Nakida) for buttons.
Sleeve Made also English rubber band. Such a simple model is now again in fashion. Therefore, all those who did not have time to try on such a sweater in 2000 can freely do it now.
Striped sweater for boy with knitting
Elegant wide strips are noble looking at a sweater for a boy. To the attention of the Needlewood, another trash is a model with comfortable buttons on the shoulders. For a child will be convenient to wear and shoot this model.

On a note!
Strips can be chosen and other colors - one bar takes 10 rows.
The scheme of this product is a simple facechair. For cuff sleeves from rubber 2 * 2. The bottom of the back and the transfer is also made with a rubber band 2 * 2-10 cm.
For backrest and passyou need to type 80 loops for growth 110 cm. Adds not needed, you only need to close 4 loops for the sleeves. Make a small sofa for the neck. In this model, the backrest and in the same way. After creating a handy and back - you need to arrange a line where the buttons will be further. You need to dial on the upper edge of the loop and check with a rubber band 2-3 cm. Do not forget to make two holes on the right and left shoulder.
Then need sew buttonssymmetric holes on the opposite side.
Button buttons and sew sleeves. Make side seams and try the sweater.
Jacquard Pattern Sweater
 A distinctive feature of such a contrasting sweater is a variety of smallest patterns. Contrast threads make them more expressive. Only painstaking work is worth it, because such a beautiful product can be made with their own hands.
For size 134/140, it is necessary 200 g of sand-colored yarn, 50 g of other colors.

Sequence of patterns A-D. Knit model facechair in Jacquard technique.
For size 134/140, you must dial 109 loops on the needles. Slit for the back and gum 10 rows and go to the canvas, adding 12 loops for each canvase. Slit 31 cm (for the back 33) and close the loops for the arm of the sleeve 8 loops. Next to check another 14 cm.
How to close the loop for the neck of the transfer / backrest:
- close the central 31p.;
- two times two loops in the following rows;
- one time one.
Sleeves:screw the needles 47 loops and 10 rows of gum. Add 8 loops in the last row. Go to the main pattern and facial smooth. Next, add in each 6th row on one loop. After 42 cm, close the loops.
Assembly: Make the shoulder seams and dial 108 loops under the booby. Make a neat collar with rubber band (these are 11 rows). Insert the sleeves. Make side seams for sleeves and products. That's all, the efforts are completed by a stunning result.
 No need to be afraid of complex elements. As soon as the most complex patterns are mastered, interesting works of any needlewoman begin. Therefore, do not stay only on creating simple options. In fact it turns out that the model that our view likes is not as complicated in the creation.
For a sweater, the boy is often used bulky buttons - it emphasizes the male character of the sweater.
Knit things very fun, and knit them nicely doubly. A sweater for a boy with knitting needles can be made in different ways. The child is suitable for a beautiful pullover with an open throat or a light sweater knitted from above the regulated. Today, cardigan, semi-peder and turtleneck are the most popular products that can be easily associated. You can also make a striped children's jumper. Sweatwood can be different. Many ideas, so why not realize at least one of them?
Knit things are very fun, but to knit their children is pleasantly doubly
Tie a thing for a teenager is not as easy as for small children, because their size is more versatile. The boys in 3 years have almost the same body parameters, so this scheme is exactly suitable.

Boys in 3 years have almost the same body parameters.
Work description:
- For a 3-year-old baby, it is better to pick up an average density yarn. At the first stage, it is necessary to calculate the amount of looping, which must be typed. The backrest and before fit so that the overall girth is 74 cm. That is, the back knit from 37 kettles.
- You need to check 3 cm of gum (as shown in the diagram). No need to do too wide gum. For novice craftsmen, it is better to choose a pattern easier, for example, you can alternate a face row with an invalible.
- When approximately 53 cm of the product is accompanied, you can make the product arm. To do this, several loops must be removed by sticking them together. It is not necessary to subscribe them in each row, how it is formed too big shoulder skeus and the sweater will be inconvenient.
- The second item above which you need to work is the front part. The number of loops for a set is the same, namely 37. Knitting is similar, however, a gate must be made. For 6 cm to the end of knitting, it is necessary to round the neck, reducing the number of loops from the center.
- Next ride sleeves. It starts knitting from the anterior gum, and then the amount of loops increases by the extreme Nakid. Increase the amount of looping is necessary in every 4 row.
Then the sleeves are sewn to other billets on the seam of the loam.
Simple sweater knitting regulated top (video)
Jumper for a teenager with her own hands: knitting for beginners
Teenage jumper should knit from threads of medium or fine density, as fat yarn is suitable for children's products.

Teenage jumper should knit from threads of medium or fine density
So, the scheme of work:
- Such a product knits with individual elements, which will then be sewn. The first element is the back.
- The measurements are removed from the teenager, then the sample is tied. This is done to determine the amount of looping.
- You need to make an elastic band so that the jumper sat well at the teenager. A rubber band can replace the plank knocked into a handy way. Its size is 5-8 cm.
- Next, there is a knitting of elastic band 2 on 2. When the back is tied to the arm, it is necessary to make a shoulder joint. To do this, the extreme loops are pronounced together for several rows.
- The second detail is the front of the jumper. Stops the same as the back.
- Next hoses are made. Loops for knitting each rusher are recruited from the shoulder seam.
- At the ends of each sleeve, there is a plank tissue.
- The last element of the jumper is a gate. To knit, the gate of the loop is gained over the edge loops of two blanks - backs and transitions.
- You need to check 12-15 cm gates.
How to tie a pullover for a child for 4 years?
Knitting pullovers for the kid is 4 years old - an interesting occupation, because children at this age already acquire the outlines of adolescents.
So, the work consists of such consecutive stages:
- It will take a red medium density yarn. It is desirable that in its composition in equal amounts were wool and acrylic.
- Claps are gained. You can start knit back. A rubber band 1 on 1 is lying 5 cm. Next Knitting according to the scheme: 1 looped face, then 1 - withcase and nakid. The second row is 1 outline loop, and the one with an insection is in withdrawal together. It turns out a beautiful openwork pattern.
- The front of the pullover fit in the same way. For such small products, it is not necessary to make shoulder beverages.
- After the pullover back and the backrest were accurate, you can knit sleeves. But before this you need to make a shoulder seam on the involving side of the future product. After that, on each side, loops for sleeves are gained. Show after a set of looping should be from the wrong side.
- The sleeves creek the same pattern as the rest of the workpiece. At the end of each hive cell there should be a rubber band 1 to 1.
In the penultimate stage all elements are stitching. After that, it is worth filing the neck. To do this, you can use threads of another color.
Sweater for a one-year-old kid
Such things knit very quickly, because the one-year-old baby is very small, therefore, the product will be small.

Such things knit very quickly
Master Class:
- Separate yarn of one color. Knitting method - handkerchief. For such a small product, one semicircle should be knit from 60 cavetles.
- The first detail should be the back. The rubber band is not done, as the handful knitting allows the product well to keep the form and not stretch.
- Knitting the transfer and backs occurs with a flat web, without shoulder bevels.
- To close two blanks, you need to split all the loops to 3 equal parts, then close the center - the neck, and 2 other parts close, sticking them before it is 1 cm above the neck.
After the hives are connected, the product can be sewed. It is important that the seams be from the wrong side.
Sweater for a boy 2 years with knitting needles: Step-by-step instructions
Such a product knits with individual elements. You will need 2 colors of yarn, for example, you can pick up black and white.

Sweater can be very beautiful, real pride craftsmen
Instruction:
- Loops are recruited on the needle.
- The back and the front of the sweater knit the same way without proving the Proucy. Black and white stripe alternate.
- To make a beautiful gate at the sweater, you need to divide all the loops on the workpice on 3 equal parts. The central part is a neck, it closes the first, and 2 other extreme parts are shoulders. They are tied by 1.5-2 cm above the neck and also close.
- After the front and the back of the backs were stitched on the shoulder seam, you can proceed to knitting the sleeves. At the end of each hive cell there is a small gum.
- It is necessary to link the gate of the sweater. To do this, after the firmware of the product along all the seams, you need to dial loops from the neck into circular needles and peel 15 cm of the web. The collar must be adjusted.
How to tie a sweater regulated?
Rellan is a knitting technique from above-down.
Children's sweater is done like this:
- Loops are recruited on circular needles. The first 15 cm is knotted with a smooth web. This is a sweater collar, which will then need to be adjusted.
- Now knitting can be segmented. It is necessary to check ½ transfer, line of the regign, shoulder, line of the regulated, then the back, the regulated line, the second shoulder, the regulated line and ½ transition.
- It is important not to move the first few rows and knit strictly according to the scheme. Then the drawing will be clearly visible and will work easier.
- After the product was accumulated to the arm, you can knit sleeves. On the workpits, the loops of one puzzle remain. At the ends of the sleeves need to make a gum.
- After the sleeves are connected, you can easily encourage a smooth cloth in a circle.
On the edge of the front parts of the front parts, the product is stitched.
Knitted jeans
In such stylish jeans, your baby will feel the most real cowboy, it certainly does not scare neither the rain nor the cold wind!

Dimensions
0 months
Final dimensions
(before washing)
1 inch \u003d 2.54 cm (example: 7 inches \u003d 7 * 2.54 \u003d 17.78 cm)
Waist: 13 inches
Step seam length: 7 inches
Side seam length: 12Tyumov
Materials
Rowan Denim Yarn
Nashville # 225 (Dark Indigo Color): 2 Talking
Tennessee # 231 (light blue) 1 tangle
A little yarn Rowan Handknit Cotton; Color classification: Mango fool # 319 (orange) for embroidery
Straight Spokes number 4.
Remains of yarn (cotton)
18 inches of gum.
Needle for stitching
Dark blue threads for stitching
Not necessary:
Little wool slice for label
Small amount of threads for embroidery on the label
Button
Knitting density
20 p. / 28 rows \u003d 4x4 inches (10x10cm) Breakdown
Attention
After knitting, Denim yarn sits at about 5-15%, only in length, with the first wash in hot water. This reduction is taken into account. Jeans can also fade with washing and sock, white heel appears like a denim tissue.
Description
Right pantna
Since the edges can be visible, remove the first loop as an invalible each row.
* CC yarn dial 35 p.
Knit 10 rows with an invented stroke, finish ezn. Nearby; To cut the thread.
Mc yarn, to peel 2 rows of a cycle knitting.
Next range of [Persons. A series]: Remove without tissing 1 p., 1 individuals, add 1 p. From the broach, knit persons will not remain 2 p., Add 1 p. From the broach, 2 persons.
Slit 3 rows of a cycle knitting
Repeat 4 rows for another 7 times. 51 p .. *
Continue with a stalking 7 inches (including cuffs), finish ezn. Nearby.
The following series [EVN. Row]: Close 5 p., Izden to the end.
Next range of [Persons. Row]: Remove without tissue 1 p., 2 together people, persons to the end.
The following series [EVN. Row]: Remove without tissing 1 p., 2 together is erased, emanated to the end.
Repeat these 2 rows again. It remains 35 p ..
** Continue to knit 10 inches with a cycle bug, finish omn. nearby.
False seam
Next range of [Persons. Row]: 17 individuals p.; throw off the next loop with the left knitting needles and dissolve to the first row .. that uses an extra needle, lift the looped loops again, but instead of lifting each shredded loop individually, as if you normally restored the looped loops, raise 1 navalized loop, then 2 low loops together, then Repeat the sequence until you lift all the loops. IMPORTANT: to lift the loops as if you knit the inside part of the cuff (it creates the illusion of the suture inside out, as on the cuffs of the real jeans. When you raise all the loops, return the loop to the left needle and knit faces to the Conda of the row.
Belt.
The following series [EVN. Row]: all individuals p ..
Knit 9 rows with a bug.
Repeat these 10 rows again. The first row from the involves will be the lower edge of the belt, on the second row of the invalible loop, bend the belt, it will turn out to be a rumor.
Locate all loops on the thread so that the loops do not form beams. Tie a firmly double knot and cut the ends, leaving 2 inches. **
Left pantna
Knit both right from * to *.
Continue 7 inches bar (including cuffs), finish individuals. nearby.
Formation of a bevel step step:
The following series [EVN. Row]: Close 3 p., Ized to the end.
Next range of [Persons. Row]: Close 5 p., Persons to the end.
Next range of [Persons. Row]: Close 3 p., Persons to the end.
The following series [EVN. A series]: 1 is elegant, 2 together is erased, emanated to the end.
Next range of [Persons. A series]: 1 persons, 2 together people, persons to the end.
Repeat these 2 rows again. It remains 35 p.
Continue as the right side of ** to **.