CROSSED loops are loops that have changed priority knitting.
For example, the second loop is knitted first, and then the first. As a result of this, the crossed loops on the canvas are located tilted to the right or left, depending on the method of knitting them.
So in the upper picture you can see how to cross the loops to the right (tilted to the right), on the bottom - how to cross the loops left (tilted to the left).

It is the technique of crossing the loops that is used to create such volumetric convex patterns such as plaits and braids. These names are often given to the same pattern, but there are still differences between them!
Harnesses
Harnesses are very similar to twisted twisted laces or ropes. The loops in the harness are always crossed ONE SIDE - to the right or to the left. Knitting of a plait with knitting needles is often performed on the seamy surface - the pattern in this case looks very expressive.
The smallest tourniquet is knitted on 2 front loops, which are crossed in each front row. Such a mini-tourniquet is called "cord" (translated from French - rope).
Braids
The braid is a strip in which from 3 to 6 lines are intertwined IN DIFFERENT DIRECTIONS. An example of a 12-stitch braid with three weaves can be seen.

And this is a simple flat braid of 8 loops. It becomes clear that the scythe is a more complex structure than a tourniquet.
But no matter how many loops you have to cross when knitting a tourniquet or braid, IT IS IMPORTANT TO REMEMBER:
- if you need to cross the loops LEFT (as in the picture above), the first group of loops is deposited (reshaped) on the auxiliary knitting needle BEFORE WORK and is knitted after the second group of loops;
- if you need to cross the loops RIGHT , the first group of loops is reshopped onto the auxiliary knitting needle AT WORK and also knitted after the second group of loops;
- patterns with crossing loops tend to decently reduce the width of the product, this must be taken into account when calculating the loops and be sure to knit a control sample;
- and more yarn is spent on braids (bundles) than on other knitting patterns - this should be taken into account when buying yarn.
Braid (plait) patterns are often used when knitting pullovers, sweaters, vests, hats and many other products designed to be worn in the cold season - they make things warmer and more durable!
Well, to consolidate the lesson, I suggest you knit a simple tourniquet.
Knitting pattern "Simple harness"
The Simple Harness pattern is really simple to make and is suitable for all knitting. The crossing of the loops in this pattern is performed in every 6th row.

To knit a sample of this pattern, select the number of loops divisible by 6, and add 2 more edge loops, for example, 30 + 2 = 32 loops. And then we will knit according to the pattern or description of the pattern.
Scheme and description of the pattern "Simple harness"

- 1st and 3rd rows: knit * 1 purl, 4 facial, 1 purl *;
- 2nd and all even rows: we knit according to the pattern of the pattern (front loops over the front, purl - over the purl);
- 5th row: * Purl 1, cross 4 loops to the left (remove 2 loops on the auxiliary knitting needle before work, knit the next 2 loops with the front ones, then knit the loops from the auxiliary knitting needles too), purl 1 *;
- 7th row: we repeat everything from the 1st row.
Having mastered the knitting of this harness, you yourself will be able to simulate something similar by changing the number of loops and the rows of their crossing, as for example I did this when knitting, where I used a simple harness of 6 loops, crossing it in every 8th row.
We will also consider knitting more complex versions of plaits and braids in this blog, but a little later. Subscribe to receive new blog articles and then you will NOT MISS ANYTHING!
Well, that's all for today! I hope this post helped you figure out what crossed loops are and how to knit crossed loops, namely, how to knit plaits with knitting needles. If something remains incomprehensible, do not hesitate, ask, we will definitely figure it out!
And this is the winter song "Ice" performed by Veronica Valley, listen ...
How to knit braids
If we talk about patterns, then those that look like pigtails look very beautiful. This pattern can suit both children and women, and even men. The pigtail pattern can look great on any item. Moreover, such a pattern can freely go with a combination of other various patterns. In order to learn, you need a little patience and dexterity, special knitting needles and a few secrets to create this masterpiece.
How to knit braids beginners
Before you start knitting a pattern in which the main element is a pigtail, you need to know the following things. So, how to knit braids with knitting needles for beginners with their own hands:

How to knit a double braid
Among all the patterns, a double braid with knitting needles is the simplest element in terms of complexity. This braid consists of two weaves. The pattern itself can be changed, the braid can be made narrower, the distance between the main patterns can be decreased or increased. Here are some examples that show you how to knit a double braid using knitting needles.
Simple double braid

Simple double braid
In this pattern, all dialed loops should be divisible by 12, not counting two hem and three symmetry loops. For a drawing, choose in advance. The first couple of rows are made in order to form the initial look of the pattern, after which the weaves themselves begin to knit. All work can be divided according to the following scheme:
- in rows 1 and 5, the loops must be knitted in the following sequence: three front, three purl, and at the end of the row there should be 3 loops, they are knitted like three purl.
- the second row begins with the fact that all the rows of the seamy side or even, need to be knitted according to the following pattern in the figure: under the front ones - the front ones, and the purl ones under the purl ones.
- in the third row, a weave is made with an inclination to the left, so that an additional knitting needle should always be in front of work. Knitting should be done in this way: purl 3, knit 3, then three loops are removed to the auxiliary knitting needle and the next must be knitted again with purl. Next, the re-removed loops must be returned to knitting, knit them with the front ones. At the end of the row, finish with three purl stitches.
- Row 7 is performed by weaving with an inclination to the right side, do not forget about the auxiliary knitting needle. The sequence of stitches for knitting will be as follows: purl 3, three are removed on an additional knitting needle, the next three loops are knit, then again you need to pick up the remastered loops and knit them with purl, then there are 3 front loops. The row ends with three purl.
- 9 and the following rows are knitted in the same way as from the first row.

Braid pattern
With the help of the video below, you can familiarize yourself with a more detailed knitting pattern and see how a double-sided braid is knitted with knitting needles:
The patterns of the braids, which are presented above, turned out to be quite voluminous. Below you can see another example of knitting bulky braids with knitting needles. This time, with the help of a different combination of purl and front loops, in which the front loops prevail, the pattern comes out more embossed.

Embossed braid
- this time the number of loops is taken as a multiple, 11 + 4 loops for edging and symmetry.
- Rows 1 and 3, 7 and 9 need to be knitted like this: purl 2, knit 9. At the end of the row, knit two purl loops for symmetry.
- if the rows are odd, then the front loops are knitted at the beginning of the row, then the front loops are made under the front loops, and the purl loops are made under the purl loops.
- the weave of the pigtails is formed precisely in the fifth row and the row is knitted in this way: 2 purl, 3 loops are thrown onto the secondary knitting needle, while leaving it under the canvas. Next, the next three are knitted with the front ones, then the thrown loops are knitted with the purl, and the three that remain are knitted with the front ones. The row ends on two purl.
- the eleventh row is knitted according to the following pattern: 2 purl loops, three front loops, then there are three loops that are thrown onto an additional knitting needle. The next three are purl, then we return the loops that we removed and make them front. At the end of the row, two front loops are obtained.

Braid scheme
How to knit wide or triple braids
You can use a wide or triple braid with, female, also a cardigan, etc. An example of such a pattern is a pattern called "royal braid".

Royal scythe
In order to create such a pattern, it is necessary to take as a basis the surface of their purl or front loops. The number for the pigtail must be a multiple of 30. In order to create this pattern, you must do the following:
- 1r. All loops are knitted with the front
- from the second row, all purl rows must be knitted with purl loops.
- 3p. The loops are knitted in the following sequence: five loops are removed without knitting and transplanted to the auxiliary knitting needle. The needle must be left in front of the canvas. The next five loops are front loops, then the removed loops are knitted with the front loops, then 10 front loops and again 5 loops are removed on the auxiliary knitting needle, leaving them at work. Further, as soon as the next five are knitted, the loops from the auxiliary knitting needles are knitted with the front ones.
- the next rows 5 and 7 are knitted with front loops.
- the ninth row needs to be knitted like this: five loops of the braids with the front ones, remove five on the secondary knitting needle and leave behind the canvas. Next, five front loops, the removed loops are knitted with the front loops, then again 5 loops are thrown onto the auxiliary knitting needle, but at the same time you leave them before work. Then 5 front loops, 5 reshoots - front, and then five loops from the main knitting needles.
- 11 row is knitted with front loops
- knitting is repeated from the first row when row 13 begins.

Braid scheme
From the very beginning, it may seem that knitting braids with knitting needles is a very difficult and overwhelming task. But in fact, this is not true. You just need to get used to it, be patient and understand the specifics of creating this pattern. After that, any kind of drawing will seem easy.
 From all the variety of patterns with knitting needles, braids, deserve a separate discussion because these are universal patterns. Many of them are suitable for knitting both men's and women's and children's clothing, as well as various accessories and decorative elements. The braid category contains hundreds of patterns, from the simplest braid, the harness, to the most complex weaves, arans and openwork braids. One little secret unites all these patterns - the interweaving of loops, using an additional knitting needle. Whatever the braid, simple or complex, the interweaving element of the loops will always be present in its scheme. Loops are intertwined in two ways:

braids knitting

1st way: the number of loops required for weaving is removed on an additional knitting needle and leave before work, knit the next several loops, and only after, loops from an additional knitting needle;
2nd way: all the same number of loops is removed on an additional knitting needle and this knitting needle is left, not before but at work, knit the next few loops, and then, loops from an additional knitting needle.
The more complex the braid, the more weaves it, and vice versa. The simplest braid, the harness, has in its scheme one repeating method of weaving of loops, the rest is a flight of imagination.
With this selection of braid patterns, you can easily figure out how to knit braids. And you can come up with more than one, your own, pattern, combining various elements.

 The simplest braid is a harness, a description of the circuit:
The diagram shows only the front rows. In the seamy rows, knit loops along the pattern of the canvas. In this case, the braid diagram is shown - a plait of four loops, the weave is done every 6 rows. You can diversify the pattern by changing the number of intertwined loops, for example, making a tourniquet of 6 or 8 loops. Weaving at the same time in 3 or 4 loops. You can also change the frequency of weaves, making them more or less often. If you leave an additional knitting needle not behind but before work, the pattern will also change its appearance.

 Braid with two weaves, description of the scheme:
This braid is a little more complicated than the previous one, but this is only at first glance. The braid consists of three parts - the same number of loops that are intertwined. To weave them, both methods are alternately used: 1 time - an additional knitting needle at work, the 2nd time - before work.

 Spikelet braid.
In this variant of knitting, braids with knitting needles, there are also 2 ways of weaving loops. Braid report 9 stitches plus the required number of purl stitches on the sides of the braid. The weaves are carried out simultaneously in different directions from the central loop of the pattern. To do this, first intertwine the loops using the knitting needle left at work, knit a central loop. The next 4 loops are intertwined in the manner of leaving an extra knitting needle before work. The pattern can be easily transformed into other patterns, making the weaving of the loops through more or fewer rows. To make the pattern larger, you can increase the pattern report by adding the number of intertwined loops.


 Volumetric braid with knitting needles.
In this pattern, the principle of weaving loops, as in the previous one, only there is no central loop. Weaves are made every 10 rows. Braid report 12 stitches.


 Braid with intricate weaves
This braid is a little more difficult than the previous ones, but the result is well worth the effort. To knit it, use two auxiliary knitting needles and several types of weaves. See the diagram of a complex braid and the legend for the diagram.
The diagram shows only the front rows, knit the purl according to the pattern: all purl loops and only the central loop - front.
The interlacing of 6 and 4 loops indicated in the diagram is done similarly to the interlacing of 3 loops, only the number of loops changes.
Using the principle of weaving loops, you can knit many other relief patterns.

 Embossed "Waves" pattern is obtained due to the symmetrical displacement of the intertwined loops, see the pattern diagram. all weaves in this case are made in one way, with the help of an additional knitting needle left before work.

 In this pattern, 2 methods of weaving of loops made on the background of the front surface are used, see the pattern of the pattern. The pattern looks like slight hint on braids. You can place such elements symmetrically or randomly, depending on the product and your idea.


 Experimenting with the interweaving of the loops, you can get new, "fantasy" braids. , knitted on the basis of a 2x2 elastic band. The diagram is taken from an old magazine. It shows how the pattern looks from the front side. Be careful, see the schematic legend. Please note: all pictures are enlarged, just click on them.

 , tied against the backdrop of the seamy surface. Half of the braid is tied with front loops, and the other half with purl. Thanks to the alternating weaves against the backdrop of the seamy surface, volumetric "petals" are obtained. Knit the pattern according to the pattern. In row 11, weave the loops as follows: remove 4 purl loops on an additional knitting needle and place before work, knit 4 front loops, and after 4 purl loops from an additional knitting needle. Continue knitting in pattern until 23 rows. In the 23rd row, weave the loops as follows: remove the 4 front loops on the auxiliary knitting needle and place at work, knit 4 purl loops, and after 4 knit loops from the additional knitting needle. Repeat stitches in every 11th row.

 Pattern "Embossed bows"
it is better to knit with thin knitting needles and thin threads. The report of this pattern is quite large and is 40 stitches, see the pattern diagram. Counter weaves are made in each front row, with a reduction in the number of stitches being woven. It seems as if the bow is braided into a tight braid.


Pattern scheme fantasy braids - bows
Fantasy braids - bows.
On the pattern diagram, only the front rows are indicated; in the purl rows, knit according to the canvas pattern. to start the pattern, knit: 1 purl row with front loops, then 1 front row with front loops, and 1 purl row with purl loops. After 1 time, knit from the 1st to the 60th row according to the scheme. further repeat the pattern from the 49th to the 60th rows.
/ 24.12.2015 at 21:19
Hello, friends!
Today, my dears, we knit braids. Sooner or later, every knitter comes to the conclusion that it is necessary to master these knitting techniques. After all, how beautiful and rich knitted products look with various braids and plaits!
For beginner knitters, tying braids at first causes some difficulties. Therefore, let's take it step by step, with a description of how to knit some of their types. And then, if you master the technique and basic principles of knitting, then in the future you can perform even very complex, intricate patterns with braids, plaits and arans.
So, let's begin. Knitting of all, without exception, patterns with braids, aran knitting, based on the technique of moving the loops. In order to reshoot the loops intended for movement, you need to acquire the so-called auxiliary knitting needles, which come in different thicknesses and look like this:

Or like this:

Ideally, the secondary knitting needle will be slightly thinner than the primary working knitting needles.
When knitting using an auxiliary knitting needle, the stitches intended for offset are re-shot onto this knitting needle and left either in front or behind the work. Then, having knitted the next loops in a row, they knit the loops already from the auxiliary knitting needle (see photo). Moreover, you can knit loops either directly from this knitting needle, or return the loops from it to the main left knitting needle, and then knit - as it is more convenient for someone.


But even if for some reason you do not have such knitting accessories, it doesn’t matter. For this purpose, you can use an ordinary safety pin, although this is not so convenient (I will reveal a secret - and I myself do so often).
Let's see what the movement of loops is using the example of the simplest braid. We will do it on 8 loops. For the sample, take 14 loops (12 loops for the braid and its "framing" + 2 edging).
Pattern description:
1st row: Purl 2, facial 8, purl 2;
2nd to 4th row we knit, what does knitting look like- over the front loops we knit the front loops, over the purl loops - purl loops (photo 1).

photo 1 - knitted the first 4 rows
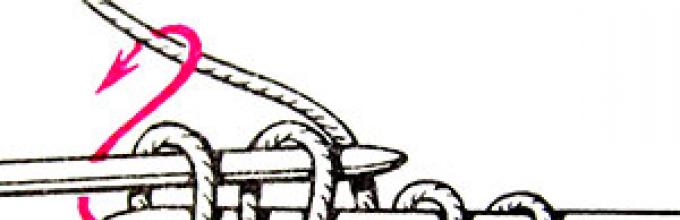
5th row: 2 purl, 4 loops to reshoot, without knitting them, on the auxiliary knitting needle and leave in front of the work; knit the next 4 loops with the front ones (at the beginning of knitting them, try not to have a large broach between the loops). Then 4 stitches from the auxiliary knitting needles are removed onto the left knitting needle and also knitted with the front knitting needles. It turned out that our hinges seemed to be crossed with an inclination to the left side (see photos 2 and 3).

photo 2 - 4 loops are removed on the auxiliary knitting needle and left in front of the work

photo 3 - we reshoot the removed loops on the left knitting needle and knit with the front
6th to 12th row - we knit according to the picture.

And if you knit such braids in a row in a row, you get such an elegant pattern:

Such simple braids can be performed on 4 and 6 and 10 or even 12 loops, the main thing is that the number is even. It all depends on how thick you are using the yarn and how wide the braid you want to get.
But it must be remembered that the more loops for the braid, the more it contracts when the loops are displaced, and, consequently, the consumption of yarn will increase. In addition, you can adjust how many rows to move the hinges. The more often (through fewer rows) the loops are moved, the “tighter” the braid will turn out to be, the less often - the looser the braid will be and will not tighten the web so much. It all depends on your taste and preferences.
You can knit a simple braid, leaving the loops on the auxiliary knitting needle not in front, but behind the work. Then your braids will no longer intertwine to the left, but to the right. This is how it looks:

In more complex braids, combinations with offset loops are used, both to the left and to the right, and various combinations of the number of loops intended for movement can also be taken into account. And it is thanks to the ability to create such different combinations that we can create so many beautiful patterns.
Now let's look at a more complex braid. Here, as I said above, we move the loops both left and right.

Pattern description:
Braid on 16 loops. We collect 22 loops for the sample (16 for the braid, 4 for the "framing", +2 for the edging).
1st row: 2 out, 16 persons., 2 out;
2nd to 6th row: we knit according to the picture;
7th row: Out 2, remove 4 loops on the auxiliary knitting needle and leave behind the work, knit the next 4 loops with the front ones, then knit 4 loops with the front knitting needles from the auxiliary knitting needles; Remove 4 loops on the auxiliary knitting needle and leave the work in front, 4 knit stitches, 4 knit loops from the auxiliary knitting needle, knit 2;
8th to 14th row: knit according to the pattern;
15th row: repeat the pattern, starting from the 7th row.
And here is a braided pattern. How to knit it, you can find at this page.

In a different way, combining the offsets of the loops, you can get such a pattern (for the diagram and description, see ):

In the examples given, the braids are made on the front surface. But there are exceptions when both elastic bands and smaller braids are intertwined. For example:


A slightly different principle in Aran knitting: there are already paths from the front surface moving in different intricacies along the seamy surface. And if in the braids we move the loops, dividing their number equally (for example, the braid with 6 loops: we move it by 3), then here we can, for example, move 2 or 3 loops of the front surface along the top, and 1 purl loop along the bottom smooth. But the principle is the same - we reshoot, move:

As soon as it is time to knit warm things, be it a hat, sweater or vest, the craftswomen immediately begin to be puzzled by the selection of yarn and the appropriate tools. An important step towards creating a cozy, soft piece is also the selection of patterns. Among all the splendor of the styles of knitted clothes, a separate group can be distinguished by products in the manufacture of which braids are used with knitting needles. Embossed braids and rhombuses, honeycombs and zigzags attract attention with an exquisite interweaving of smooth and broken lines. Such voluminous ornaments on warm things are perfect in themselves, however, for knitting a spring wardrobe, they can be supplemented with openwork paths and mesh fabric.
Braids with knitting needles - complex elements
In terms of their execution, braids with knitting needles are complex elements, therefore, to knit them, certain skills and the manifestation of handicraft are required. Traditionally, it is recommended to knit a small sample in order to see the texture of the future product. When creating various types of weaves, in addition to the basic set of tools, you will also need an additional knitting needle of a regular or special pattern. You can also use a pin. The choice depends entirely on what the craftswoman has at hand, or how often she knits just such patterns, which means she owns all the appropriate devices.
Knitting a complex braid with knitting needles is impossible without a detailed, readable diagram, which indicates not only the types of loops, but also the places of their overlaps. This element is one of the varieties of Aran patterns. If the choice of the knitter fell on a drawing that is simple in its execution, then the product knits with it many times faster. It is very long and requiring special attention to work with knitting a canvas, on which there is a large number of various weaves, large and small braids, zigzags, rhombuses and other voluminous ornaments. However, after persistent efforts and extreme efforts, a hand-made thing turns out to be very beautiful and neat. Inexperienced craftswomen should begin to master braids with knitting needles using simple schemes and, over time, increase their skill level, moving on to more complex patterns - arans with knitting needles.
Products with braids. Works of our readers
Gray scarf with braids. The work of Elena Akhremenko

Hat and snood with braids. Works of TatVen

Women's pullover with braids. The work of Marina Efimenko


Lalo knitting cardigan from braids - the work of Lucy Tueva

Jacket with a pattern of braids - the work of Lyudmila

Jacket with braids knitting - the work of Lilia

Knitted suit: skirt and vest

Melange vest with braids

Hat with "braids"

Knitted sweater with braids

White sweater with braids

Hat helmet for a boy with braids

Pink dress with braids
Knitted hat with braids

Footprints - slippers with a braid pattern

Cap with braids

Gray beret with braids

Brown bag with braids

Orange top with braids

Hat with braids

Leggings with braids

Green bag with braids

Braids with knitting needles. Models from the Internet
Skirt with braids
interesting selection on the site 20 easy summer beanie patternsA knitted skirt with knitting needles with a description will be available to a craftswoman with any experience. Such a skirt with a high belt will complement the wardrobe of every fashionista. After all, it can be worn both on dates and to work in the office.
Description for sizes S (M).
Waist circumference 70-75 (80-85) cm.
The circumference of the belt in finished form (not stretched) is 38 (43) cm.
Length - 58 (62) cm.
Materials: 1 - 7 (8) skeins of Silkroad Aran Tweed (85% wool, 10% silk, 5% cashmere) - 95m / 50g; 2 - 12 (13) skeins of Silkroad Ultra (85% wool, 15% silk, 5% cashmere) - 55m / 50g; 3 - 4 (4) skeins of Classic DK Wool (100% wool) - 98m / 50g; circular needles: No. 4 (80cm), no. 7 (120 cm), no. 10 (120 cm), additional knitting needle.
Knitting density:
9 loops / 19 rows - 10 × 10 cm "rice" pattern, needles no. 10, double thread (threads 1 and 2).
22 loops / 25 rows - 10 × 10 cm elastic, needles no. 4, double thread (3).
1 row: 1 front, 1 purl, alternately to the end of the row.
Row 2: knit over purl, purl over knit.
Repeat 2 rows.
Legend:
P1I - raise the loop from the broach between the loops and knit with the purl (+ 1 loop);
K6P - remove 3 loops for additional. knitting needle for knitting, 3 knit, 3 loops with add. knitting needles;
K6L - remove 3 loops for extra. knitting needle before knitting, 3 knit, 3 loops with add. knitting needles.
We knit the product from top to bottom.
Spring, for skirts - beauty
Skirt Description:
On knitting needles # 10 with threads 1 and 2 (fold them together), cast on 279 (319) loops, mark the beginning of the row (for example, with colored thread) and close the row.
1 row (front side - LS): * 12 loops with a "rice" pattern, 6 front loops, 4 purl, 6 front loops, 12 loops with a "rice" pattern *, repeat loops between * * 5 (6) times, 12 loops with a "rice" pattern ", 6 front, 4 purl, 6 front, 11 loops with a pattern" rice ".
Knit row 2-7 as 1st.
8 row: * 12 loops with a "rice" pattern, K6P, twice purl 2 together, K6L, 12 loops with a "rice" pattern *. repeat loops between * * 5 (6) times, 12 loops with a "rice" pattern, K6P, twice purl 2 together, K6L, 11 loops with a "rice" pattern.
Knit 7 rows without braids.
16 row: * 12 loops with a "rice" pattern, K6P, 2 purl together, K6L, 12 loops with a "rice" pattern *. repeat loops between * * 5 (6) times, 12 loops with a "rice" pattern, K6P, 2 purl together, K6L, 11 loops with a "rice" pattern.
Knit 7 rows in the pattern.
24 row: * 12 loops with a "rice" pattern, K6P, twice purl 2 together, K6L, 12 loops with a "rice" pattern *. repeat loops between * * 5 (6) times, 12 loops with a "rice" pattern, K6P, twice purl 2 together, K6L, 11 loops with a "rice" pattern.
We knit 7 rows in the pattern.
32 row: * 12 loops with a "rice" pattern, K6P, P1I, purl 1, K6L, 12 loops with a "rice" pattern *, repeat loops between * * 5 (6) times, 12 loops with a "rice" pattern, K6P, P1I, 1 purl, K6L, 11 loops with a "rice" pattern.
We knit 7 rows in the pattern.
40 row: * 12 loops with rice pattern, K6P, purl 2, K6L, 12 loops with rice pattern *, repeat loops between * * 5 (6) times, 12 loops with rice pattern, K6P, purl 2, K6L , 11 loops with "rice" pattern.
41-44 rows knit according to the pattern.
45 row: bind off 12 loops in the "rice" pattern, * 14 loops of elastic, close 24 loops in the "rice" pattern *, repeat loops from 8 to the second * 5 (6) times, 14 loops with an elastic band, close the last 11 loops in the pattern "Rice" = 112 loops.
46 row: knitting needles No. 7 we knit with an elastic band to the end, tightly pulling the thread between the sections with closed loops.
47-51 row: continue to knit with an elastic band.
Take knitting needles no. 4 and thread 3 in two folds.
Row 52-57: knit with an elastic band.
Row 58:
size S - sticking to elastic pattern, knit 2 together, * 15 knit stitches, knit 2 together, 16 knit loops, knit 2 together *. repeat loops between * * 1 times, 16 loops of elastic = 88 loops;
size M - adhering to the elastic pattern, twice knit 2 together, * 14 loops with an elastic band, twice knit 2 together, 15 loops with an elastic band, twice knit 2 together *, repeat loops from 8 to the second * 1 time, 14 loops with an elastic band, twice knit 2 together , 16 stitches with elastic band = 100 stitches.
Continue knitting with an elastic band until the height of the belt from the beginning is 29 (33) cm.
Close the loops loosely on the pattern with needles No. ten
The ending.
On the seamy side, mark the center of the section with closed loops with a "rice" pattern and sew in the center between the sections with braids, forming folds. Thus, we sew all sections with folds.
Diagram braids:
We have selected several patterns of braids with knitting needles with schemes. We hope you find them useful.