There are several options, how beautiful to make a neck of the knitted product: rubber band, clamp, decorative elements. And only the hood manages to combine convenience, practicality, style to sweater, cardigan or dress turned out to be original. Therefore, for some craftsmen, the topic is relevant: how to connect the hood from the neck of the knitting needles? Make your own hands new clothes for the off-season period will be based on knitting schemes - from simple to unusual.
Methods of knitting hood from the neck
Even for beginners, knitting this detail will not be a stumbling block, since there are several options, how to link the hood from the neck on the needles. Simple provides that the functional part of the product must be connected separately, in the form of a rectangle, and then sew on the one hand, then join the neck. Another way is to dial loops along the cutout, raise them up to the desired level, close knitting and sew edges. There are other options: classic (as a sock heel), a cape or a hood collar. Choose any way and take about the case.
Step-by-step instructions with schemes and job description
Someone will only have to master the basics, and someone already has a considerable experience of needlework, but for each category of craftsmen the basis of the work remains step-by-step instructions with schemes. They are detailed, step by step, paint the sequence of actions that will lead to the creation of a beautiful, comfortable, original thing associated with their own hands. Description of work - from color, thread thickness to assembly - eliminates the appearance of an error when there is a desire to add a knitted thing with a functional part.
Description of knitting sweaters hooded from the neck
- On the edge of the neck of the finished collected product with the front side, make a set of the required number of loops. Working thread with the help of the needles to secure at the beginning of the row, to make a nodule.
- The following 2 rows are pronounced facechair.
- Knit further to get a classic hood, you need shortwatened rows. The scheme is simple: in touching the face row, do not finish it, leaving the last loop. In this place, knitting should be rotated, make a nakid, further to check the wrong row, and deploy again, without taking one loop. So the two side parts are formed, which let go alone after another.
- The loop of the side of the side closes when the item reaches the desired length.
- Having encouraging the middle part of the hood, you need to pick up the side loops, finish the design of the hood of an English elastic band.
The uniqueness of this knitted thing is that she joined the scarf and the headdress, which will save his head, ears, neck from the cold wind, and the hairstyle from precipitation. The casual image of the scarf-hood will add fashionable notes, but before proceeding to the needlework, it is worth learn several nuances. Knit such a product is better with the title so that it makes it better at the face; The loops should not be too close to each other, and add how to get down the hinges on the hood should be smoothly.

- For the scarf-hood, warm threads (wool) are chosen, and the size of the cap is the basis, only the measure will have to increase a bit so that the product is so close.
- Dial the required amount of loops on the knitting, based on the calculation on the associated sample (use the square 10 x 10 for convenience). Next, tie a rubber 3-5 cm wide, and then a rectangle, choosing any pattern, alternating facial rows with an invalible.
- Completing the canvas, it is necessary to divide the edge into three parts, two of which to tie the mirror as a scarf, and the third close to the English pin.
- The final stage involves the assembly of the parts of the hood, the seam is performed by the same threads of small stitches. Decorate the ends of the scarf will work without any problems, for this it is suitable forces, pumps, fringe - everything so that the edge looks beautiful.
Female Pullover with a hood associated with the neck
In this case, the work will not be difficult, see for yourself:

- First, the main details of the product are knit: the back, in front of the sleeve.
- Then proceed to the strapping of the neck from the front side, the loops are gaining circular needles.
- They are tied with a canvas according to the pattern, not forgetting to slightly fall in one loop in each second and fourth row.
- For several centimeters, before the end, it is embarked on the gum, and when the height of the hood reaches the desired mark, the loops are closed. The canvas are folded in half, stitching gently edges to complete the knitting.
How to knit a sneody on the head and frighteners with knitting
Among the knitted items, the category of the most original subsidence. In appearance, it resembles a scarf-clamp or a scarf tubu. A comfortable accessory provides comfort and gives heat in a cool season. The sneou remains a stylish detail of the wardrobe, and together with the swelling, the fashion kit is compiled. If it is intended for the winter, the yarn should be warm, and the acrylic or thread is suitable for the offseason, which contains wool (20-30%).

- To work, you need to take circular knitting needles, to dial the amount of loops you need, to penetrate the first row to squeak knitting.
- Next, by the pattern circuit, eliminate the canvas, close the last row.
- The edge of both one and the other side of the slander is pronounced separately. So that the top of the scarf-clamp looked attractive and beautifully framed his face, it should be slightly narrowed when tieding.
- Then proceed to swelling, which knit on stocking spokes, clicked them into the ring. Following the pattern, first make the right, and then the left sweatshirt for the original kit.
Fashionable jacket cardigan with a hood on the knitting needles
The basis of the fashionable jacket-cardigan fit according to the openwork scheme from yarn, in which the wool content ranges from 70 to 100%:

- First you need to tie the back, where the alternating face with a wicker pattern, the touching of the arm and the bevels, leave the required number of hidels for the hood.
- Further, according to the scheme, you need to tie the left, right shelves, sleeves.
- The jacket assembly is completed with the hooding of the hood with circular spokes from the neck based on the left loops. Tie it, close the loops and sew edges.
- Fully fashionable jacket is ready when the planks are made, the holes in them for buttons are sewn together the remaining details.
Sleeveless vest with a hood for women
A vest is a well-known thing from the thing from the female wardrobe, the masters are capable of becoming a creative outfit for the cold season. Choosing the proposed knitting scheme, soon it turns out to boast the original new clothes. Such a vertex vertex knitting, knitted under the jacket or is able to become the basis for creating a jumper, for which the needlewoman needs only to carry the sleeves.


- Remove the measurement, count according to them how many loops need to be dialing for a sleeveless.
- Following the openwork pattern, tie the back, left and right shelf, laying the hinge for the hood.
- The convenient item is confused with a spoke according to the scheme, with stretching the loops from one part of the hood in another.
- The decorative spit knit separately, then sewn, connect the seam of the edge of the vest, draw up the bottom and the armor.
Male jumper with a hood from the neck
The jumper with a hood from the neck for men is created on the basis of yarn with wool and acrylic. Together with the main pattern, the openwork is encouraged, while it is necessary to resort to special refills. So, see:

- Begin to knit the male jumper with the transfer, then they make a back, the following left and right sleeves.
- Starting to the assembly, the hood knit from the neck, before closing the loops, do not forget about the gum, which will give the shape of the hood, then stitch. It will also remain to connect other details among themselves so that the male jumper is ready for the sock.
Knitting sweaters with a hood for a child
Warm knitted thing for a child is a mandatory wardrobe subject. Make it even more necessary helps a hood that protects the child from drafts. The addition to the knitted thing will be the key to comfort, and for kids who do not like to wear caps, such models are a good find.

- Tie the details of the sweater, focusing that the neck of the back will become the basis for the hood.
- Sew details, leaving the neck loop open.
- The hooding of the hood begins with the front side, a handy bug is used traditionally for the web.
- As it work, it is necessary to periodically add loops along the outer edge. Cut to the desired height, close the loops, sew the edges of the finished hood.
Jacket with a hood for a boy
To tie a really warm jacket for a small fidget, you need to add one important detail to it - a hood. Then mom will not have to worry about the comfort of a child, how warmly is warm and whether his head is protected from the wind or cold. To create this part, you will not need a lot of time if you follow the knitting scheme shown below. For starters, a brief instruction:

- Tie the basic details - the back, left and right shelf, the sleeves are made of woolen thread, leaning on the openwork pattern.
- The hood fit from the neck with a pattern of points, upon completion of the work, fold it in half, sew edges with knitted seam. Connect among themselves the rest of the jacket details.
Video tutorials for beginners to knit a hood from the neck
Beginner craftsmen who want to learn to knit with knitting needles, it is not always possible to deal with the schemes of even simple knitted models. When the off-season occurs outside the window, or real cold came, I still want to look stylish. The relevance of knitting video tutorials for beginners with the onset of cold weather is enhanced. How to make a beautiful warm outfit with your own hands and add it a comfortable detail - a hood, which knits the needles from the neck? Meet online with a kraism.
Master class on knitting hood to coat
Knitting a warm hat-hood hat
Capor-hood with a nurse for a girl
Snud-hood on circular spokes
Children's Cardigan coat with a hood from the neck
Women's knitted sweatshirt with a hood, kangaroo pockets and zipper, so-called "Hoody", is performed by various openwork patterns.
Description of the hoodies from the Brooke Nico designer translated from the magazine "Vogue Knitting" Spring-Summer 2017.
Dimensions:S, M and L
Chest circle - 91.5 (104, 119.5) cm,
Length - 51 (56, 58.5) cm,
Sleeve circle at the level of the armpit - 31.5 (34.5, 38), see
Necessary materials:
Yarn Valley Yarns Southampton (72% mohair, 28% silk; 210 m / 25 grams in the MOTK) - 7 (8, 9) of motors, zipper zipper 51 (56, 58.5) See
Required tools:
Circular Spokes No. 2.25 and No. 3.25 with a length of 60 cm, a set of 5 double-edged spokes No. 2.25 and No. 3.25, circular spokes No. 3.25 40 cm long, knitted hook No. 3.25, markers loops, hinge holders, tapestry needle.
Knitting density:
22 loops and 36 rows \u003d 10 cm Figures 3 and 6, made by the spokes No. 3.25, after eating;
26 loops and 34 rows \u003d 10 cm Figures 2 and 7, made by Spokes No. 3.25, after sipping.
PATTERN
Receptions used:
Closing the loops with three knitting needles shown in the video lesson
Video lesson
False harness on 3 loops: Threate the first loop on the left needle on the first two loops, then penetrate the first two loops like.
Remarks:
Hoody knits from top to bottom.
On the patterns of drawings are shown only face rows. When knitting with straight and reverse rows, all hinges in the involnee rows are written out with an invalible. With circular knitting, even rows are tied with facial loops.
The measure of the circle of the chest includes zippers for zipper equal to 4 cm.
Back:
Circular spokes number 3.25 dial 49 (57, 65) loops.
Installation row (invalid): 2 Pouring loops, place a marker, 1 Initious loop, place a marker, 9 Pouring loops, place a marker, 1 Initial loop, place a marker, 23 (31, 39) Pouring loops, place a marker, 1 Initious loop, Place the marker, 9 of the wrong loops, place the marker, 1 wrong loop, place the marker, 2 outline loops.
Knitting drawings 2 and 3:
1st row (facial): 1 facial loop, 1 loop add from broach, 1 facial loop, 1 nakid, marker, 1 facial loop, marker, 1st row of drawing 2 to marker, marker, 1 facial loop, marker, Loop of the 1st row of Figure 3 to repeating Rapporta (up to the Red Line), repeat 2 (3, 4) times a repeated Rapport of Figure 3 of 8 loops, 1st Picture 3 loops after a repeated Rapporta, marker, 1 facial loop , Marker, 1st Row of Figure 2 to Marker, Marker, 1 Facial Loop, Marker, 1 Nakid, 1 Facial Loop, 1 Loop Put from the broach, 1 Facial loop - on the spokes 59 (67, 75) loops.
SCHEMES

2nd and all invalid rows: Pouring loops.
3rd row: 1 facial loop, 1 loop add from a broach, 2 loops to stick together face with inclination to the right, 1 nakid, 1 facial loop, 1 nakid, marker, 1 facial loop, marker, knit pattern 2 to marker, marker, 1 facial loop, marker, knit drawing 3 to marker, marker, 1 facial loop, marker, knit drawing 2 to marker, marker, 1 facial loop, marker, 1 nakid, 1 facial loop, 1 nakid, 2 loops to stick together face with The slope to the left, 1 loop to add from the broach, 1 facial loop - on the spokes 69 (77, 85) loops.
5th row: 1 facial loop, 1 loop add from a broach, 2 loops to stick together face with inclination to the right, 1 nakid, 3 facial loops, 1 nakid, marker, 1 facial loop, marker, knit pattern 2 to marker, marker, 1 facial loop, marker, knit drawing 3 to marker, marker, 1 facial loop, marker, knit pattern 2 to marker, marker, 1 facial loop, marker, 1 nakid, 3 facial loops, 1 nakid, 2 loops Slit together face with The slope to the left, 1 loop add from the broach, 1 facial loop - on the spokes 79 (87, 95) loops.
6th row: Pouring loops, dial 7 loops at the end of the row - on the spokes 86 (94, 102) loops.
7th row: 11 facial hinges, 1 Caid 3 loops Slice together facial (1 loop to remove, 2 facial loops to stick together face with a slope to the right, 1 removed loop throw on 2 loops, accurate together), 1 Nakda, 1 facial loop, 1 Nakid, Marker, 1 Facial Loop, Marker, Knit Figure 2 Before Marker, Marker, 1 Facial Loop, Marker, Knitting Figure 3 Before Marker, Marker, 1 Facial Loop, Marker, Knit Figure 2 Before Marker, Marker, 1 Facial Loop , Marker, 1 Nakid, 1 Facial loop, 1 Nakid, 3 loops Put together facial, 1 nakid, 4 facial loops, score 7 loops on the knitting needles - on the spokes 101 (109, 117) loop.
Start knitting Figure 1 and 4:
Note: Continue to knit drawings 2 and 3 in the prescribed manner. You need to be more careful, since the numbers of the figures 2 and 3 will differ from the numbers of drawings 1 and 4.
9th Row: Knit 1st Figure 1, Marker, 1 Facial Loop, Marker, Knitting Figure 2 Before Marker, Marker, 1 Facial Loop, Marker, Knitting Figure 3 Before Marker, Marker, 1 Facial Loop, Marker, Knit Figure 2 to Marker, Marker, 1 Facial Loop, Marker, 1st Row of Figure 4 to the end of the row - on the spokes 109 (117, 125) loops.
11th Row: Figure 1 to Marker, Marker, 1 Facial Loop, Marker, Figure 2 Before Marker, Marker, 1 Facial Loop, Marker, Figure 3 Before Marker, Marker, 1 Facial Loop, Marker, Figure 2 Before Marker, Marker , 1 facial loop, marker, Figure 4 to the end of the row - 8 loops are added.
Continue to knit in the prescribed manner, in each repetition of the rapport, an additional repetition of 8 loops in each figure, while the rapport of figures 2 and 3 of the 16 rows will be accurates 3 (4, 4) times, then tie the ranks 1-15 (1-7, 1-15) Another 1 time - on the spokes 325 (365, 405) loops.
Sleeve Department:
Next row (invalid): * Pouring loops to marker, remove marker, 1 Initial loop, Remove marker, Release the following 73 (81, 89) loops on the hinge holder for sleeves, dial 4 loops, put the side marker, dial 4 loops; Repeat from * Another 1 time, the wrong hinges to the end of the row, removing the markers - on the spokes of all 195 (219, 243) loops, 97 (113, 129) hinges for the back and 49 (53, 57) loops for each shelf.
Start knitting Figures 5 and 6:
Next row (facial): Tie a series of rows 1 (9, 1) Figure 5 to repeating Rapport (to red line), repeat 5 (6, 6) times a repeated frame of drawing 5 of 8 loops, link the last 5 (1, 5) Loops drawing, marker, knitting a row 1 (9, 1) pattern 6 to repeating rapport (to red line), repeat 11 (13, 15) times a repeated frame of drawing 6 of 8 loops, knit loops to the end of the drawing 6, marker, starting with 1 (5, 1) -y loop, tie rods 1 (9, 1) Figure 5 to red line, repeat 5 (6, 6) times repeated rapport Figure 5 of 8 loops, knit loops to the end of Figure 5.
Continue to knit in the prescribed manner to the 16th row of figures 5 and 6 inclusive, then repeat the rows of 1-16 another 5 times, and another 1 time to link the ranks 0 (1-8, 0) - only 96 rows of drawings are connected.
Change the needles on № 2.25.
Relief gum:
1st row (facial): 3 facial loops, * 1 Nakid, 1 facial loop, 1 nakid, 2 facial loops; Repeat from * to the last loop, 1 facial loop.
2nd row: 3 Pouring hinges, * 3 loops Slit together facial with inclination to the right, 2 Pouring loops; Repeat from * to the last loop, 1 wrong loop.
Sleeves:
Move 73 (81, 89) loops sleeves for short circular spokes # 3.25.
To dial 4 loops, to penetrate all hinge sleeves, dial 4 loops - on the spokes 81 (89, 97) loop. Connect the loop in a circular row and place the marker of the beginning of the row.
Start knitting Figure 7:
Note: All even rows to lies with facial loops. If necessary, go to double-edged spokes No. 3.25.
1st Circular Row: Knitted loops Figure 7 to repeating Rapport (to red line), repeat 7 (8, 9) times a repeated rapport from 8-loops, knit loops to the end of the drawing 7.
Knit Figure 7 in the prescribed manner to 80th row inclusive, then 1 time to bind the rows 1-38 (1-52, 1-62) Figure 7 - on the spokes 59 (63, 69) loops.
Change the needles on № 2.25.
Next circular range: Facial loops, evenly linked 2 (3, 3) loops - on the spokes 57 (60, 66) loops.
Relief gum:
1st circular row: 1 facial loop, * 1 Nakid, 1 facial loop, 1 nakid, 2 facial loops; Repeat from * to the last loop, 1 facial loop.
2nd circular row: 1 facial loop, * 3 loops to stick together with the wrong, 2 facial loops; Repeat from * to the last loop, 1 facial loop.
Repeat rows of 1-2 embossed gum is 11 times.
Freely close all loops as facial.
Stringing shelves for lightning:
On the front side, tie the edge of the right shelf, after performing 90 (94, 98) the column without an ingredient. Tie more than 4 rows by columns without Nakid. Secure thread. Repeat for the left shelf.
Lightning Planks (2 Details):
Crochet perform chain from 91 (95, 99) air loop. Tie 5 rows by columns without Nakid 90 (94, 98) loops. Secure thread. To postpone.
Hood:
Spokes number 3.25 and on the front side, ranging from the edge of the cutting of the neck of the right shelf, gain 50 (54, 58) loops to the center of the neck of the backrest. Place the marker, dial 50 (54, 58) loops to the edge of the neck of the neck of the left shelf - on the spokes 100 (108, 116) loops.
Start knitting measurement:
1-6 rows: 4 facial hinges, * 1 Nakid, 2 loops to stick together face with a slope to the right, 2 facial loops; Repeat from * to the end of the row.
7th row: 4 facial hinges, * 1 Nakid, 2 loops to stick together face with inclination to the right, 2 facial loops; repeat from * to 2 loops before the marker, 1 nakid, 2 facial loops, marker, 2 facial loops; * 1 Nakid, 2 loops to stick together face with a slope to the right, 2 facial loops; Repeat from * to the end of the row - on the spokes 101 (109, 117) loop.
8th row: 4 facial loops, * 1 Nakid, 2 loops to stick together face with a slope to the right, 2 facial loops; repeat from * to 2 loops before the marker, 1 Nakid, 2 facial loops, marker, 3 facial loops; * 1 Nakid, 2 loops to stick together face with a slope to the right, 2 facial loops; Repeat from * to the end of the row - on the spokes 102 (110, 118) loops.
9-14 Rows: 4 Facial loops, * 1 Nakid, 2 loops Put together facial with a slope to the right, 2 facial loops; repeat from * to 1 loop in front of the marker, 1 facial loop, marker, 3 facial hinges, * 1 Nakid, 2 loops to stick together face with a slope to the right, 2 facial loops; Repeat from * to the end of the row.
15th row: 4 facial loops, * 1 Nakid, 2 loops to stick together face with a slope to the right, 2 facial loops; repeat from * to 3 loops in front of the marker, 1 Nakid, 3 facial loops, marker, 3 facial loops; * 1 Nakid, 2 loops to stick together face with a slope to the right, 2 facial loops; Repeat from * to the end of the row - on the spokes 103 (111, 119) loops.
16th row: 4 facial loops, * 1 Nakid, 2 loops to stick together face with inclination to the right, 2 facial loops; repeat from * to 3 loops before the marker, 1 nakid, 3 facial loops, marker; * 1 Nakid, 2 loops to stick together face with a slope to the right, 2 facial loops; Repeat from * to the end of the row - on the spokes 104 (112, 120) loops.
17-22 Rows: 4 Facial loops, * 1 Nakda, 2 loops Together with a facial with a slope to the right, 2 facial loops; Repeat from * to the end of the row.
23rd row: 4 facial loops, * 1 Nakid, 2 hinges to stick together face with a slope to the right, 2 facial loops; repeat from * to marker, marker, 1 facial loop, 1 nakid, 3 facial loops; * 1 Nakid, 2 loops to stick together face with a slope to the right, 2 facial loops; Repeat from * to the end of the row - on the spokes 105 (113, 121) loops.
24th row: 4 facial loops, * 1 Nakid, 2 loops to stick together face with inclination to the right, 2 facial loops; repeat from * to 1 loop in front of the marker, 1 facial loop, marker, 1 facial loop, 1 nakid, 3 facial hinges, * 1 Nakid, 2 loops Slice together face with inclination to the right, 2 facial loops; Repeat from * to the end of the row - on the spokes 106 (114, 122) loops.
25-30 Rows: 4 Facial loops, * 1 Nakid, 2 loops Put together facial with a slope to the right, 2 facial loops; repeat from * to 1 loop in front of the marker, 1 facial loop, marker, 1 facial loop, * 1 nakid, 2 loops to stick together face with a slope to the right, 2 facial loops; Repeat from * to the end of the row.
31st row: 4 facial loops, * 1 Nakda, 2 loops Together with a facial with a slope to the right, 2 facial loops; repeat from * to 1 loop in front of the marker, 1 nakid, 1 facial loop, marker, 1 facial loop, * 1 Nakid, 2 loops to stick together face with inclination to the right, 2 facial loops; Repeat from * to the end of the row - on the spokes 107 (115, 123) loops.
32nd row: 4 facial loops, * 1 Nakid, 2 loops to stick together face with a slope to the right, 2 facial loops; repeat from * to 1 loop in front of the marker, 1 nakid, 1 facial loop, marker, 2 facial loops, * 1 nakid, 2 loops to stick together face with inclination to the right, 2 facial loops; Repeat from * to the end of the row - on the spokes 108 (116, 124) loops.
33-64 Rows: repeat the rows of 1-32 another 1 time - on the spokes 116 (124, 132) loops.
65th row: 4 facial hinges, * 1 Nakid, 2 loops to stick together face with a slope to the right, 2 facial loops; Repeat from * to the end of the row.
Repeat the 65th row until the height of the hood reaches 33 cm.
Formation of the top of the hood:
Next row: 4 Facial loops, * 1 Nakid, 2 loops Slip together face with inclination to the right, 2 facial loops; repeat from * up to 2 loops before the marker, 2 loops to stick together face with a slope to the right, marker, 2 facial hinges, * 1 Nakid, 2 loops to stick together face with a slope to the right, 2 facial loops; Repeat from * to the end of the row - on the spokes 115 (123, 131) loops.
Next row: 4 Facial loops, * 1 Nakid, 2 loops Slip together face with inclination to the right, 2 facial loops; repeat from * to 2 loops in front of the marker, 2 loops to stick together face with a slope to the right, marker, 1 facial loop, * 1 Nakid, 2 loops to stick together face with inclination to the right, 2 facial loops; Repeat from * to the end of the row - on the spokes 114 (122, 130) loops.
Next row: 4 Facial loops, * 1 Nakid, 2 loops Slip together face with inclination to the right, 2 facial loops; repeat from * up to 5 loops in front of the marker, 1 nakid, 2 loops to stick together face with inclination to the right, 1 facial loop, 2 loops to stick together face with a slope to the right, marker, 1 facial loop, * 1 nakid, 2 loops facial with inclination to the right, 2 facial loops; Repeat from * to the end of the row - on the spokes 113 (121, 129) loops.
Next row: 4 Facial loops, * 1 Nakid, 2 loops Slip together face with inclination to the right, 2 facial loops; Repeat from * up to 5 loops before the marker, 1 Nakda, 2 loops to stick together face with a slope to the right, 1 facial loop, 2 loops to stick together facial with a slope to the right, marker, 2 loops to stick together face with inclination , * 1 Nakid, 2 loops to stick together face with a slope to the right, 2 facial loops; Repeat from * to the end of the row - on the spokes 111 (119, 127) loops.
Next row: 4 Facial loops, * 1 Nakid, 2 loops Slip together face with inclination to the right, 2 facial loops; repeat from * to 1 loop in front of the marker, 1 facial loop, marker, 2 loops Together with a facial with a slope to the right, 2 facial loops, * 1 Nakid, 2 hinges to stick together with a slope to the right, 2 facial loops; Repeat from * to the end of the row - on the spokes 110 (118, 126) loops.
Next row: 4 Facial loops, * 1 Nakid, 2 loops Slip together face with inclination to the right, 2 facial loops; repeat from * to 1 loop in front of the marker, 1 facial loop, marker, 2 loops to stick together face with inclination to the right, 1 facial loop, * 1 Nakid, 2 loops to stick together with a slope to the right, 2 facial loops; Repeat from * to the end of the row - on the spokes 109 (117, 125) loops.
Next row: 4 Facial loops, * 1 Nakid, 2 loops Slip together face with inclination to the right, 2 facial loops; repeat from * to the marker, marker, 2 loops to stick together face with a slope to the right, 1 facial loop, * 1 Nakid, 2 loops to stick together face with a slope to the right, 2 facial loops; Repeat from * to the end of the row - on the spokes 108 (116, 124) loops.
Replace 54 (58, 62) hinges on the spare knitting needle. Close the hood loops on two spokes by closing the loops with three knitting needles.
Right pocket:
Start knitting openwork drawing of false harnesses:
1st row (facial): 2 facial loops, * perform a false harness on the 3-loops, 1 facial loop; Repeat from * to the last loop, 1 facial loop.
2nd row: Pouring loops.
3rd row: 4 facial loops, * perform false harness on the 3-loops, 1 facial loop; Repeat from * to the last 3-loops, 3 facial loops.
4th row: Pouring loops.
Repeat the rows of 1-4 more than 4 times, then once again repeat the rows of 1-2.
23rd row: 4 facial loops, * perform a false harness on the 3-loops, 1 facial loop; Repeat from * to the last 3-loops, 2 loops to stick together face with a slope to the right, 1 facial loop - a 1 loop.
24th and all invalid rows: Pouring loops.
25th row: 2 facial loops, * perform a false harness on the 3-loops, 1 facial loop; Repeat from * to the last 4-loops, 1 facial loop, 2 loops. Together with a facial with a slope to the right, 1 facial loop is reduced 1 loop.
27th row: 4 facial loops, * perform a false harness on 3 hinges, 1 facial loop; Repeat from * to the last 5 loops, 2 facial loops, 2 loops to stick together face with a slope to the right, 1 facial loop - low loop.
29th row: 2 facial loops, * perform a false harness on the 3-hinge, 1 facial loop; Repeat from * to the last 6 loops, perform a false harness on the 3-loops, 2 loops to stick together face with a slope to the right, 1 facial loop - a 1 loop.
Freely close all loops as facial.
Left pocket:
Spokes number 3.25 dial 59 (67, 79) loops.
Tie 1 row with hinges.
Tie rows 1-22 as for the right pocket.
23rd row: 1 facial loop, 2 loops to stick together face with a slope to the left, 1 facial loop, * perform a false harness on the 3-loops, 1 facial loop; Repeat from * to the 3rd loops, 3 facial hinges - 1 loop is reduced.
25th row: 1 facial loop, 2 loops to stick together face with a slope to the left, 2 facial loops, * perform a false harness on the 3-loops, 1 facial loop; Repeat from * to the last hinge, 1 facial loop - 1 loop is low.
27th row: 1 facial loop, 2 hinges to stick together face with a slope to the left, 3 facial loops, * perform a false harness on the 3-loops, 1 facial loop; Repeat from * to the 3rd loops, 3 facial hinges - 1 loop is reduced.
29th row: 1 facial loop, 2 loops to stick together face with a slope to the left, * perform a false harness on the 3-hinge, 1 facial loop; Repeat from * to the last hinge, 1 facial loop - 1 loop is low.
Repeat rows 23-30 more 5 (5, 6) times - on the spokes 35 (43, 51) loops.
Freely close all loops as facial.
Completion:
Run the armpits seams. Sat out details.
Sew pockets to the shelves, aligning the set edges of pockets with the upper boundary of the gum, and the long side sides of the pockets with the strapping of the zipper shelves.
Plot zipper to the edges of the shelves. Sust a zipper. Pull the planks from the wrong side to the edges of the shelves, imposing them on the edge of the zipper. Sew strips.
Finally disappear knitted sweatshirt.
A back to type 78 (86) 94 loops on the spokes 78 (86) 94 and for the plank to bind 3 cm with a rubber band, while in the last ironsion row, evenly distributed, add 19 (20) 21 p. \u003d 97 (106) 115 p. Continue the work of the openwork pattern. After 29 cm \u003d 72 rows from the plank for the start of the regulated bevel on both sides, make a mark from the edge. In the following row, 1 x 1 p., Then, in each 2nd row 30 (33) 36 x 1 p. After 53.5 cm \u003d 134 rows (56 cm \u003d 140 rows), 58.5 cm \u003d 146 rows from the initial row to close the remaining 35 (38) 41 p. For the neck. Before knit, as a back, but with a cut and a neck. After 27 cm \u003d 68 of the rows (29.5 cm \u003d 74 rows), 32 cm \u003d 80 rows from the plank are closed for a cut, the average 7 (6) 7 p. And both sides are 45 (50) 54 p. Respectively finish separately. After 51 cm \u003d 128 rows (53.5 cm \u003d 134 rows) 56 cm \u003d 140 rows from the plank, close for the neck of the inner edge 1 x 5 (7) 8 p., Then in each 2-m. Close 2 x 2 . At the back altitude, close the remaining 5 p., They relate to the neck. Sleeves to dial on the knitting needles for each sleeve 44 (48) 52 loops and for the plank bind 3 cm with a rubber band, while in the last irons, evenly distributed, add 8 (9) 9 p. \u003d 52 (57) 61 p. Continue An openwork pattern, while starting with 1 edge and 2 (0) 2 p. Before the rapport, execute Rapport 5 (6) 6 times, finish 3 (1) 3 p. After the rapport and 1 edge. For the bevel of the sleeve, add from both sides in each 8th row from the strip 8 (8) 5 x 1 p. And in each 6th row 2 (2) 6 x 1 p., In addition, the 1st increase in the risk viscous , All subsequent performing alternately facial stroy and sweating \u003d 72 (77) 83 p. After 34 cm \u003d 84 rows from the plank, make a mark from the edge from both sides. The following row is emphasized from both sides of 1 x 1 p., Then in each 2nd row, it is emphasized, 30 (33) 36 x 1 p. After 58.5 cm \u003d 146 rows (61 cm \u003d 152 rows) 63.5 CM \u003d 158 rows from the plank close the remaining 10 (9) 9 p. for the neck. Hood knit across, starting with a plank. Arrow on the pattern \u003d direction of knitting. Dial on the knitting knitting 124 loops and for the plank to bind 1.5 cm \u003d 5 rows of handful viscous, starting with 1 purl range. Continue the work of the openwork pattern. For rounding after 3 cm \u003d 8 rows from the plank, it is closed on both sides of 1 x 1 p., Then in each 4th row 5 (6) 7 x 1 p. And in each 6th row 5 x 1 p. \u003d 102 (100) 98 p. After 24 cm \u003d 60 rows (25.5 cm \u003d 64 rows) 27 cm \u003d 68 rows from the plank, put the hinges on 2 knitting of 51 (50) 49 p. In parallel and combine their knitted seam. Assembly for splitting planks to dial into circular spokes along the edges of the cut of 40 loops and tie 1.5 cm \u003d 5 rows with a handful, starting with 1 of the irons. Then close the hinges like the facial. Run the seams of the regulated, side seams and seams of sleeves. Insert a hood in the neck, with a slightly charged. Cut 2 threads of 350 cm long and twist cord from them; Length in finished form - approx. 120 cm. The cord from the lower end of the cut with a uniform interval of the cross-elder to turn through the planks. Ends tie. Hoodie (English Hoodie, from Hood - Hood) - a kind of sweater, closing the thigh, from a soft cotton knitwear or fleece, with a hood. The most common hood of such a model is Anorak (with a front desk). According to the Russian classification, Hoody is associated with a sweatshirt, which, however, has a bolt in front and some other differences.
A hood or a capor can be both a separate detail of your clothing, and the addition to the usual switch / sweater. Hoods are very loved by children and teenagers. Especially organic the hood looks at children's sweaters, trendy Hoodies, jackets and coats. Coat, jacket with a hood, not only fashionable, but also functionally. In the snow, rain, strong wind hood will save you from unpleasant weather phenomena. Today we will tell you how to tie a hood knitting needles.
Knit hood with knitting needles in different ways. The easiest way is to tie a rectangle and sew it one of the sides.
Knit a hood separately from the sweatshirt. We recruit the required amount of loops on straight knitting needles. The loops should be exactly as much as the loops along the entire length of the neck plus the staks for the fasteners. Knit a rectangle up to the height of the head plus 3-4 cm. The pattern can be used the same as on the shoes.
Pattern of a hood knitting needles:

The second method - you can raise the loop in the neck of the coal neck and start knitting the main pattern of the hood according to the method described above.
How to knit a hood - collar knitting
In knitting, along with a classic hood, reminiscent of the sock heel, a hood collar is especially common. You can perform it in several ways. Here is the easiest of them.
The line of the neck on the pattern of the backrest and passes remains unchanged, only the dimensions of the clasp bar and the hood are planned. Tie a back and shelves, leaving the neck loop open. Sew the product, put on one knitted loop of the neck and, starting from point A, on the front side of the work, lie for a number of facial loops. Loops to the point and renote to the right needle, without told. Next, perform a hood with a pattern of a plank, such as a handful, adding the loop in the middle of the hood behind (see the "+" sign) or the edge of the hood.
When the height of the canvase reaches 35-38 cm, finish the work of the auxiliary thread, after ironing, depart it and sew the open loops with a "loop in a loop".


There is another way to unsightening the hood.
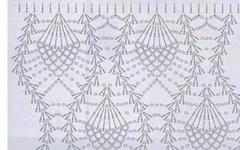
For a classic hood you need to dial loops along the edge of the neck. In order to be neatly typing on the front side. Secure the thread at the beginning of the row and with the help of the knitting needles (or hook) start through the loop on the product stretching the working thread. The loops remain on the needle. Drawing a loop need to tie 2 rows with a simple facial stroke.
Next, the hood knives shortened rows. To do this, check the next facial row not to the end, turn knitting, make the nakid, and again do not communicate with a number of hinges, turn knitting. Thus, one side of the hood is tied first, then the second fit. Thus, knit the hood of the desired length. Then we close the loop of the side.
After that, the middle part knits. When viscating the middle part, we pick up the side loops and end knitting. Several rows along the edge of the hood can be seen by English elastic or garbage in crochet. This is how the exemplary hood scheme looks like.
Interesting models with a hood from the Internet
Blue coat with hood
Beautiful and stylish model. Coat decorated with large flowers and branches with leaves behind, and in front it is a simple model.
Breast girth: 86 (97.105. 113, 120) See Size: XS (S, M, L, XL).
You will need: 12 (12. 13. 13. 14) MOTOKS BRIGGS & LITTLE ATLANTIC yarn (100% wool. 124 m / 11Vg), color - 73, red
- circular spokes number 10-12 with a length of 40 and 80 cm or other size to achieve the required knitting density
- Petaperzhatel for Kos
- 6 large buttons
- Markers for knitting
- Needle for yarn
- 5 pins for loops or remnants of unnecessary yarn.
Size 43 * 61 cm.
This is a trend model from Vogue Knitting magazine.
Knitted Hood Mocha Hoodie Hat from Sandi Prosser
The hood fit across, ranging from the front to the rear and then the vertical seam is performed.
Size 55 - 56, 57 - 58. The length of the circumference on the bottom of the product (neck) - 47, 5 (52.5). Height 25cm.
Hood with ears
To knit, you will need: Lana Gold Plus yarn (51% acrylic, 49% wool, 140 m / 100 g) - 200 g of beige color, knitting needles No. 5, 3 buttons, hook, syntheps.
Schrah with a hood
Dimensions: 116 / 122-128 / 134-140 / 146 152/158. You will need 650-700-750-800 g Yarh yarn Schachnmayr SMC Cotton Time (100% cotton. 88 m / 50 g); Spokes number 3 and No. 3.5; Circular Spokes No. 3.5; auxiliary needle; 7-8-7-8 buttons.
Scarf-hooded knitting
Scarf dimensions: Length 210 cm, width 30 cm. Hoodline: 72x84 cm.
For knitting scarf-hoods, 10 yarn motals will be required (75% wool, 25% silk; 220 m / 10 g); Spokes of 7 mm, auxiliary needles for brass, hook 7 mm, hinge holders.
Basic mating.
Filming knitting: facial loops in each row;
Facial smooth: facial loops in face rows, hinges in the involneling rows;
Spit: knit 16 loops according to schemes A and in where only the front rows are shown (in the wrong rows knit in the figure), repeating vertically 1-10 rows;
Edge loops: knit facial in each row.
Knitting density:
13 p. And 20 p. \u003d 10x10 cm facial sting thread in 2 additions;
16 p. Patterns with braids \u003d 7.6 cm in width.
Interesting models with a hood on our site:
Yellow Cape Hooded
Dimensions: 42 (46).
Materials: 1000 (1 150) Gram of yarn "Merinos Otto" (100% Merino wool, 50 grams \u003d 90 meters), Spokes No. 3.5 and No. 4, Hook No. 2.
Types of mating: Hollow gum, 2 × 2 gum, persons. smooth, ezd. Speed.
Knitted tunic with a hood
To knit tunic you will need: Catania yarn (100% cotton; 50 g / 125 m): 250 (300; 350) G № 00106 white, 300 (350; 400) g № 00164 dark blue. Spokes number 2.75 and 3. Circular spokes number 3.
Hooded vest
Dimensions of the vest: 36/36 (40/42) 44/46.
For knitting, you will need: 400 (400) 450g. Windsor purple yarn (55% of merino wool, 31% of the royal mohair, 14% polyamide, 110 m / 50 g); Spokes number 4.5; Hook number 4.
Scarf with hood
The hit of this winter is a hood, smoothly turning into a scarf. The thing is not only fashionable, but also very comfortable.
You will need: the yarn "secret of success" (100% wool, 250 m / 100 g) - 200 g of purple color, knitting needles.
Coat with hood
You will need: 1700 grams of 1700 g of walnut yarn Mondial Merino Maxi (50% Merino wool, 50% acrylic, 60 m / 100 g); Straight and auxiliary spokes number 8.
Melange jacket with a hood
Jacket with a hood tied in two threads.
Size: S-M-L-XL - XXL - XXXL.
You will need: 350-400-450-450-500-550 g Fabel yarn from Garnstudio Colors No. 161 (Rose Dream) and 350-400-450450-500-550 g. Colors No. 153 (TEX MEX): Figures 5 mm, 6 -6-6-7-7-7 metal buttons.
Coat size: OG 90 cm.
To knit coat, you will need: 700 g of thread, NR knitting needles. 5.5; 4 large buttons.
Vest with hood
Dimensions of the vest: 38-42
You will need: 750 g of blue yarn Linie 270 Faro (60% wool, 40% polyacryl. 80 m. 50 g) double-sided transparent zipper 50 cm long straight knitting needles # 5 and No. 6 long circular spokes No. 5 Hook number 5.
Knitted models with a hood for children
Striped sleeveless hooded
Clearflower dimensions: 92 (104). You will need: 100 g of orange and bright pink, 50 (100) g of yarn of color cyclamen (100% polyamide, 90 m / 50 g); Straight Spokes No. 3 and 4; Fugged Spokes number 3.
Coat for a girl with a hood
Size: 68/74 (74/80) 80/86.
You will need: 300 (400) 400gr melange yarn Linie Miranda and 200 gr Orange yarn Linie Champ (100% Merino wool, 70m / 50 g); Spokes number 7-7.5; Hook number 5,5; 3 buttons.
Size 2-3 years. You will need: "Popular" yarn (50% wool, 45% acrylic, 5% acrylic volumetric, 133 m / 100 g) - 400 g of gray, residues of fine yarn gray, knitting needles №4.5 and №2,5, 4 buttons.
Hooded jacket for boy
Size: 110/116. You will need: 450 g beige yarn Cool Wool (100% merino wool, 160 m / 50 g); Spokes number 4; Hook number 3.5; Zipper zipper 40 cm long.
Dimensions:140/146 (152/158) 164/170
You will need:9/10/11 Sveto-gray motors, 2/2/2 Mokea Blue, 1/1/1 Schachenmayr Universa yarn (55% wool, 45% polyacryl, 125 m / 50 g); Spokes number 3 and No. 3.5; Circular spokes number 3.
Rubber 2/2:alternately 2 persons., 2 izn.
Facial smooth:persons. R. - Persons. p., izn. R. - Ozn. P.
Special References 2. p.:at the beginning of those. R. 1 chr., To peck 3 p. Together of persons., Bring to the last 4 p. Row, perform 1 double barrel (remove 2 p. As individuals., 1 individuals. And stretch it through the loop removed) and 1 chrome.
Special References 1 p .: At the beginning of those. R. 1 chr., To peck 2 p. Together of persons., Bring to the last 3 p. Row, execute 1 broach (remove 1 p. As individuals., 1 individuals. And stretch it through the removed loop) and 1 chrome.
Strip alternation sequence:4 r. Blue, 6 p. Light gray. 4 r. Blue thread.
Knitting density, persons. smooth, knitting needles 3,5: 22 p. And 30 r. \u003d 10 x 10 cm.
Back:on the spokes number 3, the blue thread dial 102/110/118 p. and knit 2/2 with a rubber band, while in the 1st elevation. R. Start with 1 chridge., 1 is elevated, then knit alternately 2 persons., 2 izn. and finish a number of 2 persons., 1 is elegant. and 1 chrome. Tie more 1 r. blue. 3 r. Light gray, 3 r. Yellow-green thread, 3 r. Light gray and 3 r. Blue thread. Tie 1 out. R. izn. p. Blue thread. Then go to the spokes number 3.5 and knit faces. Ironing light gray thread, while in the 1st faces. p, evenly add 2 p. \u003d 104/12/120 p. After 60/68/78 p. \u003d 20 / 22.5 / 26 cm from the gum tie 14 p. Persons. Schedule in the specified sequence. Next knit faces. Sliding light gray thread. After 76/90/106 r. \u003d 25/30/35 cm from the gum Close for the armor on both sides of 1 x 3/4/5 p., Then in each 2nd p. 1 x 3 p., 2 x 2 p. And 3 x 1 p. \u003d 78/84/90 p. After 21/22/23 cm from the beginning of the armor, close for the shoulder beeps on both sides in each 2-p. 1 x 6/8/8 p. And 2 x 7/7 / 8p. At the same time, after 21/22/23 cm from the beginning of the prugi, it is high-side 14/16/18 p. And both sides finish separately. For rounding, close from the inside edge in every 2nd p. 2 x 6 p. Total backrest height 53/59/65 cm.
Before:on the spokes number 3, the blue thread dial 102/110/118 p. and tie 15 p. Rubber 2/2, as on the back. Then go to the spokes number 3.5 and knit faces. Ironing light gray thread, while in the 1st faces. R. Evenly add 2 p. \u003d 104/12/120 p. for kangaroo pocket in the following persons. R. Average 80 p. \u003d 36 cm postpone on the auxiliary The needles, while knit as follows: 1 chrome. and 11/15/19 p. \u003d 5/7/9 cm, for the back of the pocket re-type 80 p., then associate the remaining 11/15/19 p. (\u003d 5/7/9 cm) and 1 chrome. After 60 p. \u003d 20 cm all loops postpone on the auxiliary Spin. For the front of the pocket on the pending 80 p. Tie 24 p. \u003d 8 cm faces. The light gray thread, to form rounded inputs in the pocket, close on both sides of 1 x 1 p., Then in each 2nd p. Distance from both sides by special refills 2 x 2 p. and 15 x 1 liters. \u003d 40 p. \u003d 17 cm. After the execution of these 36 p. \u003d 12 cm in the following persons. R. Tie 1 chrome. and 31/35/39 P. Pron. Plant A spoke with a postponed 40 p. front of the pocket in front of the loops of translating and stick together. 1 p. Front of pocket and 1 p. Pron. Tie the remaining 31/35/39 p. Provision and 1 chrome. After 60/68/78 p. \u003d 20 / 22.5 / 26 cm from the gum tie 14 p. Persons. The stroke in the specified sequence, however, in the center is transferred to interrupt the execution of the bands and knit on the average 44 p. Light gray thread. After that, on all hinges knit faces. Sliding light gray thread. After 76/90/106 r. \u003d 25/30/35 cm from the rubber band Perform the armies on both sides, as on the back. After 12/13/14 cm from the beginning of the prugi, it is possible to close the middle 12/14/16 p. And both sides finish separately. For rounding, close from the inside edge in every 2nd p. 1 x 4 p., 1 x 3 p., 1 x 2 p. And 1 x 1 p., In each 4th p. 3 x 1 p. After 21/22/23 cm from the beginning of the armor, close for the shoulder beeps on both sides in every 2nd p. 1 x 6/8/8 p. And 2 x 7/7/8 p. The total height of 53/59/65 cm.
Sleeves:on the spokes number 3, the blue thread dial 54/58/58 p. and tie 15 p. Rubber 2/2, as on the back. Then go to the spokes number 3.5 and knit faces. Ironing light gray thread, while in the 1st faces. R. Evenly add 2/0/2 p. \u003d 56/58/60 p. for the stems of the sleeve, starting from the gum, on both sides for sizes 140/146 and 152/158 in every 10th p. 2/1 x 1 p. And in every 8th p. 9 / 11x1 p.; For size 164/176 in every 8th p. 13 x 1 p. \u003d 78/82/86 p. After 84 p. \u003d 28 cm from the gum tie 14 p. Persons. Schedule in the specified sequence. After that knit faces. Sliding light gray thread. After 100/106/112 p. \u003d 33/35/37 cm from the gum Close for Oak Sleeves on both sides of 1 x 3 p., Then in each 2nd p. 3 x 2 p., 16/17/19 x 1 p., 2 x 2 p., 1 x 3 p. And close the remaining 14/16/16 p. Total height of the sleeve 53/56/59 cm.
Hood:on the spokes number 3.5 with light gray thread to dial 52/54/56 p. and knit faces. smooth. To form a bevel from behind in the center of the hood in each 6th p. (\u003d persons. r.) From the left edge add 3 x 1 p. And in each 4th p. 5 x 1 p. For this, in front of the last 2 p. A series of eliminate 1 persons. Screen. From the transverse thread, then knit 1 persons. and 1 chrome. \u003d 60/62/64 n. Next to knit without additives. After 26 cm, perform a recess for rounding along the back seam of the hood, for this from the left edge in the IZN. R. Close 1 x 1 p., in the next 4th p. 1 x 1 p. And in every 2nd p. 7 x 1 p., 2 x 2 p. And 2 x 3 p. In the following persons. R. Close the remaining 41/43/45 p. The overall height of the hood 35 cm. The second half of the hood is symmetrically.
Assembly:perform shoulder seams; Switch the sleeves, perform the side seams and seams of sleeves. Send the sides of the front of the pocket to the edge to the height of 8 cm. Run the rear seam of the hood. For a hood plank for circular spokes No. 3 along the edge of the hooding of a blue thread to dial 160 p., Tie 1 out. R. Persons. n. and 1 persons. R. Persons. p. In the next is. R. Knit with a rubber band 2/2 as follows: chr., 2 is ezd., Then alternately 2 persons., 2 izn., Finish a number of 1 chrome. Tie another 2 r. Blue, 2 p. Light gray thread, 2 r. Zhilto-green thread, 2 r. Light gray and 2 p. Blue thread. In the following persons. R. All loops close the blue thread. Send the hood to the neckline, starting from the middle of the pass, with the ends of the plank to put 3 cm on each other.