We always want to give our loved ones a piece of warmth and light. But sometimes we don't know how to do it. But the answer is simple - you just need to give something. After all, this is how the memory of you, the significant date and event will remain. Therefore, today I invite you to make congratulations in the form of postcards for the bright day of Easter.
This is one of the options that can be given as a gift, if you have a desire to create something more, then I invite you to view the information about creating, and. How, which also act as a present and make, we have already discussed with you. Since you and I are fully preparing for Easter, I would like to give you a note about a recipe for an eye that does not crumble, described by my colleague in this article https://mnevkusnotut.ru/deserty-i-napitki/kak-sdelat-glazur-dlya -kulicha.html .
And for this article I have chosen the most interesting and new ideas that both children and, of course, adults can turn into reality. The highlight of some crafts is that they are created using different techniques and shapes, so read on, it will be interesting!
Of course, for kindergarten we will create presents from paper and cardboard. One of the main advantages of these materials is that they glue and cut well.
The main symbols of Bright Day are eggs, chicken, rabbit and Easter cake, so we will use them in our creativity.
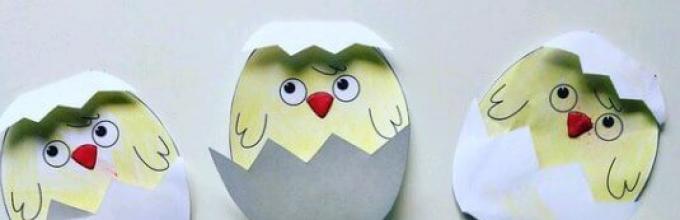
I suggest making a cute applique. You only need to paint the inside.

I am attaching the template itself so that you can reproduce it without difficulty. We draw along the line of the shell along the ruler with the blunt side of the knife so that the front part of the product bends well.

Another option for a very simple congratulations. You can take not ordinary paper, but, for example, velvet or for decoupage. It is sold in craft stores and comes in many different backgrounds and textures.

Another simple craft option in the shape of an egg. My daughter and I made a similar applique. Only instead of ordinary paper strips they used self-adhesive ones. And as an idea, you can replace them with a strip of decorative tape. They are sold in a huge variety of colors and patterns.

Using not only paper, but also improvised materials, such as napkins for buns, you can create an entire composition on an Easter theme.

Your grandmother will definitely like this funny Easter cake. But all the elements will need to be cut out by an adult, because preschoolers do not yet know how to cut lines evenly with scissors. And to avoid getting a square instead of an egg, help your child and go through this stage of work together.

A very simple option in front of you is the Easter bunny or bunny. Even if you do not perceive the symbolism of Europe, it is still worth making such an animal with your child.

Template for it. You can also cut it out of fabric, felt, cardboard, and make a tail with a cotton pad or pompom.

This is a difficult craft for a child, but with mom you can definitely conquer it! Here you will need scissors for ornaments, we bought these at a stationery store. And they cost about 50 rubles, if I'm not mistaken. 
Of course, we celebrate Easter in the spring and at this time the snow melts and the trees wake up. During this period, we bring home a willow twig. Let's show this in the picture. The willows are made from the tip of a cotton swab.

We will lay out the middle using glue from torn paper or pieces of colored napkins.

An unusual idea for a postcard - an envelope. I really liked it! Only I would draw a chicken inside and let the child color it, and then I would form an envelope.

The funny bunny won't win over me alone. The craft is very original and I have never seen anything like it in our gardens and schools.

A simple bunny is very easy to make. Use a marker or plasticine to mark the eyes.

Another idea for a craft, it is done in the presence of the mother or teacher in order to guide the child in time, because the rabbit's head is made from a heart-shaped part. And, for example, my baby glued it the way he saw it, with the tip down) Of course, it also turned out funny, but still not quite right.

Here you can better see what parts the animal consists of.

A postcard with a surprise will not leave anyone indifferent. Neither the giver nor the receiver! It is better to make the egg from thin paper so that it breaks more easily. Or you can make cuts in advance inside the middle of the part.

Another option with a surprise. Wishes are written on the back because there is a chicken inside.

This is how the shells open and release it.

Another option according to the same scheme, but more modified.

I propose to make funny residents who live in pockets.

This is what the animal looks like outside the pocket.

Template for cutting out chicken and bunny.

And this is the template for the pocket itself. By the way, this craft can also be made from felt.

Newly hatched chicks can be a great decoration for a gift.

Or these painted chickens.

Of course, I couldn’t pass by the original folding craft

This is what it looks like from the inside.

Using this template you can make the main part, all dimensions are indicated! 
Using a ruler and the blunt side of a knife, bend the lines inward so that they fold easily.
Then make holes on the outer lines into which you insert a ribbon or ribbon.

Bend the piece and paint or decorate the surface.

Another idea using openwork paper napkins for buns. They are rolled into a little ball to place the image of eggs inside.

Option for a children's Easter tree. Eggs can be made not only from paper, but also from felt, salt dough or cardboard.

There are many eggs of different sizes in this picture so you can choose the ones you need.

Another one with birds. At first I mistook them for chicken and chicken, but maybe it’s not them. What do you think?

We fold the paper into a triangle, highlighting a strip under the bottom. We bend the lines well and glue the ends on the wrong side.

Cut out grass from green paper.

And for the birds we will use the shape of a circle of different diameters. For chicken, take a diameter of 10 centimeters, and for chicken - 5 centimeters. Accordingly, make two circles of white and yellow colors.

Fold them in the middle, glue eyes on both sides and form the craft itself. You can write your wishes inside.
Another simple idea for decorating the front of a gift. I think it should inspire you.

A similar craft with fantasy animals made from circles is below. You can put these bunnies and quacks on the table, and write your wishes inside, because they open up like a book.

Here is the diagram for the chicken.

And this is for the rabbit. 
Now assemble the animals step by step according to the instructions.

Using the weaving technique, when the strips are arranged in a checkerboard pattern, we can make such a craft.

The bunnies were also made using the same technique.

You can also make a cute shape using the diagram below. To ensure that both sides are even, you'll want to roll up a piece of paper and, being careful not to move the ends, cut out the front. Fold the template in the middle.

Three-dimensional pictures always seem more difficult to execute. But this is not always the case. 0

I think you will be inspired by one of the above options and will definitely create an extraordinary gift. And the child will remember this creative process for a long time.
We make congratulations using different techniques
But even using one material, for example paper, you can create a postcard using different techniques. Remember about quilling and scrapbooking. And there are many such techniques, so I propose to cover them in more detail. Somewhere I’ll give a detailed explanation with diagrams, and I’ll show you some pictures as an option for inspiration. After all, everyone always sees something different, suddenly a brilliant idea awakens in you and you make something even better than the original.
This picture is interesting because its edges are stitched using a sewing machine. It immediately turns out that the composition is well-formed and complete.

I suggest you repeat a similar craft using this template.
It's better to take thick paper or felt!

Fabric, threads, pompoms - all this can make your applique unusual and creative. Like in this photo.

The scrapbooking technique is very popular. It involves using layers, volumes, different materials.

For example, combine fabric and cardboard. Look that the center of the composition is also stitched on a sewing machine.

Another example of how interesting different textures look when they are combined correctly. This bunny's fluffy tail just begs to be stroked. And a seemingly simple postcard immediately acquires some kind of charm.

To confirm my words, there is another option with a cardboard rabbit and a fur tail.

Also, the scrapbooking technique involves the use of different textures. So this egg is made on the basis of paper with an embossed three-dimensional ornament. By the way, for this purpose you don’t have to buy special sheets in specialized stores, but use regular wallpaper!

Using these lines you can cut out the shape of an egg.

More cool cards for you.

If you want to really surprise your family and do something non-standard, then paint the shell with flowers! Everyone will be surprised!

This cool craft is made in one color, but using different patterns, so it looks fun and not boring.

Oh, this direction of creativity on craft paper captivated me! The use of simple materials, geometric regular shapes and colors of the companions is simply amazing. Not bright shades are used, but muted ones, which adds mystery to the cards and taste to the needlewoman.

Well, or a brighter version for children with chicken, which is made in bright colors.

To confirm my thoughts that it is interesting to use different textures.

Or like this cool applique.

A multi-level craft that a child can easily repeat. Tanya, elements made of wood or beads hold up well. If you glue them with hot glue.

An Easter wreath is placed in the center of the composition of this craft.

Another simple but so luxurious idea! All elements are color-matched and look how pleasing it is to the eye! 
You can repeat this option by printing this diagram.

And also a godsend for the mother of a preschooler! Layer the egg with colorful buttons. In the picture they are divided by color, but you can use only one tone, but different sizes of buttons. The child will definitely enjoy gluing them and looking for a place for them!

Now I would like to show you an example of a felt product. You can also leave a wish on it with a pen or marker and make a gift.

If there is no felt, then take plasticine. Turn on your imagination! Using the simplest and most famous shapes: ball and flagellum, decorate the cardboard base. This option is more suitable for children under 4 years old. This way you will teach them how to work with plasticine and create, and also develop fine motor skills!

The quilling technique is also popular, but it is made only from paper. There are so many options for folding a strip. If I'm interested in you, try making a flower using this technique, which is shown at the top of the postcard.

A simple present. The main thing here is to choose the shades of the details well. So that they look harmonious.

There is one more option for you. I liked its elongated shape and the use of woolen threads.

We made fabric cards, but what if you gave a knitted Easter symbol?

Or make a cross-stitched center in the middle of the paper base.

I also provide a diagram according to which you can make embroidery. By the way, there is an option to use beads using this pattern as well.

To keep your embroidery longer, place it under a frame.

Congratulatory panel made from cocktail tubes. I was simply incredibly amazed by this work. I will definitely repeat it with my child!

Do you know the technique using stamps? You don’t have to buy them; you can take potatoes, wine corks or a sponge for this purpose.

Cool idea of using threads. When a shape is cut out from the front side, and threads of different colors are fixed inside with glue so that there are no gaps.

I would even take not simple balls, but floss to emphasize the brightness of the craft!
Easy master class on appliques in the shape of an egg
Let's take thick cardboard as a basis, from which we will cut out the shape of an egg.

You will need to make several drops of different sizes, as shown in the picture, each size is numbered so as not to get confused. It is not necessary to make exactly 10 sizes, take them at your discretion.

Now take a sheet of double-sided paper and fold it in half. We will apply our droplets to the fold line and begin to cut them out without touching the middle. This is how such sweet hearts will learn.

We will also bend them so that only one half of the part is looking at you, and we will smear the other half with glue and fix it to the base. You can make not only flowers like in the photo, but also come up with your own patterns.

That's all. I would like to note that it looks very beautiful when the edge is decorated.
Take another tutorial using eggs and an Easter basket. I give it to you in video format so that you can have a good understanding of the whole process of work.
I think you will like this idea too.
Congratulations in the form of coloring pages
To develop your child’s color sensitivity and accuracy, I suggest you use Easter-themed coloring books. Some of the ones I have given can immediately serve as a postcard, and some can even serve as a basis for creativity.

The baby will really like chicken in a basket.

If you cut out the design along the contour, you will get an almost finished gift.

I will also use one of these templates for the upcoming Easter, but my child and I will decorate with plasticine. This technique can be easily mastered. When a piece of plasticine is smeared or, as they say, stretched inside the part, respecting the boundaries.

Wonderful coloring of a painted egg, this is where you can get your hands on something before painting the boiled eggs!

This postcard, which is ready, has a rectangular shape, all that remains is to fill it with paints.

Another egg idea.

The Easter Bunny accompanied us throughout the entire article, so let's color him too.

My dears, I was pleased to describe for you all kinds of postcard options. Some of them are very easy, while some are more difficult and require manual dexterity and parental supervision. but they are all very interesting and allow you to realize your potential and create!
Hello everyone, hello!! Today I suggest you use your imagination and work with your hands, as we will make beautiful congratulations for the Holy Holiday.
Let me remind you that there is already an excellent selection on this occasion, from various scrap materials, and we also learned how to make souvenirs in the form. So if you need ideas on this, don't hesitate to come in.
Well, the question of congratulations on any holiday is always considered relevant, and it’s very cool to receive gifts that are made with your own hands. And a postcard has always been an excellent present, and if it is made in a special style and with taste, then such a wish will also be original.
For you, according to established tradition, I found the coolest and most beautiful, in my opinion, congratulations, which are made from different materials. So, read and choose!!
So, after looking through our almighty Internet, I was simply dizzy with the fact that there is so much that can be done. Moreover, the work varies in complexity. There are some that the little ones can handle, and there are also more difficult ones that require the help of an adult.
Let's quickly get acquainted with the options for creative wishes.
Look how cute these eggs are, made using the scrapbooking technique. You will learn how to make such a miracle a little later, so read everything to the end.

Here's a great idea for younger students. You just need to take an A4 sheet, trim the edges with curly scissors and draw a thematic plot, decorating it with ribbons and sparkles.

But here’s an idea made from cardboard and prepared pictures; all you have to do is cut and glue the parts.

Look how adorable the bunny is!! It is made of ordinary geometric shapes, decorated with flowers and ribbon.

And here you see elements of quilling and appliqué made from yellow napkins. Everything is done simply, but looks impressive.

An excellent option for appliquing a basket, and willows can be made using cotton swabs.

This job is for older guys, or adults. You must have both taste and accuracy in order to accurately cut out and beautifully glue small parts.

The product can also be made from fabric, for example, use thin fabric napkins or felt, and use velvet cardboard as a base.

Look what interesting ideas I found in the Land of Masters, it looks very symbolic and festive.

Here is another felt work. These voluminous yellow chicks will lift anyone's spirits!

Well, where would we be without three-dimensional 3-D options? We’ll make this beauty a little later.

As you noticed, all gifts are made with the image of undeniable attributes of the holiday: chickens, eggs, rabbits, baskets, etc. It’s understandable why, because preparations without such symbolism will not be festive, just as this day will not be bright without and.
Easy Easter cards for kids
The following works will of course contain the above attributes, so don’t be surprised. And naturally, our children are the main creators in this matter, and we, as teachers and parents, must help them develop in this direction.
Together with your child, you can cut out the halves of the shells and complete the remaining details with a felt-tip pen, then decorate with additional elements.

Here is a version of a very simple application: we cut out the grass from corrugated paper, and the eggs from colored paper.

To do this work, prepare a rabbit and oval template. First cut out a whole oval, then another, but cut the half with teeth and glue it onto the full oval along the edges, you get a pocket. Insert any character into it and decorate it. Write your wish at the back.

How do you like this kind of abstraction?? I think it looks great!!

You can draw a postcard or make it from plasticine, and also use napkins and cotton pads.

An interesting plot of circled palms. I think you will agree with me that children love to make such crafts.

See how easy and simple, and most importantly quickly, you can make a congratulatory egg. I think the execution scheme is clear, so I won’t explain it in detail.

Don't forget about the Easter tree. Older children can cut out the branches themselves, and younger children can draw them.

Here is a version of fabric applique. It looks amazing and feels nice to the touch.

An ordinary rabbit made of cardboard and a tail made of knitting threads. In my opinion, it's a decent job and looks original.

Here is such a cute and spring plot from glued colored halves.

The next idea is to fold the envelope and prepare a bunny template. Then all you have to do is cut everything out and decorate.

Another option for a three-dimensional postcard on the steps; remember, on February 23, we examined in detail the scheme of such work.

And another cool souvenir. It looks very gentle. If you have younger children, prepare the parts yourself and then glue them with your baby.

Step-by-step process of making a “Chicken” postcard from paper and cardboard
Well, while we haven’t gone far from gifts made from paper and cardboard that are accessible to everyone, I bring to your attention a detailed master class on a real postcard.

We will need: wrapping paper, thick paper, a stationery knife, colored paper, glue, scissors, ruler.
Manufacturing process:
1. First of all, make two blanks from thick paper. The dimensions of one are 15 cm by 12 cm, and the second is 15 cm by 15 cm. We will attach the parts to the second base, so bend it 3 cm from the bottom edge of the base.

2. Now step back 3 cm from the left edge and the same amount from the right, and draw stripes, the width should be 1 cm and the length 3 cm. Take a stationery knife and cut the lines. You need to make three such stripes.


4. If desired, cover the base with wrapping paper.

5. Cut out eggs and chicken from thick paper or cardboard and decorate them to your liking.

6. Glue the blanks onto the steps and glue feathers as decoration.

This way you can make gifts not only with a chicken, but also with a hen, rooster or rabbit. Or maybe you want to put a church at the top, it will also look cool.
Video on how to make a postcard for Easter using the quilling technique
I also found for you an excellent story with a step-by-step explanation of how to make a souvenir using quilling. Moreover, the complexity of the work is minimal, even an inexperienced person can handle it.
And if you already have experience, then I suggest choosing options from the following photo selection:
- Easter basket

- Symbolic image of the Cross

- Delicious Easter cake

- Colorful eggs

- Cheerful bunny

- Easter cake with angels

Agree that such works look special. There is some kind of mystery and endless tenderness in them.
Easter cards made from corrugated paper or simple napkins
Decorate a simple cardboard with pieces of rolled corrugated paper, laying out the plot you want. You can also make a ribbon. And you will get not only a wish, but also a memorable pendant.

You can create a whole picture using such improvised means, look how beautiful it is!

The next option is very aesthetic, take a printed or drawn plot as a basis, and cover the edges with a multi-colored napkin using the trimming technique. Finally, decorate everything with beads.

How do you like such a simple wreath, decorated with napkins and plasticine? How cool? Isn't it true?

Here are very beautiful baskets made of cardboard and corrugation.

And don’t forget to make fun and funny chickens and cockerels with the guys.


You can also use lace napkins instead of regular paper napkins. Such products immediately look much more festive.

How can you make an Easter card from plasticine and cardboard?
And now we need plasticine, but not simple, but soft, from which it will be easy to smear different pictures. If you have a hard one, then place it on a warm radiator in advance, then it will warm up and be easy to work with.
We'll start with the simplest options. So, make an oval, glue it to the base, make strips from plasticine and decorate with cereals and small buttons.


This souvenir requires very soft plasticine, because we cover the entire base with it, and then we also decorate it by sculpting different flowers and butterflies.


And an idea for kindergarten teachers, a great big group card for Easter. Moms and dads will definitely be surprised.

And a visual video for you about what beauty can still be created from this material.
Ideas for creating postcards using scrapbooking techniques
Of course, I can’t leave everyone’s favorite scrapbooking without attention. And as I promised you, a detailed master class. (I didn’t do it myself, the Internet helped, as usual)

We will need:
- watercolor paper for the base (size 30 cm by 12 cm);
- green scrap paper (size 14.8 cm by 11.8 cm);
- scrap paper for eggs (size 10 cm by 6 cm);
- plain paper for egg backing (size 11 cm by 7 cm);
- hole-punched openwork edge in the form of a fence (length 11.8 cm);
- white lace (length 13 cm);
- two-color cord (length 25 cm);
- small button;
- cutting in the form of a branch;
- keeper tape (length 10 cm);
- thematic inscription;
- regular scissors;
- curly scissors;
- white liquid pearls;
- paper glue;
- volumetric adhesive double-sided squares.
Work process:
1. Take watercolor paper and fold it in half. Then we take green scrap paper and a hole-punched openwork edge in the form of a fence. Glue the fence onto scrap paper and cut off the excess ends. Then glue white lace onto the fence and glue its ends to the back of the scrap paper.

2. Next we need a two-color cord and a button. Cut the cord in half. Use one part of the cord as a bow on a button, but glue the second on top of the lace. When our green scrap paper blank is ready, glue it onto the watercolor blank.
3. To make an egg, you need to cut out a regular egg from scrap paper and transfer it to plain paper. Cut out an egg from this plain paper, but use scissors. Glue the resulting egg onto our product. Then take an egg from scrap paper and glue it on top of a plain one using voluminous glue squares.

4. Then decorate: glue a button with a bow, a twig; make an inscription and droplets of liquid pearls (you can use pearlescent varnish).

And a couple more photos of ideas using this technique.


Agree that all the work is simply amazing!! And making them is not at all difficult, I think that starting from the age of 8 years, children can make such gifts.
Schemes and templates (coloring pages) for Easter cards
And in conclusion, I collected, so to speak, “helpers” for teachers, educators, parents and for children, of course.
I bring to your attention excellent templates. Choose, save and create.
- Variants of different decorated eggs.


- Such stencils can also be used as coloring books. They gave it to the kids and let them do it.


- Don't forget that the main characters are still the chickens!


- And it’s great if the product has a painted Easter cake.

- Ideas for voluminous congratulations:


- Here he is a real coloring rabbit.


- Cute chick.

Actually, that's all I have for today. Choose options for Easter cards, make them yourself or with your children, and give them to loved ones and friends. I wish you a great mood!! Bye bye.
Let's congratulate our family, friends and acquaintances on the bright holiday of Easter with the help of a cute handmade card! Such a postcard can be placed in. Motherhood.ru offers ideas for Easter cards that you can make together with your child.
Postcards with mosaic style applique
You can introduce your child to the basics of weaving and at the same time create a bright, original card using strips of colored paper. Cut strips of the same width or use ready-made quilling kits. A diagram of the simplest weaving from paper of two colors is shown in the figure below.
In a sheet of contrasting colored paper, make a slit along the silhouette of an egg. To make the egg symmetrical, fold the sheet in half when cutting. Then glue the braided fabric onto the bottom side of the sheet and decorate the card with additional details: braid, glitter, paper flowers.

An Easter card can be decorated with a bright egg in a mosaic design. Fresh, colorful and original!

If you have colored adhesive tape, you can use it to make a colored striped egg on a card. To do this, outline the shape of the egg on tracing paper; glue the tape to the base with a slight overlap of 1-2 mm; then cut along the contour; remove the tracing paper and glue the egg onto the front side of the postcard.


Postcard using silhouette cutting technique
Similarly, you can make a gentle card for Easter. To do this, using a template, we cut out the base and several chicks from white and yellow eggs, and make flowers. And glue everything onto a green base.


Application from napkin balls
Interesting works can be made using balls rolled from napkins. They are glued to the base and the necessary parts are painted, or multi-colored napkins are used. You can complement the work with flowers using the quilling technique.

Image of the temple on an Easter card
If you cut out the silhouette of a temple from white paper, paste it onto an oval-shaped sky background, decorate it with colored eggs and willow branches from colored paper, you will get an excellent thematic card for Easter.

A three-dimensional multilayer card is made by cutting out each layer separately and fastening it with an accordion. As a result of painstaking work, a very impressive Easter card is obtained.


Chicks and hens
You can glue funny colored chickens onto the white background of your Easter card. Even the youngest preschooler can cope with this task. For a small child, you can prepare cut out parts and offer to glue them.


Easy to make and quirky, this card is sure to put a smile on your grandma or grandpa's face.

For the next card you will need eyes for toys. This composition symbolizes the tender relationship between the mother hen and the chick.

Cute baby chicks just hatching from their shell - a cute children's theme for a card.


For older children, you can choose a postcard using corrugated paper and interesting protruding details of the composition.

You can make a card-book tied with a satin bow. A note of congratulations is included inside such a postcard.

Bright, spring applications with many flowers and cheerful chickens perfectly convey the joyful atmosphere of the holiday!

Craftsmen and lovers of appliqué need to take up the task of making double-sided postcards. Often the picture inside is even more interesting.


To make such a postcard you will need multi-colored paper and a template.


Another version of the postcard: with the sun, chicken, Easter eggs and a willow twig.

Preparing for Easter is one of the most pleasant spring chores. Easter crafts bring the whole family together. Making gifts decorated with cute rabbits, chicks, and delicate flowers brings bright joy. 6 original ideas for DIY Easter cards will inspire creativity in children and adults.
What you need for work
A homemade postcard carries a piece of the author’s soul. The more effort and imagination put into a card, the more it demonstrates love. Easter greetings are decorated in bright colors reminiscent of spring and the sun.
Traditional symbols of Easter messages reflect Christian ideas of love and eternal life. This is a heart, an open palm, a cross, a painted egg, the name “Jesus”. Easter is associated with the spring awakening of nature. That’s why the postcards depict flowers, green branches, rabbits, and chickens. One of the symbols of Christ is often present - a white lamb.


To make postcards with your own hands, you need to draw a sketch and prepare materials and tools. Scissors, cardboard, ruler, pencils, glue and colored paper are required components. You may need:

It is important to remember that Easter is a family holiday. Therefore, it is advisable to include retro technologies in crafts: embroidery, lacing, crocheting. Natural materials - natural twigs, pieces of wood, straws - give the card spontaneity. Easter greetings are always a little naive, made in a “childish” style. Slight negligence enhances the effect of sincerity and purity of intentions.
Nowadays, decorating Easter cards with stamps is popular. It's easy to make a stamp from raw potatoes:

Similar templates for Easter cards are made from popsicle sticks (crosses) and the contours of children's hands.
Favorite symbol: Egg cards
The first version of Easter greetings is “Egg of 4 parts”. To work you will need:
- Blue cardboard.
- Blue cardboard.
- Colored paper (any bright shades).
- Scissors, glue.
- White gouache, brush.
- Blue marker.
Manufacturing method:

Easter paper cards are made directly in the shape of an egg. For this method you need:

Step by step instructions:
- From yellow or pink cardboard, cut out 2 identical ovals according to the template.
- Cut the same oval from white paper.
- Decorate one of the colored ovals with transverse strips of lace paper.
- Glue decorative flowers or beads onto the strips in a symmetrical order.
- Write a congratulation on a white paper egg with a marker.
- Place 3 ovals - decorated, white and colored without decorations - and punch a hole in the upper wide part of the egg with a hole punch.
- Thread a ribbon through the hole and tie a bow.
If the card is intended for a man or a boy, you can do without beads and sparkles, and instead of a ribbon use a thick woolen thread or a piece of braid.
DIY Easter card - video
Working with palm templates
Your own hands and fingers serve as excellent clichés when creating Easter greetings. A simple option is “Pot of Flowers”.
Tools and materials:
- Blue cardboard.
- Colored paper.
- Glue.
- Scissors.
- Ruler.
- Colored markers.
How to make an Easter card using a stencil:

Variant of a postcard for children for Easter with a funny lamb. The index finger is used as a template here. The ease of implementation allows you to make such a craft with your children.

Materials:
- Black cardboard.
- White cardboard.
- 2 black beads.
- White gouache.
- White wool thread.
Manufacturing procedure:

Tip: the beads for the pupils are glued so that the lamb is slightly “mowed”. This gives the image a funny and touching look.
Easter surprise: card with gift
In families that love traditions, they give each other small gifts for Easter. Three-dimensional Easter cards are very convenient. They perform 2 functions at once - messages and gift wrapping.
The first option is “Postcard with seeds”
You need to prepare:

How to make a three-dimensional postcard for Easter:

Bags of seeds are traditionally placed in the “envelope”. The gift is ideal for relatives and friends who are interested in gardening.
Openwork beauty: postcard using quilling technique
Decorative quilling products are very popular now. A simple craft can be made from the following materials:
- Colored paper.
- A set of strips of multi-colored paper.
- Silk ribbon.
- Glue.
- Decorative decorations.

Method of making a postcard:
- We wrap a strip of quilling paper around a toothpick. We squeeze the resulting roll along the edges to make it look like a fish. You need to make 10-12 of these “fishes” (for petals of different colors).
- We make flowers and glue the centers. We twist the green rolls and squeeze them like leaves. Glue it.
- Roll the strips over the eggs and squeeze lightly. Attach with glue and decorate.
- We cut wide strips of 2 colors and intertwine them, making a basket. Glue onto cardboard on top of the eggs and flowers. We make a pen from a long strip of paper twisted in a spiral. Glue a small ribbon bow to the handle.
- Cut a strip of paper along one edge into a fine fringe. Lubricate the uncut side with glue and attach it to the basket - you get grass.


