
Not far off is the New Year holidays. It's time to think about decorating your home or class, prepare gifts for loved ones. A Christmas tree and balls are indispensable attributes of the New Year. A master class on making New Year's crafts from threads is quite simple, so both adults and children can handle it.
1:1042 1:1052Thread balls - master class
1:1118 1:1124 1:1134Let's start with the simplest crafts - balls of thread. They are airy, light, do not break, and their size depends only on your desire!
1:1367To make these balls, you will need:
1:1447- glue “office” silicate or PVA glue
- long needle,
- threads of different colors
- and various little things for decoration (beads, rhinestones, foil, rain, bells, etc.)
Inflate a balloon of the desired size. We thread the needle and pierce the bottle of glue with it, now the thread will pass through it and immediately become saturated with glue. We begin to wrap the ball with sticky thread. Then you have to wash your hands, because all the fingers will be in this “liquid glass”.
1:22931:9 1:13 1:23
You can do it differently. Wind the threads on the ball turn by turn, and then, from above, coat the threads with glue.
1:227 1:237 1:241 1:251When the glue dries, pierce or gently deflate the ball and pull it out. Then decorate as you wish. We filled this balloon with a shiny “rain” (it will be better seen if the balloon is made more transparent), glued stars and foil flowers on top, and tied a mini bell on the bottom.
1:839 1:849 1:853 1:863 1:867 1:877Christmas tree made of threads - master class
1:947 1:953 1:963For work you will need the following materials:
1:1050- floss or knitting threads (thick ones are easier and faster to work with),
- food film,
- Whatman A1,
- glue,
- brush,
- scissors,
- ruler,
- compass,
- pencil.
- Ribbons, tinsel, toys, sparkles, etc. are suitable for decoration.
Take whatman paper, measure a distance equal to 48 cm, divide it in half. Set the compass to the resulting center and draw a circle. Cut it out by first marking four equal parts on it with a ruler.
1:18651:9 1:13 1:23
Cut out one piece from the mold. If you want the future tree to be narrower, then cut off two parts, leaving half a circle.
1:244 1:254 1:258 1:268Make a cone by folding the resulting craft blank. Apply glue to the joint to hold the shape.
1:454 1:464 1:468 1:478Take cling film and wrap around the cone.
1:560 1:570 1:574 1:584Dilute glue with water. Dip the threads into the resulting solution, wet them and randomly wrap them around the cone. You can wear disposable gloves to protect your hands from the glue. The Christmas tree does not have to be green, so the threads will suit absolutely any color and any thickness.
1:1096 1:1106 1:1110 1:1120Wind the threads moistened with glue until the tree is dense enough. If there are few threads, then the craft will not be able to take a stable shape.
1:1409 1:1419 1:1423 1:1433Leave the Christmas tree for a while to dry and become stable. After a few hours, carefully pull out the cone and peel off the film from the threads. The Christmas tree is ready!
1:1753You can place an LED candle or a New Year's garland inside the finished Christmas tree, and fancy openwork shadows will decorate your home.
1:235 1:245 1:249 1:259 1:263 1:273If desired, the craft can be decorated. Glue tinsel or toys on top, sprinkle with sparkles. It is easy to make bows from ribbons.
1:503 1:513 1:517 1:527 1:531 1:541 1:545 1:555In addition, in addition to balls and Christmas trees, according to the same principle, you can make, for example, an angel from threads and glue.
1:744A very small ball is inflated for the head (such are obtained from fragments of bursting balls, for example :)), which, after the threads have dried, is pulled out.
1:1024But for the torso, we took a transparent plastic plate (peeled it off the box with a toy), rolled it into a cone, fastened it with a stapler in two places. Having started wrapping the body with threads, we realized that they would hold on only if they were wrapped from all sides (and not just from above, as we planned), that is, it would not be possible to pull out the cone later. But in principle, this is not necessary, because it is transparent. The wings of an angel are cut out of foil.
1:1805 1:9 1:13 1:23But we made such a snowman from threads for a competition in kindergarten.
1:152For a hat, they wrapped a measuring cup of medicine, after the threads dried, they pulled it out, cutting off the bottom of the threads from below. For the “carrot”, they also wrapped a small cone of film. Support - a cover from a coffee jar. Here is such a translucent snowman turned out:
1:646 1:6591:669 1:679 1:689 1:699
Dare and create from threads everything that your imagination inspires you!
1:817 1:827 1:831 1:841 1:845 1:855 1:859 1:869 1:873 1:883 1:887 1:897 1:901 1:911

3:9


7:9


New Year's Eve is just around the corner. We are faced with the task of decorating our home as original and unusual as possible. In this case, we resort to the usual garlands, Christmas decorations, all kinds of decorative pendants, shop figurines of fairy-tale characters - Santa Clauses, Snow Maidens, Snowmen and so on. However, from year to year, all this, to be honest, is pretty boring, and I want to somehow diversify the New Year's decor. For this, it is worth doing needlework, thanks to which you will be able to turn your home into a fairy tale. We bring to your attention our article, in which we will present you with 6 photos of ideas for interesting crafts made of threads and glue for the New Year 2020 with our own hands made very quickly and quite simply. You should not immediately abandon our excellent idea if you have never done anything like this, because our master classes will convey to you a sufficient amount of available information necessary for the work of beginners and professionals too.
Ball of thread and glue
For the New Year 2020, you can find many ideas for making balloons. Even from simple threads and glue, you get a wonderful interior decoration, created by yourself in a fairly short time. The lesson is not time-consuming, so everyone without exception can do it - not only children, but also adults. In addition, the presented master class will really appeal to novice art masters. Thanks to the available information, the most beautiful crafts for New Year's Eve can be born.
This will require:
- threads;
- glue;
- balloon.
Working process:
- First you need to inflate the balloon to the desired size.
- Then it is covered with threads in random order, which must be fixed with glue.
- When everything is ready, the ball is pierced with a needle and descends. You can pull it out carefully through a small hole or use it as a rope.
- The created ball can be decorated with tinsel or left as is. Even just hanging on a string, this craft will decorate any room for the New Year 2020.
Watch our video to better understand this creative work.
Master class: making a ball with your own hands
Snowflake

If you want your children to make holiday decorations, then you can make a simple craft of thread and glue for the New Year 2020 with your own hands, even for the youngest craftsmen. It can be in the form of a snowflake. All you need is support and maybe a little help. If you gradually perform the work according to the master class proposed by us, you will get a beautiful decorative little thing. It can be hung on a Christmas tree or on a window. In any place, such a creation will look very beautiful.
This will require:
- Threads;
- Glue;
- Oilcloth;
- Pen;
- pins;
- Scissors.
Working process:
- On an oilcloth it is necessary to draw a snowflake of any shape.
- Then, on the workpiece, you need to fix the threads pre-moistened with PVA glue, strictly along the lines with the help of pins or needles.
- When the work is dry, you can remove the pins.
- After that, you need to carefully remove the oilcloth. The snowflake is ready to decorate the house for the New Year 2019. If you make it from terry threads, then it turns out to be fluffy. For children, such a New Year's activity will be very interesting.
Watch our video tutorial and learn how to create a fun glue and glitter craft.
Master class on making a New Year's snowflake with your own hands
Feather for Christmas decor

By the New Year 2020, you will need to make with your own hands not only decorations for your own home, but also gifts. You can make wonderful gifts for family and friends on your own. To create a beautiful Feather craft, you need simple materials in the form of threads and glue, as well as a little time. Any person who appreciates beauty will be happy with such a souvenir.
This will require:
- Threads;
- Glue;
- Wire;
- Scissors.
Working process:
- For this process, it is better to use floss threads. First you need to make a feather. To do this, the wire is first wrapped with thread material, and then it should be strung on a sharp base - a rod to create a magnificent effect.
- After that, the edges must be cut with scissors to get a product that looks like a real feather.
- The next step will be the process of dipping the finished product in glue, after which you need to give time to fix it. You just need to place it on a flat surface and, preferably, oilcloth, so that it does not stick.
- After drying, you can trim the shape. The finished pen must be glued onto a cardboard base. You will get a beautiful craft for the New Year 2020. If you use the lesson for kindergarten, then each child will be able to give this wonderful product to his mother.
Our video will tell you in more detail and more clearly how to make a pen at home.
Master class: DIY Christmas crafts
Christmas tree made of thread and glue

Everyone knows that a beautifully decorated Christmas tree is an indispensable symbol of the New Year and Christmas holidays. Therefore, you should definitely make such a charming craft from threads and glue for the New Year 2020 with your own hands at home. And it doesn’t matter at all whether you have a living specimen of a forest coniferous beauty. Such cute decorations are breathtaking and uplifting if you arrange them in your home on shelves, tables, chests of drawers or anywhere else. The main thing is to have a lot of them in all rooms. To create an unusual product, you can use thread material of any kind, but yarn is best.
This will require:
- Threads;
- Glue;
- scissors;
- simple pencil;
- paper;
- decor elements: sequins, beads, pasta or cereals.
Working process:
- You need to draw a Christmas tree on paper or print it out. Along its contour, you need to lay a thread soaked in glue. It is best to use knitted ones, all this must be done very carefully so that the craft turns out beautiful and neat. Then the product must dry.
- After that, the dried surface must be treated with a shiny varnish and again left to dry. Then you need to cut out the picture and hang it on the Christmas tree. A beautiful shiny decoration for the New Year 2020 is ready! Similarly, you can arrange any other image. The instruction is elementary and suitable for self-production by preschool children.
Master class on creating a voluminous Christmas tree with your own hands
A vase for flowers

For the New Year 2020, in such a vase, created with your own hands from a simple material - threads and glue, you can put Christmas tree branches or fresh flowers. Beautiful craft looks just great.
This will require:
- Threads;
- Glue;
- Plastic container.
Working process:
- To get a long vase, you need to use a regular bottle, in which the top needs to be cut off.
- Then you need to glue knitted threads to it, placing them in any pattern. The standard ornament is vertically arranged lines. At the top, to decorate the craft, you can attach a ribbon to cover the bumps. You can use such a creation for both fresh flowers and artificial ones. And for the New Year 2020, you can place a creative festive ekibana in it, which will transform your table or any room.
Master class: an original vase made of threads and glue with your own hands
Cheerful snowman made of threads and glue

Among the interesting and very simple DIY crafts for the New Year 2019, there may be a snowman. It is also made from thread and PVA glue quite easily. However, it will still take some time to create a beautiful and neat product. In general, the whole family should participate in this creative process, from adults to children, who will be pleased to feel like your irreplaceable helpers. So let's get down to the fun stuff.
For work you will need:
- balls - 5 pcs.;
- white yarn;
- stationery glue or PVA;
- ready-made eyes or buttons;
- thin threads and a needle;
- a sheet of paper, can be orange (for the spout);
- a small piece of red felt or other fabric (for the mouth);
- scissors.
Manufacturing process:
- To create the body of a snowman, we need to inflate the balls, and each of them must differ in size from each other. In this way, we prepared the head, the middle of the body and the lower part of the snowman. Do not forget about the hands. They can be created using the same balls, but of the appropriate size, and if there is no such desire, then it would not be bad to build them from paper, sew them from fabric and some kind of filler. The choice, of course, is yours, dear friends.
- The white yarn of your choice should be pre-soaked in PVA glue or clerical glue for several minutes so that the required length of thread is thoroughly saturated with this fastening solution.
- Our next step is to wind the yarn we prepared earlier. This should be done so that the ball is completely covered with thread material, as in the photo.
- After you process all the balls, they need to be given time to dry. And after the allotted time, with a needle, you need to pierce all the balls so that only the frame of yarn remains. Carefully remove their remains through the gap.
- Now we need to connect together all the round frames we have prepared to make the body of a snowman. They will need to be sewn with a needle and thin light threads. So, we have formed a very cute fairy-tale character, consisting of three rounded parts of the body and arms.
- To give the image of a snowman expressiveness, we need to pay attention to his face. To do this, we glue ready-made eyes or black buttons to the appropriate places; the mouth, cut out of red felt or any other fabric, is attached in the form of a perky smile, also with glue.
- Let's start creating a nose - carrots. For this purpose, we need a sheet of colored or snow-white paper, A4 format. We need to roll it into a tight cone like a carrot, then fasten it with adhesive tape.
- When the base of the spout is ready, we should take the orange-colored threads and also moisten them first in the adhesive solution. Then we wrap it thickly on a paper frame so that we get a bright and even shade, preferably without large gaps. We give time to dry. After a certain period, we should pull the paper out of the thread cover very carefully.
- Frame - we sew a carrot to the face of a snowman.
- Cheeks can be expressed by slightly tinting them with blush, using a makeup brush.
- On the head of a snowman, you can put on a scarf, a hat that fits the size, or something else, at your discretion. As the main outfit, you should use a scarf.
- Build a broom out of twigs and stick it in your hand.
In such a simple way, you can make a wonderful craft from threads and glue for the New Year 2020 with your own hands at home. Your family will find this activity quite amusing. If you want to somehow diversify your entire home, then create a lot of colored balls using this technique and hang them in the form of garlands on windows, pendants on chandeliers, Christmas wreaths on doors. Watch our video tutorial to do everything right and quickly.
How to make a New Year's toy from threads and glue with your own hands? In fact, there is more than one master class that talks about this in detail and in detail. If you look at the photos and thematic videos presented in this material, it becomes clear that such crafts are not only easy to make, but in the end they turn out to be stylish and beautiful.
Probably the most popular option in this regard is a do-it-yourself ball of thread. How to make this Christmas decoration so that it turns out to be original, beautiful and just stylish?
DIY New Year's toys from threads
Shiny Ball #1
To work on this craft, you need balloons, PVA glue, as well as white thread, sparkles and water, a plate in order to pour glue into it. Glue must be diluted with a little water. If during the process the glue starts to run out, then add water to it. Decorate both the Christmas tree and the room.


Inflate the balloons to the size you want to end up with. The creation of this craft from threads begins with the fact that you will need to tie a white thread to the tail of the inflated balloon and start wrapping the balloon with thread. Then dip this blank into a bowl of glue diluted with water.
Be sure to rotate the craft so that the glue soaks the threads on each side. Before the ball dries, additionally sprinkle liberally on each side with glitter. Hang the craft to the surface until completely dry. The New Year's toy will be completely ready after the ball is specially burst inside and pulled out of the blank.


Ball #2
In many ways, the first and second New Year's crafts are similar, but there are differences already in the final version. To work, you will also need balloons, as well as dense threads (in the first version of the craft, the threads could be ordinary), PVA glue, a glass for glue, a thick needle and scissors.
Inflate the balloon, getting the size you want to see as a result of your craft. Tie tightly so that the workpiece does not let air through. Now pierce a plastic cup with a needle into which a thread has already been threaded. Pour PVA glue into a glass, diluting it with a little water.


Pulling the thread through a glass of glue, wind it around the ball in a chaotic manner. When the whole ball is wrapped, leave a small tail and cut the thread. Leave to dry in a vertical position for a day. When the glue is completely dry, pierce the ball inside and get it out.
Advice! Additionally, this ball of threads can be decorated with snowflakes, sparkles, beads or beads, Christmas tree tinsel.


Gift packaging
The photo shows that Christmas decorations can be not only excellent products in themselves, but also an addition. For example, an item made in this way will be a great addition to gift wrapping.
To work, you will need a ball, a ball of thread, acrylic paint with a brush, glue. You will also need a screwdriver, scissors, a long piece of satin ribbon. Traditionally, inflate the balloon and wrap it tightly with thread. Fix the thread with glue only in some places, so that in the end it does not move out. It is extremely important to wrap the ball so tightly that nothing can be seen through the threads. Then cover the threads with a thin layer of glue.


Apply acrylic paint to the threads using a brush. Remember that the paint here not only gives color, it also additionally holds the threads together, so you should not feel sorry for it. Hang the balloon overnight to dry well. Then carefully pull out the balloon itself from the cocoon. Next, cut the cocoon into two parts, make symmetrical holes on both sides with a screwdriver. Now put a gift inside, and then fasten the two parts of the ball, tie a beautiful satin bow around the circumference. How to do
You can maintain a cheerful New Year's mood and decorate the house in accordance with the theme of the upcoming holiday with the help of a variety of improvised materials and tools.
Try to make DIY crafts for the New Year 2018 with the symbol of the year - the Dog. It can be Christmas decorations, figurines, useful little things, postcards and much more.
Most DIY crafts can be done with young children. Therefore, we recommend that you familiarize yourself with master classes on creating children's toys and New Year's decorations from cones, paper, fabric, threads and other publicly available materials. So, let's start studying the most interesting.
Orange candlesticks for decoration
Since it is important to create a cozy atmosphere in the house on New Year's Eve, think about original candlesticks that will not only decorate the shelves and the festive table, but will also spread a pleasant aroma around the room. We are talking about crafts made from orange skins.
What will we need? Firstly, the oranges themselves (for small candlesticks, you can use tangerine). Secondly, stock up on small candles with aluminum stands.
To work, you will need a sharp knife, a pen, a spoon, metal baking dishes, as well as cloves or other spices for decoration.

These decorations are very easy to make. First, make a mark on the oranges in the middle - and draw a transverse line with a pen. Cut the skin in half along this border - and use a spoon to remove the internal content of the oranges.
Attach a metal mold to the inside of the skin and make a suitable hole by cutting off the edges with a clerical knife. So you get blanks in the shape of stars, hearts and other figures. The edges can be decorated with cloves.
Advice: you can not cut the edges of the orange skins, but cut themed figures inside so that they let the light through.

That's all, it remains to place small candles inside the blanks. Glare of fire will make such a candlestick even brighter, and it will perfectly fit into the thoughtful New Year's decor.
Another interesting way:
Candlesticks from cans
Continuing the theme of candlesticks, it is worth dwelling on another simple version of interesting crafts for the New Year. Quickly and effortlessly, you can make decorative candle holders in glass containers such as jars.
How can you decorate such candlesticks? One way is to simulate a snowball with salt sprinkled on the areas treated with glue. You can also transform the jar with pasted beads or beads.
Often, jars are decorated with lace or burlap, tied with ropes or ribbons. Thematic painting on glass (for example, in the form of frosty patterns) will not be superfluous.
In the next photo - another interesting option: thanks to the glued figures, lit candles inside create a whole winter-themed image. This effect can be achieved not only with salt, but also with artificial snow or toothpaste.

What to weave a wreath from
The Christmas wreath is gaining more and more popularity in New Year's interiors. It can be hung not only on the door, but also used to decorate the table, window sill or other areas of the room. And there are many options for decorating such crafts.
Start by choosing the base for your wreath. It must be strong and reliable so that the craft does not crumble. A vine or twigs, a wheel of wood, wire, cardboard, a hose and much more will suit you, which can be shaped into the desired shape.
Consider how to make such a wreath magnificent. You can fasten spruce branches, bells made of threads or Christmas balls in a circle. Dry flowers, berries, cones, dried fruits and cinnamon sticks, sweets, beads, ribbons, fabric figurines are suitable for decoration.

Hang the wreath by the loop and do not forget to cover its surface with sparkles or artificial snow. Inside, you can place thematic figures, for example, a Christmas tree or Santa Claus.

We sew felt decorations
We suggest you try to make crafts from felt. Even if you use stencils to create flat decorations from this material, you can achieve a bright transformation of the Christmas tree.
By sewing together felt patches of different colors, you can create many interesting figures for the New Year.

Volumetric toys will look even more interesting. Stock up on multi-colored felt, and also prepare needles, threads, scissors, a synthetic winterizer for stuffing jewelry, a pencil with paper, glue, ribbons, as well as beads or rhinestones.
Sew crafts according to the following principle:
- choose the theme of jewelry - and print templates of the appropriate size;
- transfer them to felt shreds and make two blanks of each type;
- sew the blanks together, leaving a small opening for internal filling;
- fill the toys with padding polyester, and also sew a loop from the ribbon - and thread it inside;
- sew the jewelry to the end;
- decorate crafts with headbands, lace, bows, bright buttons, and sew on eyes and nose if these are “live” characters.

Watch the video for even more ideas of felt crafts for the New Year:
sock dog
Be sure to try to make DIY crafts for the New Year 2018 that correspond to the symbols of the coming year. Cute dogs will turn out even from ordinary multi-colored socks. For work, you will also need thread, scissors with a needle, nose buttons, ribbons and filler.
Advice: instead of the usual cotton wool or synthetic winterizer, you can take any cereal, then your toy will be useful if you need to relieve stress.
The procedure for sewing such dogs consists of several stages:


Such a toy is sure to please children and will not only serve as a detail for the thematic decoration of the room, but will also be a great gift or craft for school / kindergarten.
Themed keychain toy
Want more holiday-themed toys? Then make for 2018 the year of the dog New Year's crafts with your own hands in the form of housekeepers. For sewing, you need to take pieces of fabric in two different shades, beads of several sizes, a cord and a ring for fixing keys.
Based on the diagram, cut out all the parts of the dog. Sew the details on all sides, leaving some free space for stuffing the key holder. Leave a hole at both the top and bottom to let the string through.

Sew the ears to the toy, and also decorate the muzzle by choosing threads or beads for the nose and eyes. Decorate the paws with dark threads too. Now pass the string through the inside of the craft - and secure the beads at the top. A key ring is attached to the cord at the bottom.
Bright dogs will help your child not to lose their keys and will cheer up. Moreover, such an accessory can be used after the end of 2018.

Paper crafts for the holiday
If your child needs to bring a craft dedicated to the New Year to kindergarten, it is easiest to do it on a paper basis. Due to the variety of colors, textures and effects on the surface of such materials, you can get attractive decorations that will later be used for decoration.
Paper can be twisted, folded like origami, glued to cardboard or other materials, decorated according to the principle of patchwork or quilling. From thick paper, twisted with a pencil, you will get interesting crafts in the form of Christmas trees, snowflakes, Christmas balls and other shapes.

Help your child master the origami technique and he will be able to surprise his peers with his skills in creating original crafts in the form of animals and fairy-tale characters. For example, use the following schemes to create Santa Claus crafts:


Or make a deer according to the video instructions:
Do not forget about simple applications with which your child can design postcards for the new year. You can cut out figures to decorate such crafts on the basis of ready-made printed stencils. And if at the end of the work you decorate such a postcard with beads, ribbons or sparkles, it will become even more interesting.

Modeling from polymer clay
New Year's crafts to school for the competition can be molded from polymer clay. The attractiveness of this method is associated with the ability to create absolutely any figures. To create souvenirs, clay and a marker on alcohol are used.
Start by choosing a clay of the right color - and dividing the material into several parts. From each part, form separate elements of the figure: for example, for a dog it will be a body, four paws, a tail, a head with ears.

Connect all the pieces together, exposing the transformation clay to "soften" the edges. While the material is soft, decorate the face of the dog by drawing in the eyes and nose. If you wish, you can mold a collar, scarf or any other detail for the figurine.
Now you can send the figures to the oven, preheated to 150 degrees. In about half an hour, crafts can be obtained.

Homemade twigs in the snow
And the next craft will be a great addition to other decorations that will be present in your room in the New Year. Branches with decorative snow can be placed in the center of the festive table, on the windowsill, by the Christmas tree or on the fireplace.

To begin, collect branches of spruce or other trees. You can pick up broken parts of branches where they sell Christmas trees for the New Year. Place all collected branches in a saline solution. It is made by adding 32 large spoons of coarse salt to a liter of hot water. Gradually stir the solution until it is completely dissolved.
Now lower the branches inward - and leave in this position for a while. A little later, you will see how small crystals begin to form on them. As the water cools, this process will slow down.

Advice: use a wide container so that most of the branches are immersed in the solution as much as possible.
After the appearance of crystals on the branches, it is necessary to dry them. Fix them somewhere above the bathtub or sink so that the water runs off smoothly. At this time, you can do the design of the container in which such branches will be located.

Take a vase, deep plate or jar. After the branches have dried, it remains to place them inside the finished stand. Place such a craft in front of everyone - and decorate the branches with Christmas tree decorations.
Decorative balls of threads
The most interesting crafts can be obtained from the simplest materials. For example, to create large balls that perform a decorative function, it is enough to use glue and wide threads. Take a balloon as a basis: it is he who will allow your craft to take the desired shape.

Advice: don't inflate the balloon too much. It is better to make several crafts with different parameters.
Wrap the finished balloons with colored threads so that you get one layer. Do not tightly close its surface: let wide openings and gaps remain. Thoroughly glue the applied threads with glue - and wrap the ball on top again. Repeat the procedures until you get three layers.
By the way, garlands with bright lanterns can be threaded inside such balls. Then you will get a very spectacular luminous composition for the New Year.

When the glue on each layer is dry, pierce the inside of the balloon. Carefully pull it out through one of the gaps, and decorate the craft itself with sparkles or artificial snow.
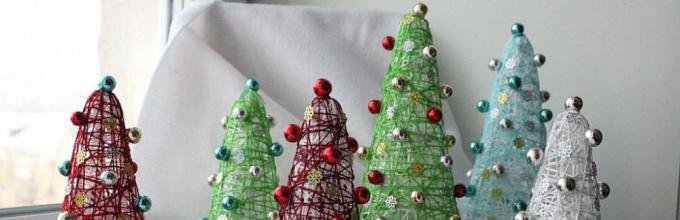
Soft Christmas trees from shreds
If you are going to do crafts for 2018, do not forget about the traditional decorations for the New Year holiday - Christmas trees. For example, you can take a fabric and sew small fragrant toys of this shape.
To create mini-Christmas trees, take shreds of brightly colored fabric, threads, scissors, buttons, a glue gun, pencil and paper, cinnamon or wood sticks, lace, braid, and any filler for a sachet (for example, carnation, tea rose, dog rose or sage).

Find Christmas tree patterns - and print stencils on paper. Cut out the figures - and transfer to textiles.
For each pillow, you need to make two such blanks. Sew them together, remembering to leave room for the inner filling.

It remains only to decorate the toy with lace, braid, ribbons and buttons, which will play the role of small Christmas balls.

Herringbone from other materials
From improvised materials, you can make both mini-Christmas trees and larger crafts. For example, by gluing cones together, you will make many Christmas trees of different colors that will be placed on shelves or on a table.
If you use more cones, you will be able to make a Christmas tree 140 centimeters high. For such a craft, you will need a glue gun, a plywood circle with a diameter of 0.7 meters, a second such circle with a diameter of 0.3 meters, legs, as well as a garland and paint (preferably with a golden or silver sheen).
Plywood circles will play the role of a base, and will also allow you to fix the backlight for the Christmas tree. Screw the legs to them - and proceed to gluing the cones. Move each new row closer to the center until you complete the top of the cone.
The next step involves painting the Christmas tree. Spray paint on its surface. Next, place the garland between the rows and hang some Christmas decorations if you want to make this craft look more realistic.

A small craft on such a theme can also be made from pasta. It will take you about an hour to create the craft. Prepare pasta, paper, spray paint and hot melt adhesive.
Twist whatman paper into a cone shape and glue the inside so that it does not fall apart. Now start gluing pasta. It can be either straight pasta or more complex figures: the main thing is that when glued, they look to the sides and give “splendor” to the craft.

At the end, paint over the craft and add decorations, if necessary. By the way, a similar effect when using a cone-shaped base can be obtained by replacing pasta with shells or coffee beans.
Interesting Christmas trees are obtained from satin ribbons using the kanzashi technique. Start by creating a cone-shaped blank with a dense bottom: use green-colored cardboard. Now take ribbons, a lighter, scissors and tweezers - and start decorating.
First of all, form large "petals" intended for the lower level of the Christmas tree. To do this, cut the ribbon into squares - and fold them diagonally. Fold the resulting triangle a couple more times. Burn the edges to prevent fraying.
Fill the next row with other petals. They are made from squares folded horizontally. After that, each corner of the figure turns in the opposite direction. Such petals can be alternated with each other - and glued onto a cone-shaped blank with a glue gun.
When the cone is completely filled with satin "petals", the Christmas tree is ready. At the top, you can place a star or a bow, and decorate the surface with beads or a homemade beaded garland.

You can get acquainted with the details of creating such crafts in the video:
Homemade snowflakes for holiday decor
Children's crafts are easily made on the basis of foam. Due to the fact that this material easily acquires the necessary shape, you can even make elegant snowflakes for the holiday.
In the work we will use a couple of bags of foam balls with different sizes or a whole piece of foam, a few unnecessary hangers, wire cutters, a glue gun, measured round spoons, liquid paint for scattering, a needle with a thread or tape.
How to make a snowflake:

So you can make several snowflakes of different sizes - and hang them from the ceiling, on the window, Christmas tree, cabinets or anywhere else in the room where you want to create a New Year's atmosphere.

Another version of the snowflake is made from glue. It will take about half an hour to work. By the way, with glue you can form not only snowflakes, but also other figures on the New Year theme.
We will need hot glue, PVA glue, a bag or folder that will not deteriorate at high temperatures, a brush, scissors, tape and sparkles. Put the folder or package on a flat surface: we will do the work on them.
Apply the desired pattern on top (in this case, snowflakes) using a thick layer of glue. Wait for the craft to dry. Then carefully peel the snowflake off the surface. It is more convenient to perform such procedures under running water.

Wipe the craft, remove excess parts with scissors - and apply PVA glue on top. Before it dries, sprinkle glitter all over the snowflake.
After drying, it remains to hang it by the loop - and you can admire the beauty.

simple plastic crafts
Armed with scissors and paints, you can make a variety of bright crafts from plastic bottles. You can use the entire container, giving it the necessary dimensions and shapes, or individual parts: for example, the bottom can be painted to imitate snowflakes, and the top of the bottle can be turned into a bell.
Such crafts are decorated with paints, sparkles, beads or ribbons. The photo shows an example of voluminous snowflakes that can be hung on a Christmas tree.

Children will love homemade toys made from these materials. Choose a craft theme with your child. Often these are fairy-tale characters or winter birds and animals.
For example, several penguins can be made by connecting the bottoms of two-liter containers in pairs. Then they are painted over and decorated with additional elements: stick a bell on the “hat”, and attach a beak to the penguin's muzzle.

You can stop at one of the most popular topics for the new year - and make Santa Claus with your own hands. If you do not want to spend time staining the bottle, which will be the basis for such a decoration, fill the container from the inside with a cloth or napkins of a suitable shade.
We make out the face of Santa Claus with the help of buttons, fabric and cotton wool, which will play the role of a beard. It is better to sew a hat separately, using a cardboard stencil as a basis. Such decorations can be placed on the festive table or around the Christmas tree: let them guard the gifts.

Another example of the original use of plastic bottles is the creation of decorative winter compositions. We recommend that you take wider bottles so that more elements can be placed inside the mono that will create an overall picture.
Decorate the top and bottom of such compositions using the tops of plastic bottles with a neck. Cover them with decorative snow or sew covers from soft fabric. Mask the borders with bright ribbons or beads and do not forget about the loop.
Before gluing the details of the composition, place inside small animal toys, cardboard Christmas trees, or simply sketch twigs of berries and spruce. Since you are making crafts for 2018 of the Yellow Earth Dog, you can place themed figurines behind the transparent plastic.

And here is another interesting solution for decorating the New Year's interior using plastic blanks:
By the way, cups and other disposable tableware can also be used for these purposes. Using multi-colored garlands and a lot of cups, you can make a bright ball that will light up your room on New Year's Eve:
And from plastic plates you get original crafts for school or kindergarten. They are easy to cut and connect to each other with glue, so your child will be able to do something interesting on their own, just like appliqués.
Show your imagination, use bright paper, pieces of fabric or cotton wool - and you will get interesting characters that correspond to the upcoming holiday.

Let's not forget about the main symbol of 2018. Help your child create a little friend who will cheer up and cheer up.

You have looked at a lot of photos of crafts for the New Year with your own hands, so with the onset of this holiday it will be much easier to come up with an individual decor or prepare interesting toys for children.
The holidays, especially the New Year, become an inspiration for people who love to make home decorations with their own hands. And children, and even more so, are always happy with creative ideas. The most relevant will be crafts in the form of a rooster - a feathered symbol of 2017. This time it is associated with the fire element and the color red. Several variants of products, diverse in technique and materials, will allow both experienced craftsmen and beginners in hande made creations to choose their own.
Pompom cocks
A pom-pom figurine is quite easy to make, even beginners can handle it. And it looks very presentable. This is a wonderful compact decoration for the Christmas tree and for the table, a present for loved ones.
The basis of the bird will be two pompoms, a smaller one for the head and a larger one for the body. You can make a very young bright yellow chicken or a colorful young cockerel. Show your imagination in the choice of yarn and other materials so that you get your own, unique symbol of 2017. A sedate and sleek, perky and disheveled, or a cute and fluffy cockerel. Use natural or your favorite colors.

In order not to combine colors for a colorful bird manually from many threads, choose melange or multi-color yarn. Play not only with color, but also with texture. Take thin or thick threads, smooth or fluffy. Beautiful and varied decorative effects will be obtained from fantasy yarn: “grass”, boucle, pile yarn (imitating fur, it looks like feathers) and other types.
Here are the balls that can be made from various threads:

To make pompoms, you can use a special template or cut out two washers from thick cardboard. The larger the hole in the center, the more magnificent the ball will turn out. Making pom poms:
- We wind the thread on the base until the hole is filled.
- We cut all the loops along the outer circumference, between the washers.
- Tie tightly with a thread in the center.
- We cut through the cardboard or open the template and remove it from the pompom. If necessary, we level the threads over the area of \u200b\u200bthe ball.

We connect two pompoms, forming the body of a cockerel. Next you need to make the wings and tail. Real dyed feathers work best. You can also cut them out of:
- felt,
- thin felt,
- thick colored paper.
Eyes can be bought ready-made for soft toys or replaced with knots, beads, buttons.
Legs are easy to make:
- from the same fabrics
- from thick colored wire,
- thin wire intertwined with threads.
We fold the wire and threads in a bundle and twist or wrap the already formed wire. We fasten all the details to the body. Sew or glue (with super glue or hot glue from a gun) to the centers of the pompons, between the threads.

Mosaic
Many do not raise their hands to throw away their favorite vase with a crack, a chipped mug. Give these things a second life by using as a material for making a rooster - a symbol of 2017. The mosaic of fragments looks very impressive. You can also use tiles, ceramic tiles. If you want to create a more elegant and subtle work, use a painted eggshell. To make such a picture, you need patience and a long time, but such needlework does not require special skills.
For the base of the mosaic, take durable cardboard or thin plywood. You can use this technique to finish:
- decorative cutting boards
- utensils,
- flower pots.
To break ceramic into small pieces, wrap it in a thick cloth and beat with a wooden or rubber mallet. Or metal, wrapped in a thick layer of soft material (synthetic winterizer, wool, felt or the like). For smaller pieces, strike with the narrow side of the hammer, attach a chisel and beat or break it. Use tile adhesive, liquid nails, plaster, hot gun glue.
Use any illustrations you like as a template. Lay the pattern up, stretch well and secure to the base of the mosaic. Draw all the contours, using moderate pressure with a pencil. Lay the pieces on the base, and when you are satisfied with the current picture, start gluing.

Combine colors and patterns on the fragments the way you like. Create a cockerel worthy to symbolize your coming year!
Panel and application
Using the application technique, you can get three very different options for the texture of paintings, due to the use of different materials:
- buttons,
- lids,
- herbarium.
The printed template is superimposed on the base of the picture and the silhouette is outlined. If internal lines are needed, they are easily transferred to the base. Tone the reverse side of the sheet with the image with a B-2B softness pencil. Attach it to the base for the mosaic, secure. With a pencil lead, lightly pressing, go through all the contours.
Further, according to the resulting markup, the selected fragments of the panel or appliqué are attached. Elements should be selected in advance. It is necessary to calculate the quantity, taking into account the area of \u200b\u200bthe final pattern and the size of each element.
Lids
Bottle caps or plastic caps are fine for large scale images. The picture from them turns out to be rather schematic, such a symbol of the next year will look good in the design of the facade of a house, summer cottage or suburban area.
 For the base, use a sheet of OSB, hardboard, plywood or pressed cork 3-5 mm thick. Also, the panel can be laid out immediately on a wooden fence or a wall of boards.
Draw or translate the contours of the future image. It is better to fix the covers on wooden surfaces with nails. Or press into the plastic base of a thick layer, gradually applied to the surface, liquid nails, polymeric cold or hot glue.
The lids are available in various diameters and thicknesses for a more structured display. Use more prominent, but smaller circumference details for the rooster itself, smaller ones for the background.
Herbarium
It is necessary to pre-collect and carefully dry the leaves of various trees under pressure. Also use the petals of different flowers. The more diverse the material, the more colorful the application will turn out.

For the base, it is better to use thick paper or cardboard. Glue the elements optimally with PVA or clerical glue. Choose a bottle with two applicators, narrow and wide or fabric, or apply the composition with a brush on the mosaic pieces, not the base. The glue stick is not very convenient, because the leaves are fragile and crumble, sticking to the rod.
A baby can also make an applique in this way, using a simple silhouette of a rooster and a small amount of leaves. For older creators, if you make an effort and approach with imagination, the picture will turn out to be stylish and unbanal. Bright and eco-friendly applications will please the eye all year round!
Buttons
Buttons are selected in various sizes and shapes, with a contrasting structure, complemented by beads and seed beads. Or, on the contrary, buttons of similar colors are used in the same shape. It turns out a variety of panels: elegant, bright, voluminous.

For the background, when gluing with cold or hot polymer glue, cardboard, plywood, OSB are suitable. You can sew elements onto fabric stretched over an embroidery hoop, then framed or stretched onto a solid base. Another convenient way is to stick buttons on pushpins and press them into the base (for example, paint-covered or fabric-covered drywall).
It is easy and with pleasure to create such homely and cozy appliques from buttons for your interior and as a gift to your loved ones.
Embody ideas for the symbol of 2017 with your own hands in the technique you like and do not forget about the sign: the year will correspond to its personification. It is up to you to decide whether it will be a proud and obstinate, but luxurious rooster, a cozy domestic chicken or a charming little chick.