How to make a hen and chick out of paper with your own hands
Hen and chick. Master class
We will tell you how to make a hen and chicken from modules.
This craft can be made by children over 6 years old. This craft is simple and good for those who are just starting to practice the art of origami.
This craft can be made for Easter to decorate the Easter table. You can make it in kindergarten and decorate an educational corner and an environmental corner with it.
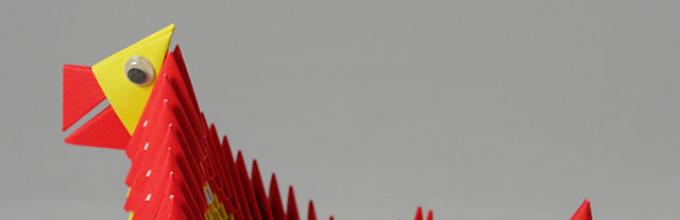
How to make such a cute mother chicken from modules using this master class.
.jpg)
We will dwell in detail on the manufacture of chicken modules
DIY paper chicken. Manufacturing
To make the chicken we will use three colors of paper: blue, white, yellow and red. The size of one module in our case is 7.5 by 5 cm. (Modules can be made in a different size and color)
Collect red, white and yellow modules. You will find diagrams for assembling modules .
.jpg)
Step-by-step process for making chicken from modules
1. Take 10 yellow modules for the first and second row and connect them in Method 2 ( see Fastening modules), closing in a circle.
.jpg)
.jpg)
3. In the fourth row, put on 20 yellow modules.
.jpg)
4. In the fifth there are 20 red modules.
.jpg)
5. In the sixth there are 20 white modules.
.jpg)
6. Then put on 20 red modules.
.jpg)
7. In the eighth row, put on 20 yellow modules again.

8. In the next row, put on 10 yellow modules, skipping two corners of the modules from the previous row.

9. There should also be 10 yellow modules in the tenth row. But each of them is already put on 4 corners of the modules of the two previous rows.

10. In the last row, put on 10 yellow modules (see photo).
.jpg)
11. Use yellow paper to make a tuft for the chicken. To do this, cut the piece of paper halfway across into strips, and use a pencil to twist the strips in different directions. Roll the uncut part of the paper into a tube and insert it into the chicken on top.
.jpg)
12. Glue the eyes to the chicken, insert a beak - a small red module - one row below the eyes.
The chicken is ready.
.jpg)
Well, here's our couple together
.jpg)
.jpg)

Hen - hen
Helps children:
Wants chicks
Everything was fine!
Yellow lumps
They make the kvochka happy.
Everyone follows mom
They find worms!
Souvenir "Chicken on the grass". Master class with step-by-step photos.
Description. The master class is intended for children of primary and secondary school age, educators, additional education teachers, parents and simply creative people who love to work with paper.Khvostikova Elena Aleksandrovna, teacher-organizer of the yard club “Ak Zhelken”, head of the “Handicraft” club of DDT, Aksu, Pavlodar region, Republic of Kazakhstan.
Purpose: This souvenir will be a wonderful gift for family and friends for a birthday, Mother's Day or March 8, Easter. In a group or classroom, such a craft will decorate a “living corner” and will look beautiful on a shelf in a children’s room.
Target: making a “Chicken on the Grass” souvenir from paper using the “modular origami” technique
Tasks:
- introduce the technology of making souvenirs using the “modular origami” technique;
- develop fine motor skills of the hands and eye;
- develop the ability to follow oral instructions;
- develop artistic taste and creativity, activate imagination and fantasy;
- improve work skills, create a work culture, teach accuracy.
Origami is the traditional Japanese art of folding paper figures.
The art of origami is a mystery, and it attracts every child with incredible transformations. It's not even a trick, it's a miracle! There are many images hidden in a piece of paper. In the hands of a child, paper comes to life. How much joy, how much delight! Children experience feelings of emotional comfort, a sense of the joy of childhood, and an incomparable feeling of satisfaction from handmade crafts.
I invite you to plunge into the world of origami and make a small souvenir “Chicken on the Grass”.
Yellow ball on the grass
It rolled merrily.
They say to the world
He was born yesterday.
He is glad of the sun and warmth
Like any child
Midges, crumbs, worms...
After all, the baby is a chicken.
R. Aldonina

Bright yellow, soft and fluffy chicks are loved by most young children. They evoke a feeling of tenderness, joy, a desire to protect and protect. Adults associate small chickens with small children; it is not for nothing that they affectionately call their babies “my chicken.” And the chicken is a symbol of summer, warmth and sunshine, a symbol of childhood!
To make the Chicken on the Grass souvenir you will need:
- office paper in yellow, red and green, A4 format,
- scissors;
- ruler;
- PVA glue;
- used computer disk.

Step-by-step preparation of chicken.
To make a chicken you will need 7 red and 315 yellow modules sized 1/64 A4 sheet.

We begin to assemble the first, second and third rows at the same time.
Row 1 – place 22 yellow modules on the short side
Row 2 – 22 yellow modules are put on with the long side down.

Row 3 - 22 yellow modules are put on with the long side down

We close them in a ring.

We turn it inward so that the long side of the modules “looks” outward.

Row 4 – 22 yellow modules with the long side facing out.
We put on rows 5,6 and 7 in the same way.

Give the body a rounded shape

Making the neck: in the 8th row we put on 22 modules with the short side out, placing them vertically. In the photo, row 8 modules are shown in red for clarity. In fact, all modules are yellow.


Let's start shaping the chicken's head.
Row 9 – 22 yellow modules, again with the long side facing out.


We put on 5 more rows in the same way (i.e. 10, 11, 12, 13, 14 rows).
Give the head a rounded shape.

Row 15 – put on 11 modules one at a time (i.e. put one on, skip one...)
We close the modules as close to the center as possible.

Let's start decorating the chicken.
Glue one red module instead of the beak.

We make a scallop from red modules. To do this, we assemble 6 modules in a column and bend it slightly with an arc.

Glue the comb to the head with PVA glue.

We make wings and a tail from yellow modules, as shown in the photo.


We insert the wings between the body modules and fix them with glue.

Glue the tail to the back.

Now we need to make the eyes.
To do this, cut out two circles with a diameter of 4 mm from a small strip of black cardboard. and eyelashes.
You can use ready-made eyes purchased at the store.

Glue the circles to the eyelashes. The eyes are ready!

Glue the eyes to the chicken.

To make the eyes look lifelike, you need to apply small white spots - highlights - with a corrector.

Step-by-step design of a souvenir.
Cut rectangles from green office paper measuring approximately 5x3.5 cm.
Cut them on one side not reaching the edge 5 mm. Twist the blades of grass with scissors.

Glue the “blades of grass” in a circle onto the disk.


Glue our chicken to the center of the disk. For beauty, you can add flowers or a butterfly to the grass.

Three little chickens
Three yellow guns.
- Who are they, three chickens?
Are they three cockerels?
The mother answered her son:
Let's wait, my friend,
Who will sing Ku-ka-river,
That's the cockerel!
R. Aldonina

If we make a shell out of white modules for our chicken, we will get a completely different souvenir.
Little chick
Born from an egg
Came out of the shell
I was very surprised!
How bright it is outside
How much space is there,
There, inside the shell,
There was no such thing!
E. Shevtsova
Not so long ago, the origami technique gained popularity in many countries and truly turned into a world art, although the roots of this art go deep into Ancient China, and this knowledge was accessible to a few, only representatives of the upper classes. In the middle of the twentieth century, technology began to spread throughout the world. Various varieties began to appear: simple origami, modular origami, pattern folding, wet origami. Origami even gradually began to be introduced into kindergartens and schools, since scientists have proven that this type of art contributes to the development of fine motor skills, concentration and perseverance in children. And if you want to instill these qualities in your child, then invite him to make a modular origami chicken in a shell together.
But before we get started, let's define what modular origami is and how it differs from the classical method. Classic origami consists of using one sheet of paper, which is folded into original figures without the help of scissors and glue. Modular origami consists of several separately folded parts, which are subsequently inserted into each other without the help of glue.
Triangular modules
So, what do we need to create a cute chicken in a shell? Let's look at the master class and detailed assembly diagram.
Of the necessary materials, we only need paper of three colors: white, yellow and red. Our chicken consists of triangular modules.
Triangular modules can be folded in different sizes, it all depends on the volume and height of your craft. All modules in one craft must be the same size. How to properly divide an A4 sheet is shown in the photo.


Having decided on the size and cutting out the necessary rectangles, we proceed to assembling the triangular modules. Detailed instructions are shown in the photo.
Related article: Blue color in the interior (photo ideas) - what combinations can there be

It is necessary to make 221 yellow modules, 304 white and 1 red module, which will serve as the beak of our chicken.
Assembling the bird
The first row is assembled from triangular modules located with the short side outward, all subsequent rows of modules are located with the long side.

We begin to assemble the chicken, for this we collect three rows of 16 yellow modules, not forgetting that the first row is located on the short side.

We turn our craft inside out so that the modules are facing us with the long side, and add 4 more rows of 16 modules each.


In the eighth row you place another 16 modules with the short side. We add 16 modules to the ninth row, but already have the long side.

And in the same way we collect four more rows. At this stage we already have the body of our chicken, now we start assembling the wings.


To assemble one wing we need 6 yellow modules. We arrange these modules according to the 3-2-1 scheme. The last module should be positioned with the short side.


We do the second wing in the same way. We attach our wings to the sides of the chicken body.


We insert the red module in the center.

Now let's start assembling our “house” for the chicken - the shell. Let's start from the bottom. We assemble the first four rows of 14 white modules.
Hen and chick. Master class
We will tell you how to make a hen and chicken from modules.
This craft can be made by children over 6 years old. This craft is simple and good for those who are just starting to practice the art of origami.
This craft can be made for Easter to decorate the Easter table. You can make it in kindergarten and decorate an educational corner and an environmental corner with it.
How to make such a cute mother chicken from modules using this master class.

We will dwell in detail on the manufacture of chicken modules
DIY paper chicken. Manufacturing
To make the chicken we will use three colors of paper: blue, white, yellow and red. The size of one module in our case is 7.5 by 5 cm. (Modules can be made in a different size and color)
Collect red, white and yellow modules. You will find diagrams for assembling modules Here.

Step-by-step process for making chicken from modules
1. Take 10 yellow modules for the first and second row and connect them in Method 2 ( see Fastening modules), closing in a circle.


3. In the fourth row, put on 20 yellow modules.

4. In the fifth there are 20 red modules.

5. In the sixth there are 20 white modules.

6. Then put on 20 red modules.

7. In the eighth row, put on 20 yellow modules again.

8. In the next row, put on 10 yellow modules, skipping two corners of the modules from the previous row.

9. There should also be 10 yellow modules in the tenth row. But each of them is already put on 4 corners of the modules of the two previous rows.

10. In the last row, put on 10 yellow modules (see photo).

11. Use yellow paper to make a tuft for the chicken. To do this, cut the piece of paper halfway across into strips, and use a pencil to twist the strips in different directions. Roll the uncut part of the paper into a tube and insert it into the chicken on top.

12. Glue the eyes to the chicken, insert a beak - a small red module - one row below the eyes.
The chicken is ready.

Well, here's our couple together


Hen - hen
Helps children:
Wants chicks
Everything was fine!
Yellow lumps
They make the kvochka happy.
Everyone follows mom
Modular origami. Lotus Flower
Modular origami chicken in a shell master class. Assembling an origami chicken according to a photo and assembly diagram

It looks fun and will become a real interior decoration or a gift for loved ones. An origami chicken can complement your collection of works using the modular origami technique. Origami chicken in shell consists of triangular origami modules of 2 colors: yellowish - 221 and snow-white - 304. Also, for the chicken beak, prepare 1 module of a reddish color. Let's start assembling modular origami chicken in shell.1. Making chicken Place the 1st row of modules with the short side out (KSN), all subsequent rows with the long side out (LS). Assemble 3 rows of 16 yellowish modules, 1st row KSN.


We turn the craft inside out so that the modules look at us with the long side and add 4 more rows of 16 modules each.


Top view

8th row of modules you place KSN - 16 yellowish modules

9th row: 16 yellowish modules

Assemble 4 more rows of 16 modules each. The chicken is assembled, now let's add the wings.

Top view

Chicken wings consist of 6 yellowish modules, each wing. We assemble according to the scheme 3, 2, 1 module. Place the last module in the wing with the KSN.


Stick the wings opposite each other, along the edges of the chicken.


Take 1 reddish module and stick it in the center between the wings.


2. Assembling the chicken shell. Bottom part. Assemble the first 3 rows of 14 snow-white modules.


And let’s add 1 row - 14 modules

In the 5th row we increase the number of modules to 21 in a row. Mix the modules this way: connect the 1st module as usual, stick the 2nd and 3rd modules onto one pocket, and so on until the end of the row.

Add 2 more rows of 21 modules

At the end of the lower part, we will create the effect of a broken shell by adding modules in places (in random order) in the 8th and 9th rows.


The upper part of the shell. Collect 3 rows of 8 snow-white modules.


In the 4th row we increase the number of modules by 2 times - 16 modules, we put each module on one pocket.

Assemble 4 more rows of 16 modules each

Top view

Similarly, we create the effect of a broken shell by randomly adding 5 modules in a row.

Cut out eyes from paper and stick them on the chicken. Now stick the chicken into the bottom part of the shell and add the top part on top. Origami chicken from modules ready.


Material taken from the website origamka.ru

For this craft you will need the following materials:
— colored office paper (yellow);
— white office paper;
— self-adhesive rhinestones for the eyes.
Manufacturing.
The craft consists of three components: a chicken, an upper and lower egg shell. We start by assembling the chicken. To do this, we assemble triplets from yellow modules, as shown in the photo.

We close them in a ring.

3-7 row – 16 modules with the long side out;
Row 8 – 16 modules with the short side facing out;

9-14 row – 16 modules with the long side out;

15 row – 8 modules;

The chicken's body is collected.

Wings.
To assemble the wings you will need a yellow module. We assemble two wings according to the diagram illustrated in the photo.

We get these blanks.

Carefully attach the wings between the modules of the 7th row of the chicken’s body.

All that remains is to make the beak and eyes. In place of the beak we insert an orange module, and we make the eyes using self-adhesive rhinestones.
Chicken assembly is complete.

Let's start assembling the shell. For this we need white modules. The lower part of the shell is assembled according to the following scheme:
1-2 rows – 10 modules;
3rd row – doubling, 20 modules;
4th row – 20 modules;
Row 5 – adding modules one at a time. There are a total of 30 modules in a row.
6th row – 30 modules;
Row 7 – form holes for the wings. We put on 5 modules, then we skip 1 module, then we put on 5 modules again and so on until the end of the row.
8th row – we put on 4 modules in the designated places;
9 row – 3 modules each;
10 row – 2 modules each;
Row 11 – 1 module each.
The upper part of the shell is made similarly to the lower part, only the number of modules is slightly smaller. The assembly diagram is as follows:
1-2 row – 8 modules;
3rd row – doubling, 16 modules;
4th row – 16 modules;
5th row - we put on 4 modules in the designated places;
6 row – 3 modules each;
7 row – 2 modules each;
Row 8 – 1 module each.
For greater clarity, the shell manufacturing diagram is shown in the photo.


Now we take our chicken and place it between two pieces of eggshell.
The craft is ready!


This cute and cheerful fluffy is made using modular origami technique.
Chicken is not just a toy. It can become a decoration for the interior of a children's room, a funny souvenir and a nice gift for a birthday or Easter.
Let's start creating!
- 40 modules of yellow paper for the chicken body and 4 of red paper for the legs and scallop;
- a small diamond made of red paper to make a beak;
- ready-made “doll” eyes;
- glue.
First we will make the body of the chicken. To do this, you only need motifs from yellow paper. We start working with two modules, which should be placed side by side with their long sides. We connect them with the third module, inserting the corners of the first two motifs into the pockets of the third. Similarly, we connect 2 more elements and get 2 finished rows. The first consists of 4 modules, and the second - of 3. We attach 1 element to the last corners of the first row and in the second row we get 5 modules.
Advice! In order to develop the shape of a chicken body, it is necessary to reduce the number of modules in each row.
So, in the seventh row we leave 4 motifs with the last corners free, in the eighth - 3, and in the ninth - 2. And finally, the body of the little fluffy is completed!
Now we face the stage of assembling and decorating our chicken. Let's start with the scallop. To do this, take two red modules and insert them into the middle of the first row. To prevent the structure from falling apart, you can fix them with glue.

Miracle in a shell
Despite the fact that modular origami requires certain skills and patience, even children can make such a chicken. In addition, at your discretion, you can decorate it with a butterfly, a flirty hat or a paper flower, you can do it in a shell or in the company of friends.
Creative individuals can make a larger-scale craft, with additional elements - this will require either a complex assembly scheme or their own imagination, which sometimes opens up limitless spaces for creativity.
Modular origami is an entire art that allows you to create real masterpieces from simple sheets of paper. Try to make a chicken with your own hands - and you will get a not only funny figurine, but a small piece of sunshine, spring warmth and good mood!
How to make a modular origami chicken in an egg?
Scheme with step-by-step guidance:
In order to make a chicken hatched from an egg, we will need: 220 white and 220 yellow modules.
We make the first row in the manner shown, in each row there are 21 modules.

The modules are connected in a circle, add another 3 and 4 row

Another fifth row has 24 modules, the 6th row also has 24 modules
Let's make the head. We install the modules as in the photo
8th and 9th row of 18 modules
For the 10th row we make 4 modules so that there are 22 of them
Row 11 is done like the tenth

Making the top honor of the shell:
1–3 row 6 modules
4–5 row 12 modules
Row 6 1 module, 3 spaces, 1 module, 3 modules, 1 module, 3 spaces, although you can do it at your discretion

We put everything together, make wings from several modules, the beak can be made from a red module, eyes from plastic or paper.
The chicken in the shell is ready!

Preparations for Easter continue and my craft factory does not stop working. And now, here is another technical craft in front of you. modular origami - chicken in a shell.
I have already described how to make a module. The total number of required modules is 424. Of these, 162 are yellow, 261 are white, and 1 is orange.
Let's get started:
Let's start collecting crafts with a chicken. It is much more convenient to fold 3 rows at once, each of them consists of 12 yellow modules. We close our modules into a ring and lay out another row of the same number of modules. Let's give shape.


From rows 5 to 8 inclusive, we lay out rows of 12 pieces.

But in the 9th row we insert the modules with the corners inward, quantity 12 pcs.

From rows 10 to 13 we lay out the same yellow modules, the number of which is still 12.
In the 14th row we put each module on 3 tails of the previous row. There are 8 modules in a row. Shape the chicken.

We make two wings separately: put 1 module on the edge, put one module on the corners and close with 1 module.

Glue the wings to the chicken, as well as the eyes and beak.

Now let’s make the shell; it consists of an upper and lower part.
Bottom part: lay out 3 rows of 14 white modules, close them in a ring. The fourth row also consists of 14 modules, and do not forget to shape the shell.


In the 5th row we make an addition: we put modules on each tail of the previous row (there are 28 modules in a row).

Row 6 is also 28 modules.

And now we act chaotically: we put on 7 modules anywhere, 6 on them, and then 5 modules. We retreat, put on 3 modules, and then 2. We retreat again, put on 5 modules, on them are 4 modules, 3 modules and 2 modules. Once again we retreat and put on 3 modules first, then 2, and 1 module.


Top:
We lay out 3 rows of 10 modules each, close them in a ring and lay out another row.


In the 5th row we add, there should be 20 modules. Sixth row - 20 modules.

Then we proceed in the same way as with the lower shell, putting it on randomly. So, we put on 5 modules, 4 modules on them. and 3 modules, skip about 8 modules, put on 4 modules, and then 3 more on top. At this point the shell is ready.

We connect all the parts; if desired, you can glue them.


