Every year, all kindergartens, schools and colleges in our country hold children's, homemade exhibitions. The guys exhibit their best works, these are all kinds of thematic drawings, appliqués, origami.
The article will describe how to make a children's owl craft. In fact, its production is not very difficult and, if desired, it can be made without any effort.

The following query is very often entered on the Internet: “how to make an owl craft from cardboard?” It's not difficult and won't take you much time.


Master class
In order to make a craft in the shape of an owl you will need the following materials:
- Plastic bottle, no matter what size
- Colored children's plasticine
- Paper colored napkins of various sizes
- Colored and white cardboard
- Scissors
- Seeds or any cereals
- Nut shells
- Wire
- PVA glue

The base for the owl will be a plastic bottle. Cut the neck off it, then make 2 small holes at the bottom of the bottle.

Draw eyes and a nose for your owl with a black marker, then carefully cut them out strictly along the contours. Take PVA glue and cover the entire bottle with it, except for the bottom, and stick colored paper on it to your taste.

Draw the tail and wings on a regular notebook, then glue it onto cardboard and cut it out. Paint the resulting body parts in any color you like.

Make eyes in the same way and glue them on with glue. Take nut shells and make wings out of them, you'll have to get creative. Wait until everything dries, and now you have a real owl ready.

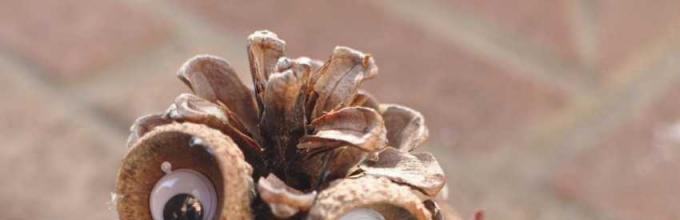
Owl made from pine cones
Probably each of us made an owl craft from pine cones as a child, and if you have never made one, it will still not be difficult for you.

To make it you need:
- Cones
- Glue (PVA, superglue)
- Felt

The wings and legs will be made of felt. Just draw them and cut them out. The eyes are also made from felt.


Owl made of cardboard
To bring to life an owl craft made from cardboard you will need:

A cardboard tube is the basis for a future craft. Take colored cardboard and cut out eyes, wings and legs for the owl. Next, color them according to your preference and stick them on the tube.

Paint the remaining areas that are not involved in the craft with colored paint. Just 20-25 minutes of work and a wonderful craft in the shape of an owl is ready. She will delight you and your children.

You can find more photos of owl crafts by purchasing the magazine “All about Crafts” or by going to a thematic website.


Pouch in the shape of an owl
All housewives always lack space to store all kinds of kitchen items and cereals. Now we will tell you where you can put them and make it look beautiful.

An owl-shaped bag will be a great place to store cereals, berries and much more. This thing will fit perfectly into the interior of the kitchen and give it coziness.
The work of making a bag is not labor-intensive and will not take you much time. You will need:
- Old but thick fabric
- Scissors
- Threads and needles
- Colored cardboard or colored paper (optional)
- Sheet of white paper

To begin, draw the wings, head and body of the owl separately on paper. Then place the fabric on the paper and cut it out along the contours of your sketches.

You should now have parts of an owl's body. Next, start stitching them together. Then draw the eyes and mouth on colored cardboard or paper. Glue this onto the fabric. The owl is ready.

As an additional decorative element, you can take a colored rope; it will serve as a kind of handle for the bag. The attribute can also be covered with rhinestones.

Conclusion
Making crafts doesn't require much effort. They develop hand motor skills and imagination well. Therefore, be sure to vaccinate your children in this type of activity.

Do crafts, because it is so interesting and entertaining, and the time spent will be useful.

Photos of owls


Making toys from paper is an activity that will never lose its popularity. Paper crafts can be very beautiful and original, and making them is a great way to keep children busy and teach them to be methodical, persevering and neat. This article will be about how to make an owl out of paper in different ways.
From a cardboard core
The main thing for such an owl is a round cardboard cylinder onto which all other elements are glued. There is huge scope for imagination; you can come up with as many finishing options as you like. Let's consider one of them.
We will need:
- a cardboard cylinder or tube on which toilet paper was wound;
- colored paper;
- scissors;
- glue;
- gouache or watercolor;
- pencil.
Let's look at the workflow.
First of all, we process our cardboard blank sleeve. We bend both upper edges inwards as shown in the photo to create “ears”. This part of the workpiece must be pressed and ironed with your fingers so that the base is as neat as possible.


After this, we choose the color of the future owl and paint it with gouache or watercolor. The base should dry well.

While the paint dries, we will have time to cut out eyes, beak and feathers from paper. We select paper of the desired color, fold several sheets of paper together, draw small circles on the back of the last sheet with a pencil and cut them out - these will be the feathers on the owl’s chest.


Cut out a small triangular beak from brown or burgundy paper.

We make feathers in the form of “tongues” from paper of the same color as for the breast circle feathers. These feathers are suitable for an owl's tail.

Now you can start gluing the base with all the decorative elements. We do this in the order shown in the photo:


The paper owl is ready, but you can show your imagination further, for example, by decorating the owl’s head with a bow, a bug, etc.


Origami paper owl
Let's consider two methods - classic origami (from one sheet) and modular origami (from many small paper blanks).
Classic origami
We take a square cut out of colored paper and bend it along both diagonals with the colored side inward, and then straighten it. We turn the title over and fold it crosswise, but now there should be a white part inside. Then, having worked with pre-planned folds, we bring the model to this form. The three upper corners need to be placed on the lower one (more details on how to do this in the video below). The “wings” of the triangles need to be folded and unfolded. We bend the top of the workpiece and unfold it again.
Next comes a more difficult task. You need to open the top of the workpiece, squeezing it from the sides, and do the same on the back side to form a rhombus (this process is shown in more detail in the video). The front and rear sections are folded so that the flaps face down. And we bring the upper corners to the axis. Pulling the part out of the middle and pressing it down, we make a wing, then do the same for another. And fold the top part. The owl using the classic origami technique is ready.
Modular origami
This method of making an owl from paper is more complicated, but the result is very beautiful and unusual.

As mentioned above, when working using the modular origami technique, a craft is formed from many pre-made small parts - modules. This is another way to make a paper owl three-dimensional and not flat, as is the case when working using the classic origami technique.
First, let's prepare the modules. The following scheme is used for their manufacture:
- Take a small piece of colored paper and bend it in half lengthwise and then across it;
- The workpiece is straightened, the right and left parts are folded to the resulting fold line;
- The figure turns over. The lower edges are folded so as to form an even triangle;
- The triangle is bent in half. The module is ready.
See also video on the topic:
Now that we have learned how to make modules, we should know how many of them we will need. To make a paper owl, you should prepare:
- 274 blue modules;
- 102 black modules;
- 62 white modules;
- 1 pink module - we will make a beak from it.
Let's start assembly. To begin with, take 2 blue parts and connect them with another one - either the same blue or black. The workpiece should consist of 3 rows, the last of which should have 22 modules. A ring is assembled from blanks. From 20 blue and 2 black parts we make rows 4-6. In rows 7 to 9 there should be only blue modules, 22 pieces. In row 10, 1 white module should be installed so that it is above the middle of the black ones located below. The remaining modules – 21 – are blue. 11th row - two white ones attached to the bottom one, and 20 blue ones.

Required number of parts for the following rows:
- 12 row: 19 blue, 3 white;
- Row 13: 18 s, 4 b;
- Row 14: 11 s, 9 b.
- 15 row: 14 s, 8 b;
- Row 16: 13 s, 9 b;
- Row 17: 12 h, 8 b.
Row 18: the black module is placed in the center, and on both sides of it there are 2 and 3 white ones, with 15 black ones around. Row 19: take 12 black modules and place them on the sides in 6 rows. Row 20: 2 and 1 black modules on the sides, 3 white ones in the middle. 21 row: 2 and 1 black on the edges, 2 white in the center. Row 22: 1 black on the edges, 1 white in the center. 23 row: 2 black modules. 24 row: 1 black module.

It turned out to be an ear. We do the second one in exactly the same way. Finally, add the beak – a pink detail. It needs to be installed in the 18th row between the white ones. All that remains is to glue on the eyes and, if desired, some decorations, and the owl using the modular origami technique is ready!
And finally. The easiest way to make an owl from paper is using ready-made templates that can be printed on a printer.
There are many tales about owls, and among all nations they personify wisdom. Our wise paper owl lives in a fairy forest. She does not hunt mice and birds, but makes friends with them, and she is only 10.5 centimeters tall.
In order to make such a voluminous paper owl, you will need:
thick colored paper -
blue
light blue
beige
brown
black
yellow flowers
paper glue,
double sided tape.
However, double-sided tape can be replaced with paper glue and corrugated packaging cardboard - boxes are made from it.
You will also need a pencil and scissors.
You can see the templates for the owl parts in Fig. 1 and 2. On the template, the name of the part is written in the color that matches the color of the paper from which this part is cut out.

We transfer the details of the owl onto plain paper, simply by attaching it to the monitor or printing it out on a printer and cutting it out. You now have your own owl templates.
We cut out the parts of the owl according to the templates (Fig. 3) and begin assembling it.

Glue the pupils to the eyes with regular paper glue (Fig. 4). We make sure that they are located in the center, otherwise the owl will mow.

We glue the eyes to the eyeliners with double-sided tape (Fig. 5).

We glue the eye pads to the owl's body with double-sided tape (Fig. 6).

We glue the owl's beak to the eye pads with regular glue (Fig. 7).

In order for the owl's eyebrows to protrude forward, we glue two layers of tape to them (Fig. 8) and glue this part onto the owl's head between the eyeballs (Fig. 9).


We bend the tail along the dotted line (Fig. 10, 11) and glue it to the back, spreading glue on the bent corner (Fig. 12).


We bend the wing parts in half (Fig. 13) and glue double-sided tape to them, as shown in Fig. 14.


Glue the wings to the back of the owl, aligning the upper edge of the wing with the mark on the template (Fig. 15).

This is what the wings look like from the front (Fig. 16).

All that remains is to glue the legs: bend each one along the dotted line (Fig. 17) and glue it close to each other, aligning it with the lower edge of the body and the middle mark (Fig. 18).


To make the owl's legs voluminous, place a pencil or pen under them and press with your fingers for about a minute. During this time, the paws will become convex.
Our paper owl can stand on its legs and tail. And even wander through fabulous autumn forests with fallen autumn leaves made of paper.

You can make an owl using different colors of paper. The main thing is that they are combined with each other. If you have creative ideas for decorating an owl, you can safely apply them, then it will look even more interesting and attractive.
As always, we offer an idea, and you, based on your desires and preferences, will create a unique, one-of-a-kind owl.
Actually, I don't really like twitchers. But one day I saw a picture from an old book, where there was a description of how to make a children's hanger - an Owl. She opened her eyes when they hung clothes on her. And I wanted to make such a twitching owl.
Most of the time this owl sleeps peacefully, but if you pull the thread, it will open its eyes and flap its wings. And maybe even shout “Woo-hoo!”

Materials and tools:
Thick cardboard or corrugated packaging (used for making boxes)
Colored paper
Colored cardboard (yellow)
PVA glue
Scissors
Thick threads
Marker or felt-tip pen
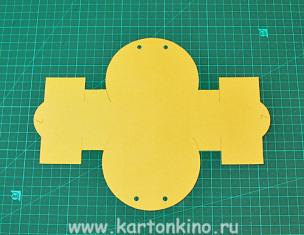
Cut out the owl's body and two wings (in a mirror image) from cardboard.

We cover them with brown paper. We dry it under a press (put a heavy book on top). 


Glue the head parts from colored paper and dry them.

Cut out the part with the pupils from yellow cardboard. We outline the location of the pupils and eyelids with a pencil.

We glue the lower eyelids on it from paper of the same color as around the eyes.

Using an awl, we pierce the shoulder and wing at the junction. It is convenient to do this on a hard rubber mat or on an unnecessary album (magazine).

We make a mount for the wing. You can use special clips for scrapbooking, or make them yourself from a button and a piece of wire. We fasten the wings, they should move freely.

We pull the first thread through the holes in the upper part of the wings and in the lower part of the part with the pupils. We pull the second thread only through the holes in the lower part of the part with the pupils.

We secure the upper part of the part with the pupils with an elastic band. We securely sew it to the “ears” of the owl.

By adjusting the size and tension of the threads, you can tie them together. We tie a button or ball to the end of the thread, which we will pull on.
Using a black marker or felt-tip pen, draw the feathers on the wings and complete the eyes.


Pattern sheet A4 format.

Making toys from paper is an activity that will never lose its popularity. Paper crafts can be very beautiful and original, and making them is a great way to keep children busy and teach them to be methodical, persevering and neat. This article will be about how to make an owl out of paper in different ways.
From a cardboard core
The main thing for such an owl is a round cardboard cylinder onto which all other elements are glued. There is huge scope for imagination; you can come up with as many finishing options as you like. Let's consider one of them.
We will need:
- a cardboard cylinder or tube on which toilet paper was wound;
- colored paper;
- scissors;
- glue;
- gouache or watercolor;
- pencil.
Let's look at the workflow.
First of all, we process our cardboard blank sleeve. We bend both upper edges inwards as shown in the photo to create “ears”. This part of the workpiece must be pressed and ironed with your fingers so that the base is as neat as possible.


After this, we choose the color of the future owl and paint it with gouache or watercolor. The base should dry well.

While the paint dries, we will have time to cut out eyes, beak and feathers from paper. We select paper of the desired color, fold several sheets of paper together, draw small circles on the back of the last sheet with a pencil and cut them out - these will be the feathers on the owl’s chest.


Cut out a small triangular beak from brown or burgundy paper.

We make feathers in the form of “tongues” from paper of the same color as for the breast circle feathers. These feathers are suitable for an owl's tail.

Now you can start gluing the base with all the decorative elements. We do this in the order shown in the photo:


The paper owl is ready, but you can show your imagination further, for example, by decorating the owl’s head with a bow, a bug, etc.


Origami paper owl
Let's consider two methods - classic origami (from one sheet) and modular origami (from many small paper blanks).
Classic origami
We take a square cut out of colored paper and bend it along both diagonals with the colored side inward, and then straighten it. We turn the title over and fold it crosswise, but now there should be a white part inside. Then, having worked with pre-planned folds, we bring the model to this form. The three upper corners need to be placed on the lower one (more details on how to do this in the video below). The “wings” of the triangles need to be folded and unfolded. We bend the top of the workpiece and unfold it again.
Next comes a more difficult task. You need to open the top of the workpiece, squeezing it from the sides, and do the same on the back side to form a rhombus (this process is shown in more detail in the video). The front and rear sections are folded so that the flaps face down. And we bring the upper corners to the axis. Pulling the part out of the middle and pressing it down, we make a wing, then do the same for another. And fold the top part. The owl using the classic origami technique is ready.
Modular origami
This method of making an owl from paper is more complicated, but the result is very beautiful and unusual.

As mentioned above, when working using the modular origami technique, a craft is formed from many pre-made small parts - modules. This is another way to make a paper owl three-dimensional and not flat, as is the case when working using the classic origami technique.
First, let's prepare the modules. The following scheme is used for their manufacture:
- Take a small piece of colored paper and bend it in half lengthwise and then across it;
- The workpiece is straightened, the right and left parts are folded to the resulting fold line;
- The figure turns over. The lower edges are folded so as to form an even triangle;
- The triangle is bent in half. The module is ready.
See also video