And hello everyone again! Today we continue the topic of winter atmosphere, toys, gifts, beautiful costumes. And if more precisely, today we will talk about snowflakes. The products are perfectly suitable for decorating Christmas trees, as well as clothes, shoes, accessories, and so on. Therefore, we dedicate today's theme to them! After all, they will be appropriate for any theme of the New Year's costume and not only!
Snowflakes as decorations
Most often knitted little things decorate warm socks, blouses, poncho, sweaters, skirts, dresses, mittens and so on. Such dandelions are suitable for anyone who wants to stand out or simply feel in a warm and cozy atmosphere.
Knitting snowflakes matter is very exciting and interesting! This is probably everyone. Especially needlewomen with a huge experience that can be knitted with knitting needles and crochet.
Types of mating snowflakes
On the Internet there is a bunch of diagrams for which you can bind the guns with the knitting needles. But you will not have to look for a wonderful pattern for a long time! After all, all schemes can be found on our website.
Beautiful white snowflakes
Therefore, we now offer you to look at simple, but very elegant schemes for which you can connect insanely beautiful and gentle little things.
So let's get up!
Such a thing will be appropriate for any suit or outfit as an accessory. The color is better to pick up white or blue / blue. But this, naturally, depends on the color of the product itself, the element of which will be knitted snowflake.
- Product number 2.
This knitted snowflake is also suitable for decorating your outfits and accessories. Color Choose at your discretion.
 Knitting Figure Snowflake
 Slightly reduce the size, you can link such a thing for your socks or mittens. Color at your discretion.
- Pattern "Star" №4
Pushki patterns in the Norwegian jacquard style. Such drawings are suitable for decorating a warm winter sweater, tights, skirts. The color of the product should be contrasting the color of the thing itself. Therefore, if you manufacture a certain thing dark (black, brown, green) or bright (red, orange, yellow) color, such a snow crystal will better look white.
- Pushinka number 5.
Such a wonderful thing is suitable for decorating the tree. To do this, you just need to add a ribbon for which you can hang a piece on a twig.
- Pushinka pattern №6
Such drawings will also be well appropriate to decorate things, especially veasions and knitted socks.
- Crystal number 7.
Such sticks are also perfect for decorating the tree.
- Pushinka number 8.
Such a work will be appropriate to decorate what you can only please! By the way, it can also be booed on the Christmas tree!
- Crystal number 9.
Such beauty can become an excellent napkin or its element. But on the winter tree she looks very beautiful!
- Dandelion number 10.
Simple and understandable scheme. Together with her you can create an insanely luxurious paper!
 Pattern of dandelion
 Crystal №11
A very elegant and neat fluff can happen if you try to try well.
Crystal №12.
Two very elegant guns that best be relevant to decorate forest beauty, as well as an element of a festive napkin.
Napkin №13
Very unusual crystal in the form of a dandelion, because its end side is different from another.
Crystal №14.
Very elegant fluff, so best of all it will be relevant as a napkin element.
Crystalline №15
A truly winter accessory. After all, in summer or spring it will be inappropriate.
Knitted snowflakes №16
And again the Norwegian patterns for clothes or accessories.
Knitted snowflake №17
Many twigs, like on corals, suitable for the New Year's decoration for green guests.
Pattern number 18.
Magnificent possible range of colors, so such patterns are perfect for clothes.
Crystalline №19
Also a very unusual and magnificent fluff!
Dandelion number 20.
Very elegant crystalline, which are suitable for the festive table.
Crystalline №21.
Gorgeous products for decorating a festive table or green beauty. Detailed scheme and instructions will help you in creating such beauty!
Other types of snowflakes

 Knitting scheme patterns
 - Pushinka №22.
Instructions in Russian and the detailed scheme will help create you luxurious knitted snowflakes.
- Crystallian №23.
Such a luxurious bag with knitted fluffs is perfect for your winter wardrobe.
- Pattern number 24.
Such a drawing in the Norwegian style is suitable for any type of clothing!
- Pushinka №25
Graceful and gentle crystalline will perfectly fit into any New Year's atmosphere.
- Patterns №26.
Such products can be made at home and create a truly designer thing!
- Crystal "Zhanna"
Such a dandelion is very unusual that he needs a delicate and luxurious name. Therefore, the name of Jeanne is perfect for this product.
- Crystal "Carolina"
Unusual, bright, memorable. That is why Carolina's name is such a product just right!
- Pattern "Winter"
Here is such a scheme for decorating clothes.
But you have the idea of \u200b\u200bthe designer thing itself, to decorate poncho.
Plot "Crystals"
Excellent option for winter kitchen.
But your finished product in red and white tones. Naturally, you should pick up the colors at your discretion.
Auditable for needlewoman
These are the magnificent products can be created with the needles.
As you can see, knitted snowflakes can be very beautiful, elegant, which are suitable for all occasions! And knitting snowflakes will bring great pleasure to you!
And today it's all!
Thanks to all needlewomen for attention!
To new meetings!
In the cold season, so I want to please yourself and your loved ones with the beauty, which is so little around! And at all, it is not necessary to grieve for the summer days, you can bring to the house comfort based on the winter fairy tale, if you know how to create festive winter symbols with your own hands. To do this, you can use yarn, knitting or crochets. It must be said that winter themes in crochet or knitting needles, perhaps the most relevant, and the New Year's theme is one of the most beloved by all the craftsmen - after all, it raises the mood so much!
One of the many interesting winter elements with which you can decorate the house during the winter holidays, and everyday life, too, are hooked snowflakes. These are very cute and delicate openwork products that can be "applied" in the farm in a different quality:
- christmas decorations;
- festive coasters under cups and glasses;
- new Year's keychains;
- decoration-stickers for simple jackets flasks;
- elements of the decoration of New Year's gifts and postcards;
- stripe on sweaters, hats, scarves.
In general, the snowflakes associated with a crochet will be useful in everything that is enough fantasy. These useful decorations we will learn how to knit with crochet today, and will help in this schemes and descriptions that will be useful for both beginner needlewomen and professionals who are in search of different snowflake options.
Crochet snowflakes - schemes with descriptions for beginners
The wonderful news is that the forms of crocheted snowflakes can be a different way, like dimensions - and therefore, they will not be boring to knit them. Moreover, after learning practice, new in crochet in crochet will be able to tie the snowflake by their idea, having received the original and beautiful decoration of their own authorship.
But for beginnings, consider several traditional options for knitting snowflakes with crochet. To learn how to crochet patterns that turn into snowflakes should adhere to the following recommendations and schemes.
How to tie the most simple snowflake?
Crochet Snowflakes is suitable for both beginners in this case, if you choose among light challenges. We present several types of snowflakes with crochet, which are easily knit if you stick to the detailed description.
Popular articles:
Easy snowflake crochet number 1

This snowflake fit according to the following scheme and detailed description with the photo:

We make a ring from the thread and knit 1 air lift air loop.
1 row: knit 8 columns without an in-ring in the ring, tighten the ring from the thread and knit the connecting column, entering the hook in the 1st column without the onset of this row.
2 row: knit 3 air loops of lifting + 2 air loops according to the pattern scheme (i.e., knit 5 air loops), in the next loop, knit a column with an attachment, then knit 2 air loops, * in the next loop 1 Stage with Nakud, 2 again 2 air loops * From * We continue to knit until the end of the row.

We clic down a number of connective column, the hook we enter into the 3 air loop of the lift.
3 row: In order to go to knitting from the arch, connect 1 connecting column, then 2 lifting air loops, knit 3 columns with a nakid with a total vertex, then knit 5 air loops, * in the next arch, knit 4 columns with an attachment with a total vertex, again 5 Air loops *, continue to knit from * to the end of the row. We are closed by a number of connective column, entering the hook to the total top of the columns.

4 row: knit 1 air loop lifting and 1 column without a nakid in the same loop of the base, knit a pico from 3 air loops, and a column without a nakid to the same loop of the base, then knit a pico of 5 air loops, and a column without a nakid to the same The loop of the base, knit pico from the 3-air loops and the column without a Nakid, introducing a hook in the same loop, then we knit 3 air loops * into the overall vertex of the next group of columns we knit the same way 1 column without Nakid, pico from 3 air loops, 1 Column without Nakida, Pico of 5 air loops, 1 column without a Nakida, Pico of 3 air loops, 1 Stage without a Nakid.


Let's try to connect with crochet a few more options for simple snowflakes, and we will help us in this detailed master classes.
Easy snowflake crochet number 2

To work with the scheme and description it was easier and more convenient, we use the following abbreviations:
VP
- air loop;
PSN.
- semi-sololbik with nakid;
SSN
- Column with 1st Nakud;
SBS
- Column without Nakid;
CS2N
- Column with 2 nakidami;
CC3N
- Column with 3 nakidami;
SS
- Connecting column.
Scheme and work move:

1 row: 4 VP (replacement 1 SSN + 1 VP), * 1 SSN, 1 VP * 6 times. Tighten the sliding knot. Connect the PSN circle in 3 VP row.
2 row: 1 VP, 1 TBI in the same arch, * 5 VP, 1 failure in the arch between the SSN of the previous row *. From * to * repeat to the end of the row. A row ends 1 fail-to-arch, 2VP, 1 SSN in the first failure at the beginning of this series. Thus, each new row will begin in the middle of the previous petal.
3 row: 4 VP, 1 TBI into the same arch, * 5 VP, in a large arch, we are proving 1 fails, 3VP, and in the same army 1 fail *. Thus, repeat from * and to * until the last arch. In the last arc of the row, they are proving 1 fails, 3 VP, 1 failure and finish a number of 2 VP, in the first VE lifting of 1 SSN. And again you should be in the middle of the petal.
4 row: 4 VP, 1 TBI into the same arch, * 7 VP, in a large arch, I have 1 fail-off, 3VP, and in the same arch 1 fail *. Thus, repeat from * and to * until the last arch. In the last major arch of the row, there are 1 fails, 3 VP, 1 failure and finish a number of 3 VP, in the first VE lifting of 1 CC2H. And again you should be in the middle of the petal.
5 row: 4 VP, 1 TBI into the same arch, * 9 VP, in a large arch, we are proving 1 fail-off, 3VP, and in the same army 1 fail *. Thus, repeat from * and to * until the last arch. In the last major arch of the row, they see 1 fails, 3 VP, 1 failure and finish a number of 4 VP, in the first VE lifting of 1 ss3n. And again you should be in the middle of the petal.
6 row: 4 VP, in the arch insisted 5 fails, * 5 VP, in a large arch, there are 5 fail--3 VP-5 IBS *. Thus, repeat from * and to * to the end of the row. The row finish 5 failures in the last major arch and SS in the first 1 VP of lifting this series.
We offer another version of the crocheted Christmas snowflakes, which will come in handy in the decoration of the house.
Easy snowflake with crochet number 3

It is necessary to start knitting from the center, and you can do this in two ways:
- We make a chain of several air loops, connect it in a ring and knit on.
Hour a ring on your finger from the thread and we are taking it with the columns without a Nakid; - We recruit 5 air loops and closing the ring. Insert the connecting column and 3 air loops of the first row.
Again, we make a connecting column and three air hinges, closing arc with a connecting column. To be clearer, glancing periodically in the photo below.
Such arcs should turn out 6 pieces. Close a number of connective column.
We bind the first arc arc: 1 column without a Caida, 3 air loops, 2 columns without Nakid.
We also assign the second and third arch. Also: 2 columns without Caida, 3 air loops and 2 columns without Nakid.
We repeat three more times. You can finish the master class for beginners. We already got an openwork little asterisk. But let's try to tie it even more and more beautiful.
Third row start with a connecting column. Next Rowing report: 1 Column without Nakida, 3 Air loops, 1 Stage without an inlection, 5 air loops, 1 column without an inlets, 3 air loops, 1 column without an inlets, 2 air loops.
Repeat the report of the row another 5 times.
We turned out the openwork snowflake with a crochet connected, which can be starch and hang on the Christmas tree.

Master class for knitting beautiful snowflakes for the new year
If the question is "how to please households during the winter holidays?" The answer will "do something beautiful with your own hands", then the snowflakes are hooked - this is exactly what you need! These small winter symbols can be used in a variety of purposes, and they will give a special mood without exception to everyone. But first, you need to choose suitable crochet snowflakes knitting schemes, and consider several master classes.

Reduction to the description:
VP
- air loop;
SSN
- Column with Nakud;
SBS
- Column without Nakid;
P5
- Pico from 5 VP;
P3.
- Pico from 3 pp;
SS
- connecting column;
PSSN
- A semi-solitary with Nakud.
Knit snowflake:
Please note that at the beginning of the row instead of the columns they are proving the VP.
SSN \u003d 3VP; ISP \u003d 1VP.
We start with the ring.
1 row: * 2ss with a total vertex, 3VP * x 5 times, ss;
2 row: * (1SBN, 5VP, 1SBN) - in one loop, 4VP) * x 5 times, ss;
3 row: 3ss, in the arch of 5VP - 2SSN, 2VP, under the arch of 4VP - 1SBN, 2VP
* (2ssna, 3VP, 2SSN) - 5VP, 2VP, 1SBN under the trail. Arch, 2VP) * x 4 times.
The end of the row - 2ss in the first arch with which a number began, 1VP, 1PSN to the third VP;
4 row: Under the just associated PSS - (1SBN, P5, 1SBN, P3), 2VP, 1SBN - in the 2nd SSN, P3, 2VP, under the failure. Half the lace is cluttered.
The following five knit the same.
We continue to knit after the SS
* 2VP, 1SBN knitted to SSN, P3, 2VP, under the arch - (1SBN, P3, 1SBN, P5, 1SBN, P3), 2VP, 1SBN in 2 s SSN, P3, 2VP, Under the ICS *.
Tied five rays, and we take the sixth - 2VP, 1SBN, P3, 2VP, under the 1st arch - 1SBN, P3, SS.
Filament fix and cut. Snowflake ready!

Another version of the snowflake with a knitted crochet may look like this:

Reduction to the description:
P6 - Pico from 6 VP;
SP - connecting loop;
SBS - a column without Nakid;
VP - air loop;
SSN - Column with Nakud.
Knit snowflake:
At the beginning of knitting snowflaps, we collect a chain of 6VP. Do not forget about the replacement of the first BP columns:
- 3VP is equal to 1ss;
- 1VP is 1SBN.
1 row:
1VP, 11SP, SP;
2 row:
(2ss, 3VP) - 6 repetitions, SP;
3 row:
(2SBN at the vertex of the SSN of the second row, under the arch - 2ss, 4vp, 2ss) - 6 repetitions, the joint venture;

4 row: (2Sp, in two SSS knit 2SBN, under the arch - 1SBN, P6, 1SBN, 1SSN, three hundred pico (P6), 1SSN, 1SBN, P6, 1SBN, 2SBN to SSN 3GO, 1VP, we skip two loops) - 6 repetitions , SP.

All extra threads we remove, fixing them, and cut off.
Starch the openwork motif, align and fix pins, let it dry. Snowflake crochet ready.
Video lesson
For helping with newcomers in such a difficult case, like crochet, visual lessons always come, which help to avoid the simplest mistakes and pay attention to important points that master classes in photos do not always be fully transmitted. This video lesson helps to tie a snowflake with a crochet even the masters who are taken for this for the first time in life.
Video "Snowflakes Crochet for Beginners"
How to tie a snowflake?


Winter is a special time of year. It has its own atmosphere, its character and a number of their characters. Among the symbols of winter, perhaps one of the most important and popular images of the snowflake can be considered. It is placed everywhere: on souvenirs, napkins, household items and clothes. If you also wanted to decorate your interior with an unusual knitted snowflake, in this article we will tell you how to tie a snowflake with a hook or spice.
Snowflake crochet
Before tieting the snowflake with a hook, select the yarn for your pattern. We recommend using cotton yarn for elegance of the product.
Instructions for knitting snowflakes with crochet:
- Check the four air loops, the first and fourth combine the connecting column, then type one lifting air loop, 6 columns without a Nakid and one connecting column in the first column without a Nakid. You should get a dense ring.
- Initially, there is a needed pattern of the beam with snowflakes with air loops, and then return to the connecting columns to the ring.
- In total, you should get 5 or 6 rays, depending on your wishes.
- If the finished snowflake is stash, to be treated with a solution of PVA and water in a ratio of one to two and pretty dry, such snowflakes can be sprung throughout the house.
Snowflake knitting
As a rule, the question of how to tie the snowflake with the knitting needles, arises from those who decided to decorate their knitted product with the corresponding pattern. Snowflake circuits for embroidery on top of the knitted canvas can be found a great set. That's what you should pay attention to:

You can, of course, embroider the pattern and tritely cross, but it will not look so carefully, like when embroidery the loop in the loop.
The main advantage of the snowflake pattern is that it never comes out of fashion and is always relevant on any winter things. Sweaters, pants, scarves, caps, gloves - it will be everywhere to the place. Especially beautiful white snowflake pattern looks on red, burgundy, blue, blue, black and dark brown background.
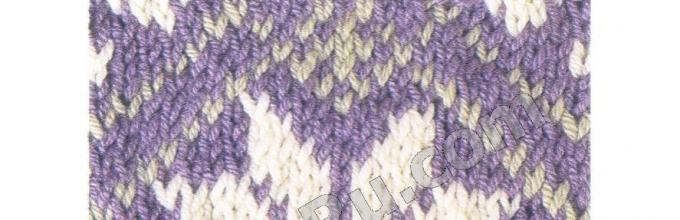
With the image of snowflakes always attract attention. It is about them that will be discussed in this article. They appeared for the first time in the south of Norway, where each needleman tried to tie something unique and unique on the spokes. Traditionally, they preferred to create all sorts of interpretations of snowflakes, and each was originally original. In winter, when a strong cold on the street, warm knitted clothes with a snowflake pattern, becomes the most popular and in demand. For example, you will be offered some snowflakes for knitting snowflakes.


Before starting knitting such a snowflake with two threads, it is better to see the actual video, especially for those who are just starting to do this. This knitting method is suitable for being able to connect several colors of yarn in one row. But there is one disadvantage: from the inside the formation of an armor. If the gaps between the monochrome loovers will be equal to four peels, then the free thread will cause some problems during socks of such clothes. The scheme presented will be simple in execution, since under it there are already notation that must be strictly observed.
Video: Knit Snowflake Pattern Jacquard
Dress with snowflake pattern
Such an ornament will greatly decorate not only the winter and warm dress, but also for other weather too. Demi-season clothing can be knitted from cotton threads that will not create any discomfort, even in the sun. There is one embodiment of knitting, which will help create a large snowflake pattern - this is the use of several yarn colors with crossing the threads in those places where color changes occurs. Crossing occurs every five or seven kettops. In this case, the threads on the wrong should not be saved. Then there will be no problem with broach. As a result, your knitting should be warm due to outstretched yarn on the wrongness, which complies it doubly. The most important thing is to carefully monitor the diagram and tension of the yarn. Observing such rules, you can make the snowflake pattern correct and unique.
The scheme that is used for knitting is presented below. It is worth paying attention to the fact that the scheme has no gap more than four loops, only in the fourth, fifth, eleventh, seventeenth and eighteenth rows. The snowflake pattern will be repeated every twenty pets.
Schemes of Norwegian snowflakes
The first scheme will be wonderful to look at knitted sleeves or on the edges of the COFT and sweaters, as well as on the pockets or bags. If you link about ten such squares from the remaining colored threads, and then sew their knitted seam, then from this web you can create a fashionable bag that will be unique.
 The following scheme will show the knitting pattern of the snowflake more tender and not so geometric as the previous one. This winter drawing will wonderfully complement the ornament of sweaters, sweaters, any sleeves, as well as coquettes. The scheme involves the use of three yarn colors.
One small secret for beginners of knitters. In order not to confuse in numerous threads and do not confuse the pattern, all the colors of the yarn are placed on each separate finger of the left hand. So you do not confuse, what a thread should be stretched into the Linets next in the queue. In the process of work, two fingers are always involved, and so you can use the rest.
The next snowflake ornament will be presented in the easiest of its version. In this case, only two colors are used. And with what frequency you will do it, solve only you. The pattern is suitable for any kind of clothing and knitted accessory.
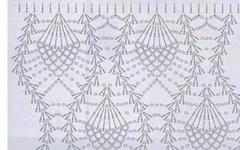
We are on the example of a fairly simple and beautiful pattern of "Snowflake" will learn how to read the schemes of jacquard patterns and knit them! Such a snowflake can be decorated with any warm thing - sweater, cap or mittens! So, let's begin.
Dear needlewomen! I want to warn you that loops I knit the "grandmother's way" - for the rear wall of the loop. This method is not classic, and in many sources of the product knit "classically". Read more about the methods of checking loops read.
Here is the scheme of our pattern (click to closer). One cell is one loop. Horizontally - horizontal rows, vertically - vertical.
 For a pattern, we will need 28 hinges + 2 for the edge (first and last) loops that cannot enter the pattern, as they remove them through a row.
 As you can see, the first row ties the thread of the same color, which we do. Since the color pattern begins with the next row, do not take this row to the end ...
 And pink thread.
 I turn the knitting. We have .

 Further, according to the scheme, follow from the cell 1.1 in the direction of knitting, that is, to the right left, - two green loops. Next, we will change the color - omit the thread of the green color down so that it does not interfere with us. And we throw a pink thread on the index finger - now she has a worker. Do not pull! She must lie freely to not spray the canvas. Be careful and follow this rule throughout the entire pattern of pattern - follow the thread to be stretched, this is a frequent error when knitting jacquard.

 Do not forget to lower the pink thread down so that it does not get from the front side. And they see 2 green.


 I turn the knitting. Now we have the front side - the stretch of the threads remained on the wrong way. Remove the edge loop. Next knit according to the scheme, starting from the cell 2.28 now against the direction of knitting, that is, from left to right.

 One pink. Do not forget to lower the threads down after checking, only now for knitting.
 One green. And so on according to the scheme. Do not forget that we knit the face rows to the right - to the left, and the invalid - to the left - to the right (it does not always happen, it all depends on the pattern and scheme, sometimes it happens on the contrary). I think that you all understood and continue to figure it out, and nothing complicated will not. I would like to give another one advice - the threads will inevitably be twisted among themselves, spin them, tie to each row, not less likely that there is no excessive tension of the threads.