


Silver Age dress


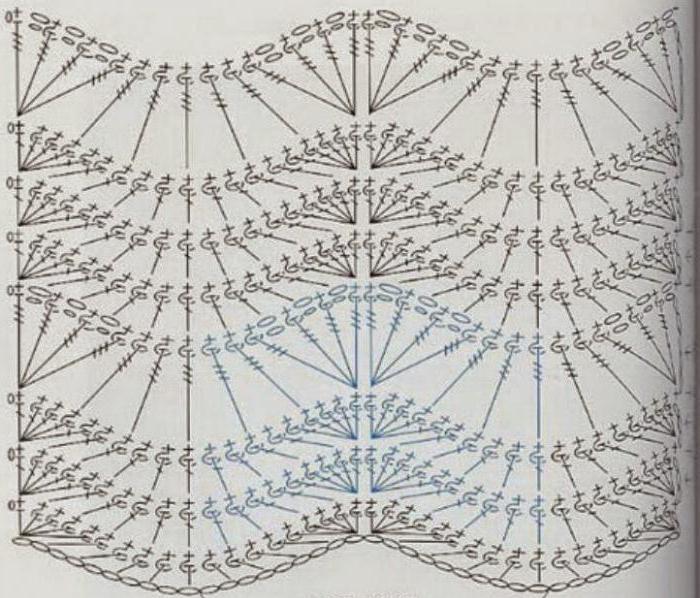
The main fabric of the skirt is crossed stitches and double crochets, in a circle 
skirt Carolina
The main fabric of the skirt is knitted from crossed columns; after a certain number of rows, 2 types of frills are tied.
Frill No. 1 (if you count the top of the skirt) is a braid of flowers with 6 petals. I took this as a basis and tried to knit it continuously, slightly changing the pattern
Frill No. 2 is knitted in 2 stages (I numbered them in the diagram), and indicated where to cling to the main fabric of the skirt. And also - the “curliness” of the frill can be adjusted by the number of columns in the shells; in the second stage - I drew 9 tbsp. s\n (I saw so much on the very top frill No. 2, and on the next one I already saw 6 tbsp. s\n). 


dress Valencia, Clover, untitled and Vichy


Cloth from s1n.
Attach a new thread at the end of the first row C1n
Row 1 - and knit a row of sc with a picot. I have 4 sc, picot from 3, (7 sc, picot from 3) repeated until the end of the row, 3 sc... Fastening straight into 2 half loops with! n. You can knit fabric from C1n, capturing only 1 half-loop, but I like it tighter.
2nd row - double crochet stitch in the 7th sc, sc in the 1st sc, 8 sc in the 5 crochet stitch, ss in 7 sc in the previous row; a stitch with 5 crochets... You can also fasten 5 sc to the fabric C1n, as the first rapport is connected.
3rd row - sc with picot through 7, attached with a broach to 5 sc from 9 sc of the arch.
Naturally, depending on the threads and the desired result, the number of loops from the posts varies as desired. To obtain more voluminous arches, sc can be replaced with half-columns.


dress Charlotte


(description from Jeannette) I started knitting from the top from the bottom up. A chain of air loops equal to the volume of the low waist. I knitted in the round, but it’s better to knit back and forth, because it can squint. Here is a diagram of the front with the side part 
. I knitted embossed double crochets everywhere, but you can also knit regular double crochets because I tied them on top anyway, although I didn’t tie them on the back, but left just embossed double crochets.
It was fitted on the sides and on the back. On the back, I gradually made two from three crossed columns.
I ended up with 65 stitches on the back and 74 stitches on the front.
I tried on a dress 38 cm - unfolded in front.
Having tied the front back with one piece of cloth, she tied the skirt. The upper part of the skirt is 28cm. I knitted a row of double crochets 198 pcs. You can use any pattern in this part. I alternated a relief stitch, two double crochets, a relief stitch with a pattern. Then I added it gradually and from two double crochets I got 4.
Then I knitted the border of their 8 repeats. The design is terrible... at the end there are arches made of air loops. But if you look at the diagram and pattern you can understand


I sewed a border along the bottom, knitted several rows of fillet mesh and added frills to it.


Basic ruffles 615 both on the sleeve and on the skirt in three rows.
Sleeve. First I knitted the border. Then I knitted several rows of fillet mesh and tied frills onto it. And the top was knitted with crossed stitches, forming an armhole. 
This is the pattern I used on the top of the skirt. This is the first and second row, then repeat. And, as I already wrote, gradually increase the double crochets to 4, for flaring the skirt.
vintage dress


Vintage dress.
(description from Tonic) Silk Tweed threads 50g/200m (it took 700g), hooks 3 and 3.5
Scheme of the main canvas 
Sleeve pattern 
Back calculation: 
Raised ridge on both sides of the front: 4 dc in 4 base loops, picot from 3 ch.
Ruffles on the back: 


I knitted continuously.
I knitted a regular row up to the place where the ruffle should begin (the current row turns out to be unknitted). I unfold the knitting and knit with a single crochet back to the second end of the intended ruffle (I insert the hook not under both loops of the previous row, but under those that will later be on the front side of the product, then use the remaining paired loops for knitting the next row of the main fabric, leaving the ruffles on the front side)). Having knitted the ruffle to the second end of the expected length of the ruffle, I unfold the knitting and on freshly knitted single crochets I knit either a small ruffle (single crochet, ch, single crochet in each loop of the previous row) or a large ruffle (7 treble crochet in the loop of the previous row, skip 2 loops*, repeat until *). Having knitted to the first end of the ruffle (we returned to the previously unknitted row), we go down to the base of the row of single crochets and again continue to knit the main previously unfinished row.
And so every time. It turns out to be a whole canvas.
Mallorca dress


(description from kVitochka) I knit Mallorca from top to bottom. The beginning of knitting is the line under the chest. I collected 12 repeats of waves (16 loops each) according to the very first wave pattern. I tied 7 waves to the waistline. I knitted 4 rows of fillet mesh - 1 C1H, 1VP. I switched to a wavy pattern according to pattern 2 with a repeat of 19 loops. As a result, 36 loops were added. Knitted to the hip line, knitted 4 rows of fillet mesh. In the next row I added a repeat of the pattern to the front and back.
All my calculations are probably of no interest to anyone. I'd rather write the main points.
Between the rows of waves I knitted a fillet mesh. It is very plastic and obeys the bends of the waves of the main pattern. The increase in loops must be done at this stage. The mesh is then tied with ruffles. 
dress Miracle 


dress Sofia


Jacqueline dress
seam on the top of the dress 
And one of the skirt stripes 

The entire skirt is knitted alternating DCs in rotating rows in a circle and crossed columns. Wider hem - crossed 3 dc (2+1) straight row to the left, reverse row to the right. In addition, I used a series of concave posts to form a horizontal strip and a frill of 3 Dcs with peaks.
top frill 
Bottom frill 
rings 

Parisian dress
online - http://www.stranamam.ru/post/6520407/


dress Heart
online - http://www.stranamam.ru/post/4138868/ 


yoke 
yoke top 
strip connection 
The center of the yoke is the fan between the hearts.
At the yoke we knit the first two circular rows, the third is connecting with the second strip. In the same row we form the transition to the sleeves.
How I calculated the sleeves: using pins, I first pinned the loops of the first and second stripes together from the center of the front to the sides in accordance with the diagram. I repeated the same procedure from the center of the back to the sides. As a result, armholes were formed on the sides.
Connecting stripes when expanding the hem.
We connect according to the scheme for connecting the stripes, only: each fan is connected to a pico of a heart (do not forget to initially place the stripes so that the hearts are located in a checkerboard pattern in front)
Sleeves. hook No. 2.5
Armpit. In the first row: dc2n from the picot of the nearest heart, dc2n into the heart column, ch 1, dc2n into the heart, dc2n into the picot of the heart. In the second row between ss2n (where there is a ch) we knit a fan.
We knit five rows of fans (the fifth is connecting with the next ribbon of hearts). There are 14 fans in each row. Fan: 2 patent columns, 1 ch, 2 patent columns.
The first and second stripes of sleeves are connected by one row of fans; between the second and third there are three rows.
On the sleeves in the upper two stripes the hearts are located one under the other, the lower ones are in a checkerboard pattern.
Well, don’t forget to add frills: 2ch, picot from 3ch, 2ch, ss (you can sc). Ruffles can be made more magnificent
Venus dress There really are 2 layers. I’m currently knitting a similar dress, only, unlike the author of the description, I knit 1 layer of the bodice in stitches simultaneously from the second ball with false flowers (this is more convenient for me, but it’s worse from the point of view that if you have to unravel, then you need to unravel both 1 and 2 layers) and attach it a little differently - the bases of the petals - in 2 loops of the 1st row of st1n base, the middle between the colors. - in the girth of the 6th s1n of the 3rd row of the base, the top - for 2 loops of the 4th row of the base. My flowers are made of 5 stitches on sts with 2 yarn overs and chains of 4 ch, knitted in 1 row.
Flowers:
We attach the thread to the girth of the 3rd st 1n of the base, 1 ch of rise *, sc to the girth of the same column of the base; 4 ch, 2 dc 2n together in dc of this row; 3c2n together in the 3rd c1n of the base; 3s2n together in the 9th st of the base; 4 ch, 1 dc2n in the loop between the lower petals, ss in 2 loops of the 4th row of the 6th dc1n of 1 layer, 4 ch, ss in the loop between the lower petals; 4 ch, 2 s2 n; *, sc in the girth of the 11th s1n 3 rows of the base.
Rapport on 10 st1n base.
In height there are 3 rows of the base with 1n, fastenings: at the top of the 1st row (2 lower petals), in the girth of 3 rows with 1n (the ends of 2 middle petals), at the top of the 4th row with 1n of the base.
(description from Luduchka) Part one: bodice.
I knitted the dress in circular turning rows. The seam is on the back, it is almost invisible. First, I knitted the bodice with double crochets from the bottom up, making a chain under the bust. I didn’t knit the armholes! On the front part I made increases for the chest (two undercuts). Then I began to knit the upper openwork part of the bodice from top to bottom. On the first row of double crochets from the top I attached an ordinary small ruffle (it was hooked to the main fabric through 2 stitches). On the second stripe from the top, the openwork began. I used this diagram as a basis: 
In the openwork part I did not make any decreases; in terms of the number of loops it is wider than the main one.
I started from the third row of this pattern. Instead of a fluffy stitch, I knitted a regular stitch. There goes “double crochet, double crochet”; I attached these posts through a post on the main fabric. Next, the entire openwork part was simply knitted from top to bottom. That is, the next row is flowers (instead of two double crochets, I have three double crochets), then three rows according to the pattern, then another row of flowers. And I knitted the next row like the first, hooking it to the main fabric. (This was the second row from the bottom or the penultimate row from the top on the main fabric) The neckline, armholes are completely knitted according to this wonderful pattern: 
Part two: body.
From the bodice down in a circle in turning rows: a series of crossed columns, then calculated the vertical pattern. I made increases both in hemstitches and in the fabric with posts. There was no system of increments, I just tried on the dress every 2-4 rows. I used this pattern as the basis for the hemstitch flare 
Part three: lower tier. Stripe of flowers from the bodice pattern. I honestly counted the number of rows of double crochets on Zhannushka’s dress. I flared every 3-5 rows just evenly, I didn’t specifically calculate anything. The girls wrote that the more flares, the better, so there is nothing to be afraid of. The bottom diagram is here: 
After knitting the last pattern, I steamed the dress to get an idea of the length. This pattern is convenient in that it can then be continued to be knitted downwards with a net to the desired length.
Next came the tying with dangling flowers. Then a row of dangling flowers under the chest and above the knees. Laughing Laughing Laughing Flower patterns caught my eye and were interpreted 

Sienna dress (three-color)
online - www.stranamam.ru/post/7782727/ 
As BabaNata said, “everything is simpler than a steamed turnip...” The pattern consists of 6 rows, which are constantly repeated - only the color of the yarn changes. The dress is knitted from top to bottom, the expansion of the fabric occurs, for example, due to an increase in. p. in the arches in the 5th row (in the diagram 2, and in the place of expansion you need to do 3), and in other rows. At the bottom of the hem, the pattern is slightly different - you can see it in the photo or knit it at your discretion (I think this is not so important). At hip level, 3 mini ruffles are knitted, consisting of 1 row.
The crossed stitches of the 1st and 2nd rows are connected as follows: knit a double crochet over the 3rd loop of the base (not counting the last one), attach a double crochet to the 2nd loop of the base behind the 1st stitch and the 3rd stitch double crochet into the 1st stitch of the base in front of the first two stitches, etc. 
dress cyprus


The top is knitted approximately according to this pattern: 
The hem is knitted from bottom to top: 
I don’t know what about the frills on the hem - are they knitted immediately or knitted separately and tied in the process of knitting the hem.
Similar scheme 
And the design of the neck, fastener and sleeves is based on the photo
dress Maria


scheme for expansion by increasing rapports 
scheme with 7 cones for slight expansion 
Dress without name 


dress Silver, Jasmine and Grace
http://www.stranamam.ru/post/8913625/#com65834655 - online 


spikelets


Main drawing 

leaves are knitted separately 
frill - 2 sc, picot from 3 in. P.
bodysuit 


frill A - two columns with 1n from one base loop, ch 

Now about the rings. I replaced all the single crochets with half crochets. I didn’t redraw the diagram, but the result can be seen in the photo of the yoke. In addition, the crocheted rings were half a size larger than the dress.
sleeve 


Isabella dress

The pattern was invented and drawn by NadinBo, first cast on 200 sts, then the first row of dc, 2nd row - add 1 dc every 5th loop, row with a pattern of arches, row of dc, add stitches, row rings, etc. I knitted and laid out to make a circle, so that it wouldn’t fall apart, based on the pattern diagrams,
yoke 
diamonds 

flowers 

frill 
Net 
Flora dress 


dress Antonia and the Belle Epoque 
Antonia's bodice is like the Venus and Jolie dress (only there are sleeves) 
we knit the hem according to the pattern, periodically adding double crochets in the middle of the track of stitches, convex stitches along the edge of the track, then we tie it with a mini frill 
frill 
The bodice is knitted in two layers, and periodically both fabrics are knitted side by side using half-columns. You can knit the row to which the top layer is tied behind the back wall of the loop or only every 3rd loop. I didn’t draw a second layer along the entire length of the bodice, I think it’s understandable, especially since the Venus dress has already been discussed, knitted, and patterns posted. Let's not forget about Vanessa's favorite frills in places where the pattern changes - under the bodice and on the hem. 


Leonora dress 


yoke patterns 
and hem 
On the yoke, the last row of single crochets was drawn, the second row was not drawn - when knitting it, it is necessary to tie the motifs to the main fabric (I drew their placement). About the hem - expansion must be done when knitting 10 double crochets - in the middle, first add 1 square (1ch, 1st s/n, 1st crochet), then 2 and 3.
motives 

Vincetta dress

motives

http://winter-cherry-.gallery.ru/watch?a=Nen-eLII - motives are continuous
Hem 

Leticia dress


bohemian dress
Riviera dress


dress Adeline


bottom frill 
Ariadne dress


top


Ibiza dress


up - fans of 5 double crochets in 1 point, skip 2 loops, single crochet, skip 2, 5 double crochets in one point, etc.
in the next row, 5 stitches are stuck into the single crochet of the previous row.
small frills - 3 picots per loop, skip 2, again 3 picots. The armhole and neckline binding is the same.
large frills - a row of single crochets, then along this row any fans from two rows with a picot on the last.
Lady and Renaissance dress


The top is crocheted, only in the transverse direction - a row of SSN, a row of relief columns (as in Mallorca)


"floral" dresses


http://www.stranamam.ru/post/5509638/)

Cote D'Azour dress


verbal diagram: 3rd row - column b/n, 11th century. p, 1 half-stitch in the first loop, b/n stitch in c. p. of the previous row, etc., 4th row - 11 columns of non-cash pattern in each “petal”, with the 6th column we attach the motifs to each other.
Aphrodite dress


Aphrodite's bodice is knitted with convex double crochets, with the lower column girth at the back.
Central pattern 
or (only one repeat of the pattern is knitted vertically upward, the rest is double crochet on the right and left) 
pattern to the right and left of the central stripe first 
The sides at the bottom are ordinary double crochets with piping every few rows. looks like vintage.
Jolie dress


Jolie's bodice, it seems to me, is knitted according to the principle of Venus,


The first row is arches of 5 air loops. The second is an arch of 5 chain stitches, then two double crochets together (with a common top), then with two chain loops we go down to the arch of the first row and make a connecting stitch into the arch, then with 3 chain loops we go up, 2 stitches with a double crochet together, with 3 chain loops we go down and make a connecting stitch into the arch, then 2 chain loops, 2 double crochets together and a single crochet stitch in the middle of the next arch.
skirt pattern 
Aurora dress

Knitted from top to bottom, in the round.
First a pattern of flowers. There are 24 of them on the neck.
Flowers "read" from left to right)))

Then from the neck down with crossed double crochets - 96 (two crossed stitches) - 2 rows.
The third row of columns, adding in circles (focusing on flowers. Each 4 flowers was added along crossed columns. It turned out 96+6.
The fourth row is single - no increase.
The fifth row is like the third, total +6=108. This is where the increase ends.
Further in a circle up to the 10th row inclusive.
I divided it into the back - 30, and the front - 32, and the sleeves (23 each, crossing the column). In the armholes I cast on 20 chain stitches, for 10 crossing stitches.
Through the row, I added 1 crossing stitch under the chest on the sides. from each side.
There are 9 rows from the armhole.
Then, according to the “Star Burst” scheme - 21 rapports. Six rows. 
And six rows of crossed stitches = 69 crossed. Art.
I separately tied an insert of 22 flowers to the waist. Attached to the top.
And again 6 rows crossed. columns = 76 crossed st. That. I had a hip augmentation done.
Then, according to the “Star Explosion” scheme - 23 rapports. Six rows.
And again 7 rows crossed. columns = 86 crosses. Art.
Further, according to the lower diagram, in a straight line without increases or decreases.
The bottom strapping is the third scheme. I didn’t draw the last row, I just marked where the picot was.
Angelica dress


description from katjona
bodice

, but it’s possible, like in a skirt, one column is fluffy, the second is simple
Tummy 
skirt 
small frills 
large frill 
Georgiana dress

description from DoroFea 
Between the flowers I have 3 rows of crossed stitches, I knit frills immediately behind the front wall of these posts - first a row of stitches. b. n, and then a picot trefoil. It turns out two rows of frills - in the first row of crossed columns and in the second row.
Duchess dress


The bodice and the top of the skirt are knitted in a simple check stitch with an air loop between them
the upper part of the sleeve, the flashlight itself. As I saw, the ruffles in it are tied to the main pattern, and not to the mesh. Accordingly, the middle part of the skirt is knitted in the same way. ruffles like in children's dresses 
valentine dress
Crochet is as old as time. It’s unlikely that anyone knows exactly when, where and for what purposes people started crocheting. It seems that this type of needlework is very outdated, and crocheted items cannot look modern. However, it is not. If the master has a subtle taste and his own style, then the products turn out to be unique, beautiful, refined, and most importantly, relevant. This is exactly the type of clothing that designer from Brazil Vanessa Montoro crochets.
A little about the designer
Vanessa Montoro became interested in fashion design as a child. After learning to crochet, her goal was to take it to the next level, making it sophisticated, chic and fashionable at all times. Definitely, the designer succeeded. Today, many stars are happy to wear clothes created by Vanessa Montoro: dresses (patterns will be below), skirts, blouses and coats are her creations.
Vanessa's clients love her clothes not only for their unique designs, but also for their environmental friendliness. All models are made of silk or wool and are dyed by the designer at home according to ancient recipes. The range of outfits is always neutral: calm natural colors give things even more color and originality. Some dresses look like vintage ones, as if they had been lying in a grandmother’s chest for several decades and were waiting in the wings to decorate a modern girl in the twenty-first century.
Dress models
The collections that Vanessa Montoro creates are full of beautiful women's names and “tasty” words. These are the names for example:
- "Sofia". Skirt with layered lace frills, just above the knee length and 3/4 sleeves.
- "Olivia". Textured knee-length pencil skirt and long lace sleeves.
- "Jacqueline." Cute dress with buttons with an openwork skirt of a semi-fitting silhouette and short sleeves.
- "Zephyr." A textured mini dress made from hexagonal motifs, a mesh neckline and short sleeves.
- "Duchess." A low-cut, button-down dress with long sleeves and voluminous shoulders.

If you want to knit yourself a dress from a designer’s collection, you don’t have to completely repeat the pattern and style. Look at Vanessa Montoro's dresses with diagrams, descriptions and combine them into your ideal dress, inspired by design ideas. Experiment with the length of the skirt and sleeves, the depth of the neckline and the fit of the silhouette.
Yarn and hook
Vanessa Montoro prefers crocheting, so you will need it for work. As mentioned earlier, the designer deals with natural silk yarn. You, of course, can also take silk, but if you are not very confident in your abilities yet, or the cost of yarn scares you a little, then for work you can choose:
- 100% mercerized cotton. This yarn has a slight sheen, a bit like silk thread, the product is smooth and very durable.
- Viscose. This is a durable, shiny yarn. The advantage of viscose over cotton is that the finished product is much lighter in weight, but more difficult to care for, since it tends to stretch after washing.
- It is rarely used in its pure form, but complements yarn of natural composition well. A very strong thread with the inherent shine of silk.
- Bamboo. This is a natural hypoallergenic yarn, soft, smooth and pleasant to wear.
It is better to choose a hook for work that is not the thinnest, No. 2.5-3.5 is suitable. This will make the product more loose and textured, in the style of the dresses that Vanessa Montoro knits.
What measurements should be taken?
Before you start knitting a dress for yourself or someone else, you need to take several measurements, according to which the pattern will be built in the future:
- Neck circumference (NC) - you will need this measurement if you have chosen a turtleneck dress model. If the dress is a bustier or with straps, then this measurement is not needed.
- Chest girth (CG) - measured at the most convex points of the chest.
- Chest height (CH) - from the base of the neck to the most convex point of the chest.
- Waist circumference (WT) - you need to measure at the narrowest point, you can first tie a belt or cord around your waist.
- Distance from chest to waist (CT) - measured vertically.
- Hip circumference (HG) - at the widest point of the hips.
- Product length (DI) - from the seventh cervical vertebra to the desired length.
- Shoulder length (HL) - from the base of the neck along the edge of the shoulder.
- Shoulder width (SH) - from the base of the neck to the armhole.
- Shoulder circumference (OU) - at the widest point of the arm. We take measurements only if the dress has sleeves.
- Sleeve length (SL) - from the end of the shoulder to the desired length.
Constructing a pattern
Almost all crochet dresses (Vanessa Montoro) have a form-fitting silhouette; they hug the figure tightly, emphasizing all its advantages. If you have a perfectly fitting sheath dress in your wardrobe, you can use it as a pattern. Lay it out on a flat surface and apply the connected elements to it.

If there is no such dress, then it is better to create a pattern that can then be used for a long time:
- Construct a rectangle whose height is DI and width is OB.
- Divide the upper part in half and place point A, from it in both directions set aside segments equal to ОШ:4. These are points B and C.
- From points B and C, measure down a distance equal to VG, connect new points horizontally, and place OG:2 between them. These are points D and E.
- Smoothly connect points E, G and the lower right corner of the rectangle, as well as D, F and the lower left corner of the rectangle.
- Connect B and C with a smooth line - this is the neck.
- From B and C, set aside the DP, put B 1 and C 1.
- From B 1 C 1, measure down the width. These are armholes.
- Smoothly trace the entire pattern.
Features by Vanessa Montoro
Almost all models are knitted from separate sections, which are then joined together. They can go both horizontally and vertically. Each section is knitted with a specific pattern according to the pattern. Due to this, crochet looks very unusual, just as Vanessa Montoro intended. Dresses, the diagrams for which are presented below, hold their shape better, do not stretch and fit perfectly to the figure.

The finished pattern is divided into blocks, which are knitted separately. There is usually a beautiful lace trim along the bottom of the hem. Some models are made entirely of lace, and if you are not ready to wear them naked, take care of the lining, or wear the dress with a plain matte slip.
Elements found in diagrams
The following are often found in diagrams:
- Single crochet.
- Single crochet stitch.
- A column with two or more crochets.
- A curvy stitch with three crochets (H) with a common top. We make H, insert the hook into the desired loop, pull out the working thread, H again, insert the hook into the same loop, pull out the thread, and H again, pull out the thread again. We knit all the loops with one chain stitch.
- Relief column (in the diagrams it is designated as a column with H with a “hook”). We make H, insert the hook not into the top loop of the column of the previous row, but behind the column itself. Next we knit as a regular double crochet. This is how knitting becomes embossed.
- Crossed double crochets. We knit the first stitch with H into the second loop, make H again and insert the hook into the first loop, after which we knit a stitch with H. The bases are crossed.

Lace binding
The edges of the dresses that Vanessa Montoro knits (patterns are attached) have either frills or a beautiful lace trim. You need to start it when all the details have already been assembled, since this is the final stage of work on the dress. For the frill, you can use the proposed pattern or choose it to your taste. Also, openwork binding can be on the sleeve cuffs and neckline. This gives the dresses a vintage touch and makes them feminine and romantic.
Good afternoon
Showing off my new crochet work.
Daedalus added to the post because in my haste I forgot about someone. details...
This is a very famous dress by Vanessa Montoro (many of her works are knitted online!), and this dress is also available online
I have been crocheting for 1.5 years, and with long breaks because I also work...
I really love the crochet hook, I’m constantly looking for ideas for knitting, but I can’t keep my hands free!
I knitted the dress very quickly, in exactly 30 days, and this despite the fact that I worked and often didn’t pick up a crochet hook for 3 or 4 days, and sometimes I knitted for 4 hours in front of the TV... If you set aside 2 hours a day, you can no problem for 1 month. knit too...
I already tried to knit a dress from Vanessa, but failed miserably, I knitted Olivia.
I've been looking at Sienna for over a year!!! I licked my lips for a long time!
But I’m ready for Sienna, I’m very happy with the dress, everyone on the street was paying attention.
One minus: I can’t find sandals to go with the dress, everything is wrong...
I took a photo in the old ones... they are very outdated in fashion and closed toes are inappropriate here (in sandals), but ballet flats or shoes with thick heels are also suitable...
Knitted Lily from Yarn Art 225m\50g on a crochet yoke. 1.9, and on the body 2.1.
It took about 600g, maybe less (I’ll calculate it to clarify..)
Beige 4.5 skeins, turquoise 4 skeins, brown 3.5. skein.
With this yarn, as for me, the dress is already quite thick from Begonia, I would not dare to knit it. The girls wrote that they wear the dress from Begonia only in the spring because you can’t wear it in the hot summer...
I think I will wear my Sienna on hot days!
The dress to wear is very comfortable and practical, I didn’t knit it tight...
The yarn performed well when worn. I sat in the car a lot and it stretched just a little on my butt, straightening it with my hands it straightened out! They wrote online that Coco was taking a lot of pain in her butt...
The coquette turned out right the first time, the cat girl helped me. Already knitted. HUGE THANKS TO VICTORIA FOR YOUR HELP!!!
I knitted a yoke (the pattern should be divided by 6, I cast 174 stitches on the yoke, I also did increases so that the loops were divided into 6), starting with a row of sc, then immediately shells, and then in each row where VP I put not 2 ch, but 3 vp. Thus, it didn’t fold anywhere... everything was great!
I knitted a yoke until I reached the collarbone, then I divided it into 4 parts, a little more on the back, but in general, as for me, it’s possible to do the same on the back and front!
And the sprout is front and back, 2p in front. less, i.e. 4 rows!
I made increases in dc, twice by 24 p. and then 4 times by 12 p. I've had enough...
At the waist I put more brown in order to visually reduce it... and then again more light colors, this way you can play up the figure...
My colors are a little competitive: chocolate, beige, bright turquoise... I would advise taking, for example, dark chocolate (mine with red), melted. milk, and light birch... It will be easier to change colors in the rows...
Well, the main color, as for me, is the frill. Immediately the view changed! I knitted it according to the picture... no pattern...
I'm really sorry if I made a post and didn't give enough explanations, if I add anything!!!
Not enough time to record!
People often wrote to me that the photos I published were not of good quality, but I tried my best!
Thank you all for your attention and for the green arrows!


There is a detailed description of the pattern online!
Again I forgot to write that my stripes are all different, i.e. I didn’t systematize the stripes by color, everything is very chaotic, you can see it in the photo...
This is how I caught the color scheme, it turned out that this was the essence
There is no need to make many wide stripes, they will cut the figure in abundance...!!!
I have 2 brown rows, inside between them is beige or turquoise and then I changed everything the other way around... From the photo you can understand what I’m writing about!
P.S Many girls thank me for not skimping on explanations.
That's why I'm making a post, to help others by example, and I really don't like it when girls post just to brag...
Having all the explanations and diagrams, not everyone will undertake to repeat..., not everyone will knit at all, the soul must lie in knitting and creativity, and in the idea itself!!!
Let's live together and help others with advice!


Online here http://www.stranamam.ru/post/7782727/
Successful pekhorka yarn, kr 2.0.., three colors.. Consumption about 600 g, dress length 97 cm.
I knitted for the line for September 1st, I finished knitting on September 1st in the morning early from 5 o’clock..
This post helped me a lot http://www.stranamam.ru/post/8717758/ thanks to the author..
Og 102 cm, From 95 cm, my height is 158 cm..
I scored 180 VP and then knitted according to the pattern..
I knitted a yoke, when dividing it into front-back-sleeves, I always leave more for the chest on the front..
Then a sprout is a must!!! on the hinges of the back...
Then I picked up 15 stitches on each side from my armpits, then followed the pattern, then made a slight decrease under the bust, then widened to the hips and started knitting in the round..
I knitted the dress in the round without turning..
I did the raises like this in the fifth row of the diagram (instead of 2 v.p. I did 3 v.p. - I repeated the increases 2 times, and in the third increase in the fifth row I did instead of 2 v.p. - 3 v.p., but every other time).
Crossed columns knitted like this The crossed stitches of the 1st and 2nd row are connected as follows: knit a double crochet over the 3rd loop of the base (not counting the outermost one), attach a double crochet to the 2nd loop of the base behind the 1st stitch and 3- 1st double crochet in the 1st stitch of the base in front of the first two stitches, etc.
The sleeve was knitted in one piece in length.. The bottom of the dress, neckline and sleeve were simply tied with fans from 5Dcn, like the 4th row according to the pattern..
The dress is very light in its execution, it is interesting to knit it, because every time you think about what color to knit the next row...
I wear it without a lining, but always with a petticoat to look decent and the dress will stretch out less at the point..
Thank you all for watching and for the green arrows.. I probably tired you today with my stories, but I haven’t posted anything for a long time, and then it just burst out, I still need to show my blouses, lilies, etc..
Good mood and easy loops to everyone!!!

Yoke width 15 cm..


Yoke and sprout

Rostock closer

Good evening everyone. I've been promising patterns for my dress for a long time, the inspiration for which came from Emma's dress. It’s not easy to assemble a circuit based on the already connected one, in my case it’s true that it’s based on the unconnected one
I drew it as best I could, if something is not clear, write, we’ll try to figure it out.


I started knitting from the neckline. I don’t remember how many loops, but the thought of counting makes me shake. I knit from Italian stock silk. 100g 3000 meters. In 4 threads, hook 1,2. I left a small slit at the back, there will be a button there. You need to knit 4 corners. Two on the shoulders, one on the chest and, accordingly, the fourth on the back. Since I have a cut on my back, I did the additions for the corner in half, not like for the whole corner. After 12 cm, I aligned the collar and continued with the continuous fabric down.

As the collar is knitted, on the shoulders in the rounded areas, no additions are made to the angle, the main pattern is simply knitted, but the corners on the chest and back continue to be knitted. The mesh that I didn’t like from Emma, I knitted according to this pattern:


